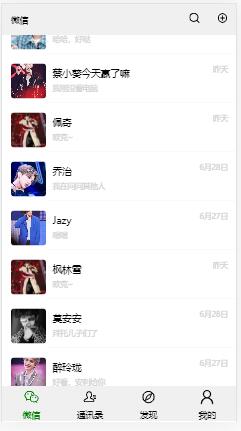
Vue实现聊天界面
本文实例为大家分享了Vue实现聊天界面展示的具体代码,供大家参考,具体内容如下
1.功能需求
根据索引选择跟不同的人进行聊天
2.代码展示
mock.js:
import Mock from 'mockjs'
Mock.mock("/chatchild",{
'result':[
{
id:"001",
imgurl:"/static/image/10.jpg",
name:"XKDK",
date:"09:23",
words:"哈哈,好哒"
},
// ... ...
]
});
export default Mock
userinfo.js:
let usermsg={
id:"122",
imgurl:"/static/image/8.jpg",
words:"是的!",
data:{
id:"1529",
imgurl:"/static/image/7.jpg",
name:"易安居士",
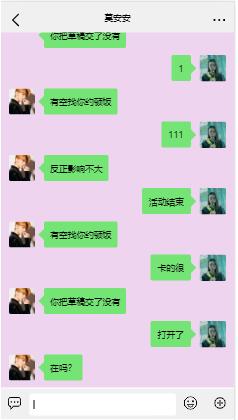
words:[
{info:"在吗?"},
{info:"不在"},
{info:"你把草稿交了没有"},
{info:"我今天中午吃完饭 就一直看剧了"},
{info:"我发现我真的是宅女"},
{info:"哈哈哈"},
{info:"有空找你约顿饭"},
{info:"嗯嗯"},
{info:"反正影响不大"}
]
}
}
export default usermsg
index.js:
import Vue from 'vue'
import Router from 'vue-router'
import Chat from '../components/Chat.vue'
import ChatDetail from '../components/Pages/ChatDetail.vue'
Vue.use(Router)
export default new Router({
routes: [
{
path: '/Chat ',
component: Chat
},
{
path:'/ChatDetail',
component:ChatDetail
}
]
})
// 解决路由报错的代码
const originalPush = Router.prototype.push
Router.prototype.push = function push(location) {
return originalPush.call(this, location).catch(err => err)
}
Chat.vue:
<template>
<div id="chat">
<Bottom />
<Header :name="msg" />
<div class="chat_alluser">
<div ref="chatuser" @click="checkChild(index)" class="chatuser" v-for="(item,index) in chat" :key="index">
<ChatChild :imgsrc="item.imgurl" :nickname="item.name" :time="item.date" :word="item.words" />
</div>
</div>
</div>
</template>
<script>
import Bottom from "../components/Menu/Bottom";
import Header from "../components/Menu/Header";
import ChatChild from "../components/Pages/ChatChild";
export default {
name: "Chat",
components: {
Bottom: Bottom,
Header: Header,
ChatChild: ChatChild
},
data() {
return {
msg: "微信",
chat: null,
name: null
};
},
mounted() {
this.$axios.get("/chatchild").then(res => {
this.chat = res.data.result;
});
},
methods: {
checkChild(index) {
this.$refs.chatuser[index].style.backgroundColor = "rgb(240,240,240)";
// 动态dom元素渲染完成之后,跳转到另一个界面(ChatDetail)
// 获取动态name
let username = this.chat[index].name;
this.$nextTick(() => {
this.$router.push({
path: "/ChatDetail",
query: { name: username }
});
});
}
}
};
</script>
<style lang="scss" scope>
#chat {
width: 100%;
.chat_alluser {
margin-bottom: 7.5rem;
.chatuser {
position: relative;
top: 3.5rem;
padding: 0.3rem 0;
}
}
}
</style>
父组件使用子组件里的属性和方法:
在父组件中的子组件上定义ref属性,通过 this.$ refs.name.属性或this.$refs.name.方法
ChatChild.vue:
<template>
<div id="chatchild">
<div class="photo">
<img :src="imgsrc" alt />
</div>
<div class="content">
<div>
<span class="content_nickname">{{nickname}}</span>
<span class="content_time">{{time}}</span>
</div>
<span class="content_word">{{word}}</span>
</div>
</div>
</template>
<script>
export default {
name: "ChatChild",
props:{
'imgsrc':String,
'nickname':String,
'time':String,
'word':String
}
};
</script>
<style lang="scss" scope>
#chatchild {
width: 100%;
height: 5rem;
display: flex;
flex-direction: row;
box-sizing: border-box;
.photo {
flex: 1;
height: 5rem;
img{
object-fit: cover;
width: 4rem;
height: 4rem;
border-radius: 5px;
display: block;
margin: 0 auto;
margin-top: 0.5rem;
margin-left: 1rem;
}
}
.content {
flex: 4;
height: 5rem;
border-bottom: 0.5px solid rgb(240, 240, 240);
padding-left: 0.5rem;
padding-top: 0.5rem;
box-sizing: border-box;
div{
.content_nickname{
display: inline-block;
font-size: 1.1rem;
margin-top: 0.3rem;
}
.content_time{
float: right;
margin-right: 1rem;
color: rgb(209, 206, 206);
font-size: 0.8rem;
}
}
.content_word{
color: rgb(209, 206, 206);
font-size: 0.8rem;
display: block;
margin-top: 0.5rem;
}
}
}
</style>
ChatDetail.vue:
<template>
<div id="chatdetail">
<div class="chattop">
<div @click="goback" class="chattop_back">
<icon-svg icon-class="houtui_shangyibu_zuojiantou_shangyiye" />
</div>
<div class="chattop_name">{{name}}</div>
<div class="chattop_more">
<icon-svg icon-class="gengduo" />
</div>
</div>
<div class="chatcontent">
<ChatMsg ref="chatmsg" />
</div>
<div class="chatfooter">
<div @click="changeSound">
<icon-svg :icon-class="issound" />
</div>
<div>
<input ref="sendcontent" @keypress="sendmsg" :type="istype" :value="isvalue" />
</div>
<div>
<icon-svg icon-class="biaoqing" />
</div>
<div>
<icon-svg icon-class="del" />
</div>
</div>
</div>
</template>
<script>
import ChatMsg from "./ChatMsg";
export default {
name: "ChatDetail",
data() {
return {
name: null,
issound: "xiaoxitongzhi",
istype: "text",
isvalue: "",
isshow: false,
tomsg: "",
msgchild: null
};
},
components: {
ChatMsg: ChatMsg
},
mounted() {
this.name = this.$route.query.name;
this.msgchild = this.$refs.chatmsg;
},
methods: {
// 进行返回操作
goback() {
this.$router.go(-1);
},
// 切换input的类型
changeSound() {
// 在data中定义一个变量isshow:false,利用this.isshow与!this.isshow进行切换
if (!this.isshow) {
this.isshow = true;
this.issound = "yuyin";
this.istype = "button";
this.isvalue = "按住 说话";
} else {
this.isshow = false;
this.issound = "xiaoxitongzhi";
this.istype = "text";
this.isvalue = "";
}
},
// 发送消息
sendmsg(e) {
// 1、用ref定义输入回复内容的input文本框,定义sendcontent变量接收其value值(输入的内容)
let sendcontent = this.$refs.sendcontent.value;
if (e.keyCode === 13 && sendcontent.split(" ").join("").length !== 0) {
// 2、将ChatDetail(父)组件中的sendcontent(文本框输入的值)先用tomsg接收
this.tomsg = sendcontent;
// 3、用ref定义ChatMsg(子)组件,并在mounted中使用$refs获取,即this.msgchild
// 4、调子组件里的方法,并将tomsg传到ChatMsg(子)组件(具体的聊天内容)中
this.msgchild.saveMsg(this.tomsg);
// 5、发送完一条信息之后,需清空文本框
this.$refs.sendcontent.value = "";
// 回车时,调用子组件的随机消息的方法
this.msgchild.randomMsg();
}
}
}
};
</script>
<style lang="scss" scope>
#chatdetail {
position: relative;
background-color: rgb(238, 212, 238);
.chattop {
position: fixed;
top: 0;
left: 0;
z-index: 10;
width: 100%;
height: 3.5rem;
line-height: 3.5rem;
background-color: rgb(240, 240, 240) !important;
display: flex;
flex-direction: row;
.chattop_back {
flex: 1;
margin-left: 1rem;
}
.chattop_name {
flex: 20;
text-align: center;
}
.chattop_more {
flex: 1;
margin-right: 1rem;
}
}
.chatcontent {
width: 100%;
height: 100%;
}
.chatfooter {
position: fixed;
left: 0;
bottom: 0;
z-index: 10;
width: 100%;
height: 3.5rem;
line-height: 3.5rem;
text-align: center;
background-color: rgb(240, 240, 240) !important;
display: flex;
flex-direction: row;
div:nth-child(1),
div:nth-child(3),
div:nth-child(4) {
flex: 1;
svg {
font-size: 1.5rem;
margin-top: 0.9rem;
}
}
div:nth-child(2) {
flex: 5;
input {
width: 100%;
height: 2.5rem;
outline: none;
padding-left: 0.5rem;
box-sizing: border-box;
height: 2.5rem;
margin-top: 0.5rem;
border-style: none;
font-size: 0.9rem;
border-radius: 4px;
background-color: #fff;
color: #000;
}
}
}
}
</style>
ChatMsg.vue:
<template>
<div id="chatmsg" ref="msg">
<!-- 动态创建 -->
<div v-for="(item,index) in lists" :key="index">
<div v-if="item.id==122" class="user">
<div v-scroll>
<img :src="item.face" alt />
<div class="bubble">
<span>{{item.word}}</span>
</div>
</div>
</div>
<div v-if="item.id==1529" class="touser">
<div v-scroll>
<img :src="item.face" alt />
<div class="tobubble">
<span>{{item.word}}</span>
</div>
</div>
</div>
</div>
</div>
</template>
<script>
import userinfo from "./userinfo";
export default {
name: "ChatMsg",
data() {
return {
userimg: "",
lists: []
};
},
mounted() {
this.userid = userinfo.id;
this.userimg = userinfo.imgurl;
},
// vue自动滚动到底部
directives: {
scroll: {
inserted(el) {
el.scrollIntoView();
}
}
},
methods: {
saveMsg(tomsg) {
this.lists.push({
id: this.userid,
face: this.userimg,
word: tomsg
});
},
randomMsg() {
let touserdata = userinfo.data;
this.lists.push({
id: touserdata.id,
face: touserdata.imgurl,
word:
touserdata.words[Math.floor(Math.random() * touserdata.words.length)]
.info
});
}
}
};
</script>
<style lang="scss" scope>
#chatmsg {
position: relative;
top: 3.5rem;
width: 100%;
min-height: 44rem;
background-color: rgb(238, 212, 238);
margin-bottom: 3.5rem;
overflow-x: hidden;
overflow-y: auto;
.user {
position: relative;
width: 100%;
overflow: hidden;
margin: 0.8rem 0;
img {
object-fit: cover;
width: 3rem;
height: 3rem;
border-radius: 3px;
float: right;
margin-right: 1rem;
}
.bubble {
position: relative;
float: right;
margin-right: 1rem;
padding: 0.8rem;
box-sizing: border-box;
border-radius: 3px;
max-width: 65%;
background-color: rgb(116, 228, 116);
span {
height: 1.25rem;
line-height: 1.25rem;
}
}
.bubble::after {
position: absolute;
right: -1.3rem;
top: 0.8rem;
content: "";
width: 0;
height: 0;
border: 0.7rem solid;
border-color: transparent transparent transparent rgb(116, 228, 116);
}
}
.touser {
position: relative;
width: 100%;
overflow: hidden;
margin: 0.8rem 0;
img {
object-fit: cover;
width: 3rem;
height: 3rem;
border-radius: 3px;
float: left;
margin-left: 1rem;
}
.tobubble {
position: relative;
float: left;
margin-left: 1rem;
padding: 0 0.7rem;
box-sizing: border-box;
border-radius: 3px;
max-width: 65%;
background-color: rgb(116, 228, 116);
line-height: 3rem;
}
.tobubble::after {
position: absolute;
left: -1.3rem;
top: 0.8rem;
content: "";
width: 0;
height: 0;
border: 0.7rem solid;
border-color: transparent rgb(116, 228, 116) transparent transparent;
}
}
}
</style>
3.目录结构
以上就是本文的全部内容,希望对大家的学习有所帮助,也希望大家多多支持。
以上是 Vue实现聊天界面 的全部内容, 来源链接: utcz.com/p/239363.html