Nginx反向代理+DNS轮询+IIS7.5 千万PV 百万IP 双线 网站架构案例
Nginx ("engine x") 是一个高性能的 HTTP 和反向代理服务器,也是一个 IMAP/POP3/SMTP 代理服务器。 Nginx 是由 Igor Sysoev 为俄罗斯访问量第二的 Rambler.ru 站点开发的,它已经在该站点运行超过两年半了。Igor 将源代码以类BSD许可证的形式发布。 Nginx 的中文维基:http://wiki.codemongers.com/NginxChs 在高并发连接的情况下,Nginx是Apache服务器不错的替代品。Nginx同时也可以作为7层负载均衡服务器来使用。根据我的测试结果,Nginx 0.5.31 + PHP 5.2.4 (FastCGI) 可以承受3万以上的并发连接数,相当于同等环境下Apache的10倍。 Nginx 超越 Apache 的高性能和稳定性,使得国内使用 Nginx 作为 Web 服务器的网站也越来越多,其中包括新浪博客、新浪播客、网易新闻、腾讯网、搜狐博客等门户网站频道,六间房、56.com等视频分享网站,Discuz!官方论坛、水木社区等知名论坛,盛大在线、金山逍遥网等网络游戏网站,豆瓣、人人网、YUPOO相册、金山爱词霸、迅雷在线等新兴Web 2.0网站。 在高并发连接的情况下,Nginx是Apache服务器不错的替代品。Nginx同时也可以作为7层负载均衡服务器来使用。根据我的测试结果,Nginx 0.8.46 + PHP 5.2.14 (FastCGI) 可以承受3万以上的并发连接数,相当于同等环境下Apache的10倍。 根据我的经验,4GB内存的服务器+Apache(prefork模式)一般只能处理3000个并发连接,因为它们将占用3GB以上的内存,还得为系统预留1GB的内存。我曾经就有两台Apache服务器,因为在配置文件中设置的MaxClients为4000,当Apache并发连接数达到3800时,导致服务器内存和Swap空间用满而崩溃。 而这台 Nginx 0.8.46 + PHP 5.2.14 (FastCGI) 服务器在3万并发连接下,开启的10个Nginx进程消耗150M内存(15M*10=150M),开启的64个php-cgi进程消耗1280M内存(20M*64=1280M),加上系统自身消耗的内存,总共消耗不到2GB内存。如果服务器内存较小,完全可以只开启25个php-cgi进程,这样php-cgi消耗的总内存数才500M。 在3万并发连接下,访问Nginx 0.8.46 + PHP 5.2.14 (FastCGI) 服务器的PHP程序,仍然速度飞快。下图为Nginx的状态监控页面,显示的活动连接数为28457(关于Nginx的监控页配置,会在本文接下来所给出的Nginx配置文件中写明): 500) {this.resized=true; this.width=500;}">
 500) {this.resized=true; this.width=500;}">
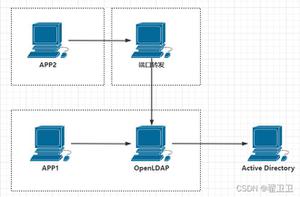
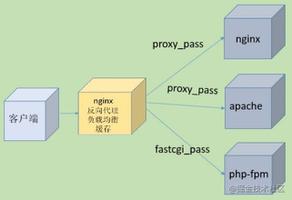
为什么Nginx的性能要比Apache高得多?这得益于Nginx使用了最新的epoll(Linux 2.6内核)和kqueue(freebsd)网络I/O模型,而Apache则使用的是传统的select模型。目前Linux下能够承受高并发访问的Squid、Memcached都采用的是epoll网络I/O模型。 处理大量的连接的读写,Apache所采用的select网络I/O模型非常低效。下面用一个比喻来解析Apache采用的select模型和Nginx采用的epoll模型进行之间的区别: 假设你在大学读书,住的宿舍楼有很多间房间,你的朋友要来找你。select版宿管大妈就会带着你的朋友挨个房间去找,直到找到你为止。而epoll版宿管大妈会先记下每位同学的房间号,你的朋友来时,只需告诉你的朋友你住在哪个房间即可,不用亲自带着你的朋友满大楼找人。如果来了10000个人,都要找自己住这栋楼的同学时,select版和epoll版宿管大妈,谁的效率更高,不言自明。同理,在高并发服务器中,轮询I/O是最耗时间的操作之一,select和epoll的性能谁的性能更高,同样十分明了。 某公司有一站点,一天IP 430W,PV 3100W,之前采用5台 DELL R610 做NLB,系统2008 IIS7.5.每天高峰期时都不堪重负.会出现以下情况1:远程登陆巨慢无比2:远程登陆系统后无法操作,表现为鼠标移动缓慢,操作延时,系统呆滞.3:CPU长期在80%以上,内存消耗极高4:.... 经过部门讨论后决定采用Nginx反向代理的架构替代目前不堪重负的站点.拓扑图如下 500) {this.resized=true; this.width=500;}">硬件: 前端采用2台DELL M420刀片,虚拟4台Centos5.8跑Nginx反向代理.后端依旧采用5台服务器,不过从硬件上也升级到DELL M420 2008系统 IIS7.5网络结构:Nginx电信 192.168.0.1 192.168.0.2 联通 192.168.1.1 192.168.1.22008 IIS7.5电信 192.168.0.10 192.168.0.11 192.168.0.13 192.168.0.14 192.168.0.15联通 192.168.1.10 192.168.1.11 192.168.1.13 192.168.1.14 192.168.1.15域名xxx.com通过DNS轮询到 Nginx前端,再根据你的配置甩向不同upstream新架构部署好后能明显感觉整个站点打开都飞快,后端完全无压力状态,这还并没有开启Nginx自带的Cache.现在这套架构每天承载百万IP 千万PV的访问量 如图AWStats 统计结果
 500) {this.resized=true; this.width=500;}">Nginx性能图如下
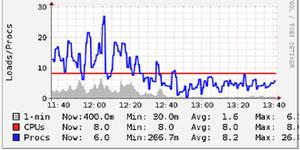
 500) {this.resized=true; this.width=500;}">单台Centos CPU图
 500) {this.resized=true; this.width=500;}">
安装步骤:一:2台宿主机虚拟成4台这个步骤就略过,网上教程一大把.在这里我们每台分配2个cpu共8个核心,内存6G,硬盘100G.系统要求:Linux 2.6+ 内核,本文中的Linux操作系统为CentOS 5.8 64位)系统为最精简安装文本界面,系统安装好后配置系统.#修改系统DNS
rm -rf /etc/resolv.conftouch /etc/resolv.confecho -ne "nameserver 114.114.114.114\nnameserver 114.114.115.115\nsearch localdomain" >>/etc/resolv.conf
#修改系统源mv /etc/yum.repos.d/CentOS-Base.repo /etc/yum.repos.d/CentOS-Base.repo.backupwget http://mirrors.163.com/.help/CentOS5-Base-163.repocp CentOS5-Base-163.repo /etc/yum.repos.d/
#yum 升级安装,根据需求自己行删除yum install -y lrzsz gcc gcc-c++ make flex autoconf automake vixie-cron libjpeg libjpeg-devel libpng libpng-devel freetype freetype-devel libxml2 libxml2-devel zlib zlib-devel glibc glibc-devel glib2 glib2-devel bzip2 bzip2-devel ncurses ncurses-devel curl curl-devel e2fsprogs e2fsprogs-devel krb5 krb5-devel libidn libidn-devel openssl openssl-devel kernel-devel wget patch ntp libevent m4 zip unzip gd gd-devel file libtool-libs gmp-devel pspell-devel mod_perl-devel parted apr-util readline-devel sysstat vim* popt-devel patch openssh-clients net-snmp net-snmp-devel net-snmp-utils net-snmp-libs
#设置ssh下 SecureCRT标签显示为帐号@IPtouch /etc/sysconfig/bash-prompt-xtermvim /etc/sysconfig/bash-prompt-xterm #添加以下一行echo -ne "\e]2;${USER}@$(/sbin/ifconfig eth0|grep 'inet addr'|sed -e 's/^.*inet addr:\(.*\) Bcast.*$/\1/')\a"
#设置term类型是screen时(命令screen进入新窗口时)标签显示内容, 和xterm一样cp /etc/sysconfig/bash-prompt-xterm /etc/sysconfig/bash-prompt-screen
#设置term类型不是xterm和screen时标签显示内容, 也和xterm一样cp /etc/sysconfig/bash-prompt-xterm /etc/sysconfig/bash-prompt-default
#给予可执行权限chmod +x /etc/sysconfig/bash-prompt-*
#修改文件句柄数为65535,默认系统为1024echo "session required /lib64/security/pam_limits.so" >>/etc/pam.d/loginecho -ne "* soft nofile 65534* hard nofile 65534" >>/etc/security/limits.conf
#添加iptablesrm -rf /etc/sysconfig/iptablestouch /etc/sysconfig/iptablescat << EOF >> /etc/sysconfig/iptables此段加入你的iptables规则EOFservice iptables restart
#根据硬件优化Linux性能cat << EOF >> /etc/sysctl.conf# Add#开启SYN Cookies,当出现SYN等待队列溢出时,启用cookies来处理net.ipv4.tcp_syncookies = 1#表示SYN队列的长度,默认为1024,加大队列长度为8192,可以容纳更多等待连接的网络连接数。net.ipv4.tcp_max_syn_backlog = 65536#每个网络接口接收数据包的速率比内核处理这些包的速率快时,允许送到队列的数据包的最大数目net.core.netdev_max_backlog = 262144net.ipv4.tcp_fin_timeout = 30#当keepalive起用的时候,TCP发送keepalive消息的频度。缺省是2小时net.ipv4.tcp_keepalive_time = 1200#redis设置net.core.somaxconn = 262144net.core.wmem_default = 8388608net.core.rmem_default = 8388608net.core.rmem_max = 16777216net.core.wmem_max = 16777216net.ipv4.tcp_timestamps = 0#参数的值决定了内核放弃连接之前发送SYN+ACK包的数量net.ipv4.tcp_synack_retries = 2#在内核放弃建立连接之前发送SYN包的数量net.ipv4.tcp_syn_retries = 2#启用timewait快速回收net.ipv4.tcp_tw_recycle = 1net.ipv4.tcp_tw_reuse = 1net.ipv4.tcp_mem = 94500000 915000000 927000000#系统中最多有多少个TCP套接字不被关联到任何一个用户文件句柄上。这个限制仅仅是为了防止简单的DoS攻击,不能过分依靠它或者人为地减小这个值,更应该增加这个值(如果增加了内存之后)net.ipv4.tcp_max_orphans = 3276800#允许系统打开的端口范围net.ipv4.ip_local_port_range = 1024 65535#增加系统文件描述符限制fs.file-max = 65535#允许更多的PIDs (减少滚动翻转问题); may break some programs 32768kernel.pid_max = 65536# 增加TCP最大缓冲区大小net.ipv4.tcp_rmem = 4096 4096 16777216net.ipv4.tcp_wmem = 4096 4096 16777216net.ipv4.conf.all.send_redirects = 0net.ipv4.conf.default.send_redirects = 0net.ipv4.conf.eth0.send_redirects = 0net.ipv4.conf.all.send_redirects = 0#2012-8-30#net.ipv4.ip_conntrack_max=1048576#net.ipv4.netfilter.ip_conntrack_max=1048576net.ipv4.netfilter.ip_conntrack_tcp_timeout_time_wait=120net.ipv4.netfilter.ip_conntrack_tcp_timeout_close_wait=60net.ipv4.netfilter.ip_conntrack_tcp_timeout_fin_wait=120net.ipv4.neigh.default.gc_thresh1=10240net.ipv4.neigh.default.gc_thresh2=40960net.ipv4.neigh.default.gc_thresh3=81920#timewait的数量net.ipv4.tcp_max_tw_buckets =6000EOF
#刷新sysctl.conf复制代码 代码如下:
/sbin/sysctl -p
#禁用ipv6复制代码 代码如下:
echo -ne "alias net-pf-10 off\noptions ipv6 disable=1" >>/etc/modprobe.conf/sbin/chkconfig --level 35 ip6tables off
#关闭 selinux复制代码 代码如下:
sed -i '/SELINUX/s/enforcing/disabled/' /etc/selinux/config
#将同步好的时间写到CMOS里复制代码 代码如下:
sed -i 's#SYNC_HWCLOCK=no#SYNC_HWCLOCK=yes#' /etc/sysconfig/ntpd
#设置同步时间复制代码 代码如下:
echo "0 6 * * * /usr/sbin/ntpdate 192.168.0.172;/sbin/hwclock -w; >/dev/null 2>&1" >>/var/spool/cron/rootservice crond restart
#修改系统启动级别复制代码 代码如下:
sed -i 's/id:5:initdefault:/id:3:initdefault:/g' /etc/inittab
#禁止ctrl+alt+del复制代码 代码如下:
sed -i "s/ca::ctrlaltdel:\/sbin\/shutdown -t3 -r now/#ca::ctrlaltdel:\/sbin\/shutdown -t3 -r now/" /etc/inittab
二:获取相关开源程序:Nginx 官方当前稳定版为 nginx-1.2.4 ,我测试环境使用版本为nginx-1.3.3pcre-8.31nginx_upstream_check_modulengx_cache_purge-1.6请自行从网络下载安装步骤:#新建WWW用户组和WWW用户复制代码 代码如下:
groupadd wwwuseradd -g www www -s /bin/false
#创建相应的目录复制代码 代码如下:
mkdir -p /data/html/wwwmkdir -p /data/proxy_temp_dirmkdir -p /data/proxy_cache_pathmkdir -p /data/logschown -R www:www /data/proxy_cache_pathchown -R www:www /data/proxy_temp_dirchown -R www:www /data/html/chown -R www:www /data/logs
#安装内核和openssl复制代码 代码如下:
yum -y install openssl-devel kernel-devel
#安装Pcre复制代码 代码如下:
tar zxvf pcre-8.31.tar.gzcd pcre-8.31./configure --prefix=/usr/local/pcre makemake install
#安装nginx复制代码 代码如下:
tar zxvf ngx_cache_purge-1.6.tar.gztar zxvf nginx-1.3.3.tar.gztar zxvf nginx_upstream_check_module.tar.gzcd nginx-1.3.3patch -p1 < /root/nginx_keepalived_install/nginx_upstream_check_module/check_1.2.2+.patch./configure --prefix=/usr/local/nginx --user=www --group=www --with-http_stub_status_module --with-http_realip_module --with-http_gzip_static_module --with-openssl=/usr/ --with-pcre=/root/nginx_keepalived_install/pcre-8.31 --add-module=/root/nginx_keepalived_install/ngx_cache_purge-1.6 --add-module=/root/nginx_keepalived_install/nginx_upstream_check_modulemakemake installcp /root/nginx_keepalived_install/cut_nginx_log.sh /usr/local/nginx/sbin/chmod +x /usr/local/nginx/sbin/cut_nginx_log.shecho -ne "00 00 * * * /bin/bash /usr/local/nginx/sbin/cut_nginx_log.sh" >>/var/spool/cron/rootservice crond restartchown -R www:www /usr/local/nginx/cp /root/nginx_keepalived_install/nginx /etc/rc.d/init.d/chmod +x /etc/rc.d/init.d/nginxchkconfig nginx on
到这里Nginx安装完毕,目前Nginx所有的配置都是默认配置,我贴下我案例中的NGINX配置,如有错误请大牛们指导.Nginx.conf
复制代码 代码如下:
user www www; worker_processes 8; worker_cpu_affinity 00000001 00000010 00000100 00001000 00010000 00100000 01000000 10000000;worker_rlimit_nofile 204800;error_log /data/logs/error.log;pid logs/
nginx.pid;events { worker_connections 240800; use epoll; }http { include nginx_load_balance.conf; #include proxy.conf; include mime.types; default_type application/octet-stream; server_names_hash_bucket_size 128; #log_format access '$remote_addr - $remote_user [$time_local] "$request" ' #'$status $body_bytes_sent "$http_referer" ' #'"$http_user_agent" $http_x_forwarded_for'; #access_log /data/logs/access.log access; sendfile on; tcp_nopush on; tcp_nodelay on; server_tokens off; keepalive_timeout 60; client_header_buffer_size 4k; #large_client_header_buffers 4 32k; client_max_body_size 10m; client_header_timeout 120s; client_body_timeout 120s; send_timeout 120s; gzip off; gzip_min_length 1k; gzip_buffers 4 16k; output_buffers 1 512k; postpone_output 1460; #gzip_http_version 1.1; gzip_comp_level 4; gzip_types text/plain text/css text/javascript text/xml application/x-javascript application/xml application/xml+rss; gzip_vary on; server { listen 80; server_name localhost; location / { rewrite ^ http://www.test.com$request_uri?; #root /data/html/www; #index index.html index.htm; } error_page 404 /data/html/www/404.html; error_page 500 502 503 504 /50x.html; location = /50x.html { root html; } location /status { stub_status on; access_log off; } location /nstatus { check_status; access_log off; #allow SOME.IP.ADD.RESS; #deny all; } } include vhost/*.conf;}
复制代码 代码如下:
upstream dx { ip_hash; server 192.168.0.11:80; server 192.168.0.12:80; server 192.168.0.13:80; server 192.168.0.14:80; server 192.168.0.15:80; check interval=3000 rise=2 fall=8 timeout=3000 type=http; check_http_send "GET / HTTP/1.0\r\n\r\n"; check_http_expect_alive http_2xx http_3xx http_4xx; #server 192.168.0.30:80; backup; } upstream lt { ip_hash; server 192.168.1.11:80; server 192.168.1.12:80; server 192.168.1.13:80; server 192.168.1.14:80; server 192.168.1.15:80; check interval=3000 rise=2 fall=8 timeout=3000 type=http; check_http_send "GET / HTTP/1.0\r\n\r\n"; check_http_expect_alive http_2xx http_3xx http_4xx; #server 192.168.1.30:80; backup; }
proxy.conf复制代码 代码如下:
proxy_temp_path /data/proxy_temp_dir; #指定临时文件目录proxy_cache_path /data/proxy_cache_path levels=1:2 keys_zone=cache_one:2000m inactive=1d max_size=1g;client_body_buffer_size 512k; #增加缓冲区代理缓冲客户端请求的最大字节数proxy_connect_timeout 60; #增加连接后端服务器超时时间proxy_read_timeout 60; #增加后端服务器响应请求超时时间proxy_send_timeout 60; #增加后端服务器发送数据超时时间proxy_buffer_size 32k; #增加代理请求缓存区大小proxy_buffers 4 64k; #增加proxy_busy_buffers_size 128k; #增加系统繁忙时可申请的proxy_buffers大小proxy_temp_file_write_size 128k; #增加proxy缓存临时文件的大小proxy_next_upstream error timeout invalid_header http_500 http_503 http_404; #增加故障转移,如果后端的服务器返回502、504、执行超时等错误,自动将请求转发到upstream负载均衡池中的另一台服务器,实现故障转移。proxy_cache cache_one; #增加使用web缓存区cache_one
以上是Nginx配置,下面是vhost中网站配置xxxx_com.conf复制代码 代码如下:
server{listen 192.168.0.1;server_name xxx.com;access_log /data/logs/dx.log dx;location / { proxy_next_upstream http_502 http_504 error timeout invalid_header; # proxy_cache cache_one; # proxy_cache_valid 200 304 12h; # proxy_cache_key $host$uri$is_args$args; proxy_set_header Host $http_host; #proxy_set_header X-Real-IP $remote_addr; # proxy_set_header X-Forwarded-For $remote_addr; proxy_set_header X-Forwarded-For $proxy_add_x_forwarded_for; proxy_headers_hash_max_size 51200; proxy_headers_hash_bucket_size 6400; proxy_pass http://dx; #if ($request_uri ~* "^/upload/") { #add_header Cache-Control 'max-age=86400'; #} location ~* \.(gif|jpg|jpeg|png|flv|swf|ico)$ { proxy_set_header Host $http_host; proxy_set_header X-Forwarded-For $proxy_add_x_forwarded_for; proxy_pass http://dx; add_header Cache-Control 'max-age=86400'; } location ~* \.(js)$ { proxy_set_header Host $http_host; proxy_set_header X-Forwarded-For $proxy_add_x_forwarded_for; proxy_pass http://dx; add_header Cache-Control 'max-age=600'; } #expires -1; add_header Cache-Control 'no-store, no-cache, must-revalidate'; add_header Pragma no-cache; } location ~ /purge(/.*) { allow 127.0.0.1; allow 192.168.0.0/16; deny all; #proxy_cache_purge cache_one $host$1$is_args$args; } location ~ .*\.(php|jsp|cgi|asp|aspx|flv|swf|xml)?$ { proxy_set_header Host $http_host; #proxy_set_header X-Forwarded-For $remote_addr; proxy_set_header X-Forwarded-For $proxy_add_x_forwarded_for; proxy_pass http://dx; }}server{listen 192.168.1.1;server_name xxxx.com;access_log /data/logs/lt.log lt;location / { proxy_next_upstream http_502 http_504 error timeout invalid_header; #proxy_cache cache_one; #proxy_cache_valid 200 304 12h; #proxy_cache_key $host$uri$is_args$args; proxy_set_header Host $http_host; #proxy_set_header X-Real-IP $remote_addr; proxy_set_header X-Forwarded-For $remote_addr; proxy_set_header X-Forwarded-For $proxy_add_x_forwarded_for; proxy_headers_hash_max_size 51200; proxy_headers_hash_bucket_size 6400; proxy_pass http://lt; #if ($request_uri ~* "^/upload/") { #add_header Cache-Control 'max-age=86400'; #} location ~* \.(gif|jpg|jpeg|png|flv|swf|ico)$ { proxy_set_header Host $http_host; proxy_set_header X-Forwarded-For $proxy_add_x_forwarded_for; proxy_pass http://lt; add_header Cache-Control 'max-age=86400'; } location ~* \.(js)$ { proxy_set_header Host $http_host; proxy_set_header X-Forwarded-For $proxy_add_x_forwarded_for; proxy_pass http://lt; add_header Cache-Control 'max-age=600'; } #expires -1; add_header Cache-Control 'no-store, no-cache, must-revalidate'; add_header Pragma no-cache; } location ~ /purge(/.*) { allow 127.0.0.1; allow 192.168.0.0/16; deny all; #proxy_cache_purge cache_one $host$1$is_args$args; } location ~ .*\.(php|jsp|cgi|asp|aspx|flv|swf|xml)?$ { proxy_set_header Host $http_host; #proxy_set_header X-Forwarded-For $remote_addr; proxy_set_header X-Forwarded-For $proxy_add_x_forwarded_for; proxy_pass http://lt; }}
至此,一套完整的Nginx反向代理全部结束.网站无法打开排查1:ping域名看解析是否正常且是否连通.2:配置本机Hosts指向后端单机IIS查看网站是否正常访问.3:检查前端Nginx进程和端口是否存在,ps -ef |grep nginxnetstat -an |grep 80系统相关配置NginxNginx目录/usr/local/nginx//usr/local/nginx/conf/nginx.conf Nginx主配置文件/usr/local/nginx/conf/nginx_load_balance.conf Nginx反向代理轮询配置文件/usr/local/nginx/conf/proxy.conf Nginx缓存配置相关/usr/local/nginx/conf/vhost/ Nginx虚拟主机配置目录Snmp/etc/snmp/snmpd.conf日志切割/root/scripts/ 所有日志切割脚本都在这个目录crontab -l 列出计划任务crontab -e 编辑计划任务系统相关操作Nginx重启Nginx service nginx restart重载Nginx配置文件 service nginx reload检测Nginx配置语法是否正确 /usr/local/nginx/sbin/nginx -t关闭Nginx service nginx stop启动Nginx service nginx startSnmp重启Snmp service snmpd restart关闭Snmp service snmpd stop启动Snmp service snmpd start 最后编辑: chen 编辑于2012/11/07 17:57
以上是 Nginx反向代理+DNS轮询+IIS7.5 千万PV 百万IP 双线 网站架构案例 的全部内容,
来源链接:
utcz.com/p/256774.html