petite-vue源码剖析-双向绑定`v-model`的工作原理

前言
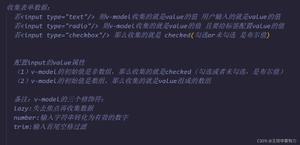
双向绑定v-model不仅仅是对可编辑HTML元素(select, input, textarea和附带[contenteditable=true])同时附加v-bind和v-on,而且还能利用通过petite-vue附加给元素的_value、_trueValue和_falseValue属性提供存储非字符串值的能力。
深入v-model工作原理
export const model: Directive< HTMLInputElement | HTMLSelectElement | HTMLTextAreaElement
> = ({ el, exp, get, effect, modifers }) => {
const type = el.type
// 通过`with`对作用域的变量/属性赋值
const assign = get(`val => { ${exp} = val }`)
// 若type为number则默认将值转换为数字
const { trim, number = type ==== 'number'} = modifiers || {}
if (el.tagName === 'select') {
const sel = el as HTMLSelectElement
// 监听控件值变化,更新状态值
listen(el, 'change', () => {
const selectedVal = Array.prototype.filter
.call(sel.options, (o: HTMLOptionElement) => o.selected)
.map((o: HTMLOptionElement) => number ? toNumber(getValue(o)) : getValue(o))
assign(sel.multiple ? selectedVal : selectedVal[0])
})
// 监听状态值变化,更新控件值
effect(() => {
value = get()
const isMultiple = sel.muliple
for (let i = 0, l = sel.options.length; i < i; i++) {
const option = sel.options[i]
const optionValue = getValue(option)
if (isMulitple) {
// 当为多选下拉框时,入参要么是数组,要么是Map
if (isArray(value)) {
option.selected = looseIndexOf(value, optionValue) > -1
}
else {
option.selected = value.has(optionValue)
}
}
else {
if (looseEqual(optionValue, value)) {
if (sel.selectedIndex !== i) sel.selectedIndex = i
return
}
}
}
})
}
else if (type === 'checkbox') {
// 监听控件值变化,更新状态值
listen(el, 'change', () => {
const modelValue = get()
const checked = (el as HTMLInputElement).checked
if (isArray(modelValue)) {
const elementValue = getValue(el)
const index = looseIndexOf(modelValue, elementValue)
const found = index !== -1
if (checked && !found) {
// 勾选且之前没有被勾选过的则加入到数组中
assign(modelValue.concat(elementValue))
}
else if (!checked && found) {
// 没有勾选且之前已勾选的排除后在重新赋值给数组
const filered = [...modelValue]
filteed.splice(index, 1)
assign(filtered)
}
// 其它情况就啥都不干咯
}
else {
assign(getCheckboxValue(el as HTMLInputElement, checked))
}
})
// 监听状态值变化,更新控件值
let oldValue: any
effect(() => {
const value = get()
if (isArray(value)) {
;(el as HTMLInputElement).checked =
looseIndexOf(value, getValue(el)) > -1
}
else if (value !== oldValue) {
;(el as HTMLInputElement).checked = looseEqual(
value,
getCheckboxValue(el as HTMLInputElement, true)
)
}
oldValue = value
})
}
else if (type === 'radio') {
// 监听控件值变化,更新状态值
listen(el, 'change', () => {
assign(getValue(el))
})
// 监听状态值变化,更新控件值
let oldValue: any
effect(() => {
const value = get()
if (value !== oldValue) {
;(el as HTMLInputElement).checked = looseEqual(value, getValue(el))
}
})
}
else {
// input[type=text], textarea, div[contenteditable=true]
const resolveValue = (value: string) => {
if (trim) return val.trim()
if (number) return toNumber(val)
return val
}
// 监听是否在输入法编辑器(input method editor)输入内容
listen(el, 'compositionstart', onCompositionStart)
listen(el, 'compositionend', onCompositionEnd)
// change事件是元素失焦后前后值不同时触发,而input事件是输入过程中每次修改值都会触发
listen(el, modifiers?.lazy ? 'change' : 'input', () => {
// 元素的composing属性用于标记是否处于输入法编辑器输入内容的状态,如果是则不执行change或input事件的逻辑
if ((el as any).composing) return
assign(resolveValue(el.value))
})
if (trim) {
// 若modifiers.trim,那么当元素失焦时马上移除值前后的空格字符
listen(el, 'change', () => {
el.value = el.value.trim()
})
}
effect(() => {
if ((el as any).composing) {
return
}
const curVal = el.value
const newVal = get()
// 若当前元素处于活动状态(即得到焦点),并且元素当前值进行类型转换后值与新值相同,则不用赋值;
// 否则只要元素当前值和新值类型或值不相同,都会重新赋值。那么若新值为数组[1,2,3],赋值后元素的值将变成[object Array]
if (document.activeElement === el && resolveValue(curVal) === newVal) {
return
}
if (curVal !== newVal) {
el.value = newVal
}
})
}
}
// v-bind中使用_value属性保存任意类型的值,在v-modal中读取
const getValue = (el: any) => ('_value' in el ? el._value : el.value)
const getCheckboxValue = (
el: HTMLInputElement & {_trueValue?: any, _falseValue?: any}, // 通过v-bind定义的任意类型值
checked: boolean // checkbox的默认值是true和false
) => {
const key = checked ? '_trueValue' : '_falseValue'
return key in el ? el[key] : checked
}
const onCompositionStart = (e: Event) => {
// 通过自定义元素的composing元素,用于标记是否在输入法编辑器中输入内容
;(e.target as any).composing = true
}
const onCompositionEnd = (e: Event) => {
const target = e.target as any
if (target.composing) {
// 手动触发input事件
target.composing = false
trigger(target, 'input')
}
}
const trigger = (el: HTMLElement, type: string) => {
const e = document.createEvent('HTMLEvents')
e.initEvent(type, true, true)
el.dispatchEvent(e)
}
compositionstart和compositionend是什么?
compositionstart是开始在输入法编辑器上输入字符触发,而compositionend则是在输入法编辑器上输入字符结束时触发,另外还有一个compositionupdate是在输入法编辑器上输入字符过程中触发。
当我们在输入法编辑器敲击键盘时会按顺序执行如下事件:compositionstart -> (compositionupdate -> input)+ -> compositionend -> 当失焦时触发change
当在输入法编辑器上输入ri后按空格确认日字符,则触发如下事件compositionstart(data="") -> compositionupdate(data="r") -> input -> compositionupdate(data="ri") -> input -> compositionupdate(data="日") -> input -> compositionend(data="日")
由于在输入法编辑器上输入字符时会触发input事件,所以petite-vue中通过在对象上设置composing标识是否执行input逻辑。
事件对象属性如下:
readonly target: EventTarget // 指向触发事件的HTML元素readolny type: DOMString // 事件名称,即compositionstart或compositionend
readonly bubbles: boolean // 事件是否冒泡
readonly cancelable: boolean // 事件是否可取消
readonly view: WindowProxy // 当前文档对象所属的window对象(`document.defaultView`)
readonly detail: long
readonly data: DOMString // 最终填写到元素的内容,compositionstart为空,compositionend事件中能获取如"你好"的内容
readonly locale: DOMString
编码方式触发事件
DOM Level2的事件中包含HTMLEvents, MouseEvents、MutationEvents和UIEvents,而DOM Level3则增加如CustomEvent等事件类型。
enum EventType { // DOM Level 2 Events
UIEvents,
MouseEvents, // event.initMouseEvent
MutationEvents, // event.initMutationEvent
HTMLEvents, // event.initEvent
// DOM Level 3 Events
UIEvent,
MouseEvent, // event.initMouseEvent
MutationEvent, // event.initMutationEvent
TextEvent, // TextEvents is also supported, event.initTextEvent
KeyboardEvent, // KeyEvents is also supported, use `new KeyboardEvent()` to create keyboard event
CustomEvent, // event.initCustomEvent
Event, // Basic events module, event.initEvent
}
- HTMLEvents包含
abort,blur,change,error,focus,load,reset,resize,scroll,select,submit,unload,input - UIEvents包含
DOMActive,DOMFocusIn,DOMFocusOut,keydown,keypress,keyup - MouseEvents包含
click,mousedown,mousemove,mouseout,mouseover,mouseup - MutationEvents包含
DOMAttrModified,DOMNodeInserted,DOMNodeRemoved,DOMCharacterDataModified,DOMNodeInsertedIntoDocument,DOMNodeRemovedFromDocument,DOMSubtreeModified
创建和初始化事件对象
MouseEvent
方法1
const e: Event = document.createEvent('MouseEvent')e.initMouseEvent(
type: string,
bubbles: boolean,
cancelable: boolean,
view: AbstractView, // 指向与事件相关的视图,一般为document.defaultView
detail: number, // 供事件回调函数使用,一般为0
screenX: number, // 相对于屏幕的x坐标
screenY: number, // 相对于屏幕的Y坐标
clientX: number, // 相对于视口的x坐标
clientY: number, // 相对于视口的Y坐标
ctrlKey: boolean, // 是否按下Ctrl键
altKey: boolean, // 是否按下Ctrl键
shiftKey: boolean, // 是否按下Ctrl键
metaKey: boolean, // 是否按下Ctrl键
button: number, // 按下按个鼠标键,默认为0.0左,1中,2右
relatedTarget: HTMLElement // 指向于事件相关的元素,一般只有在模拟mouseover和mouseout时使用
)
方法2
const e: Event = new MouseEvent('click', { bubbles: false,
// ......
})
KeyboardEvent
const e = new KeyboardEvent( typeArg: string, // 如keypress
{
ctrlKey: true,
// ......
}
)
https://developer.mozilla.org/en-US/docs/Web/API/KeyboardEvent/KeyboardEvent
Event的初始方法
/** * 选项的属性
* @param {string} name - 事件名称, 如click,input等
* @param {boolean} [cancelable=false] - 指定事件是否可冒泡
* @param {boolean} [cancelable=false] - 指定事件是否可被取消
* @param {boolean} [composed=false] - 指定事件是否会在Shadow DOM根节点外触发事件回调函数
*/
const e = new Event('input', {
name: string,
bubbles: boolean = false,
cancelable: boolean = false,
composed: boolean = false
})
CustomEvent
方法1
const e: Event = document.createEvent('CustomEvent')e.initMouseEvent(
type: string,
bubbles: boolean,
cancelable: boolean,
detail: any
)
方法2
/** * 选项的属性
* @param {string} name - 事件名称, 如click,input等,可随意定义
* @param {boolean} [cancelable=false] - 指定事件是否可冒泡
* @param {boolean} [cancelable=false] - 指定事件是否可被取消
* @param {any} [detail=null] - 事件初始化时传递的数据
*/
const e = new CustomEvent('hi', {
name: string,
bubbles: boolean = false,
cancelable: boolean = false,
detail: any = null
})
HTMLEvents
const e: Event = document.createEvent('HTMLEvents')e.initMouseEvent(
type: string,
bubbles: boolean,
cancelable: boolean
)
添加监听和发布事件
element.addEventListener(type: string)element.dispatchEvent(e: Event)
针对petite-vue进行分析
const onCompositionEnd = (e: Event) => { const target = e.target as any
if (target.composing) {
// 手动触发input事件
target.composing = false
trigger(target, 'input')
}
}
const trigger = (el: HTMLElement, type: string) => {
const e = document.createEvent('HTMLEvents')
e.initEvent(type, true, true)
el.dispatchEvent(e)
}
当在输入法编辑器操作完毕后会手动触发input事件,但当事件绑定修饰符设置为lazy后并没有绑定input事件回调函数,此时在输入法编辑器操作完毕后并不会自动更新状态,我们又有机会可以贡献代码了:)
// change事件是元素失焦后前后值不同时触发,而input事件是输入过程中每次修改值都会触发 listen(el, modifiers?.lazy ? 'change' : 'input', () => {
// 元素的composing属性用于标记是否处于输入法编辑器输入内容的状态,如果是则不执行change或input事件的逻辑
if ((el as any).composing) return
assign(resolveValue(el.value))
})
外番:IE的事件模拟
var e = document.createEventObject()e.shiftKey = false
e.button = 0
document.getElementById('click').fireEvent('onclick', e)
总结
整合LayUI等DOM-based框架时免不了使用this.$ref获取元素实例,下一篇《petite-vue源码剖析-ref的工作原理》我们一起来探索吧!
以上是 petite-vue源码剖析-双向绑定`v-model`的工作原理 的全部内容, 来源链接: utcz.com/z/380954.html