Android 实现抖音小游戏潜艇大挑战的思路详解
《潜水艇大挑战》是抖音上的一款小游戏,以面部识别来驱动潜艇通过障碍物,最近特别火爆,相信很多人都玩过。

一时兴起自己用Android自定义View也撸了一个,发现只要有好的创意,不用高深的技术照样可以开发出好玩的应用。开发过程现拿出来与大家分享一下。
项目地址:
https://github.com/vitaviva/ugame
基本思路
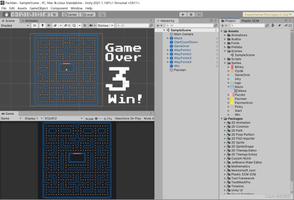
整个游戏视图可以分成三层:
- camera(相机):处理相机的preview以及人脸识别
- background(后景):处理障碍物相关逻辑
- foreground(前景):处理潜艇相关
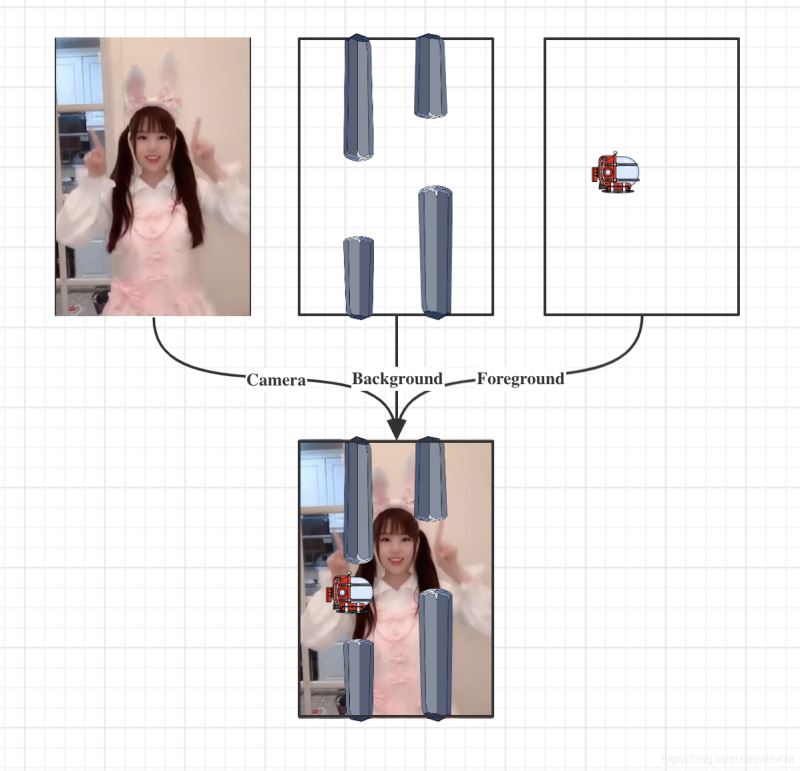
代码也是按上面三个层面组织的,游戏界面的布局可以简单理解为三层视图的叠加,然后在各层视图中完成相关工作
<FrameLayout xmlns:android="http://schemas.android.com/apk/res/android"
xmlns:tools="http://schemas.android.com/tools"
android:layout_width="match_parent"
android:layout_height="match_parent">
<!-- 相机 -->
<TextureView
android:layout_width="match_parent"
android:layout_height="match_parent"/>
<!-- 后景 -->
<com.my.ugame.bg.BackgroundView
android:layout_width="match_parent"
android:layout_height="match_parent"/>
<!-- 前景 -->
<com.my.ugame.fg.ForegroundView
android:layout_width="match_parent"
android:layout_height="match_parent"/>
</Framelayout>
开发中会涉及以下技术的使用,没有高精尖、都是大路货:
- 相机:使用Camera2完成相机的预览和人脸识别
- 自定义View:定义并控制障碍物和潜艇
- 属性动画:控制障碍物和潜艇的移动及各种动效
少啰嗦,先看东西!下面介绍各部分代码的实现。
后景(Background)Bar
首先定义障碍物基类Bar,主要负责是将bitmap资源绘制到指定区域。由于障碍物从屏幕右侧定时刷新时的高度随机,所以其绘制区域的x、y、w、h需要动态设置
/**
* 障碍物基类
*/
sealed class Bar(context: Context) {
protected open val bmp = context.getDrawable(R.mipmap.bar)!!.toBitmap()
protected abstract val srcRect: Rect
private lateinit var dstRect: Rect
private val paint = Paint()
var h = 0F
set(value) {
field = value
dstRect = Rect(0, 0, w.toInt(), h.toInt())
}
var w = 0F
set(value) {
field = value
dstRect = Rect(0, 0, w.toInt(), h.toInt())
}
var x = 0F
set(value) {
view.x = value
field = value
}
val y
get() = view.y
internal val view by lazy {
BarView(context) {
it?.apply {
drawBitmap(
bmp,
srcRect,
dstRect,
paint
)
}
}
}
}
internal class BarView(context: Context?, private val block: (Canvas?) -> Unit) :
View(context) {
override fun onDraw(canvas: Canvas?) {
block((canvas))
}
}
障碍物分为上方和下方两种,由于使用了同一张资源,所以绘制时要区别对待,因此定义了两个子类:UpBar和DnBar
/**
* 屏幕上方障碍物
*/
class UpBar(context: Context, container: ViewGroup) : Bar(context) {
private val _srcRect by lazy(LazyThreadSafetyMode.NONE) {
Rect(0, (bmp.height * (1 - (h / container.height))).toInt(), bmp.width, bmp.height)
}
override val srcRect: Rect
get() = _srcRect
}
下方障碍物的资源旋转180度后绘制
/**
* 屏幕下方障碍物
*/
class DnBar(context: Context, container: ViewGroup) : Bar(context) {
override val bmp = super.bmp.let {
Bitmap.createBitmap(
it, 0, 0, it.width, it.height,
Matrix().apply { postRotate(-180F) }, true
)
}
private val _srcRect by lazy(LazyThreadSafetyMode.NONE) {
Rect(0, 0, bmp.width, (bmp.height * (h / container.height)).toInt())
}
override val srcRect: Rect
get() = _srcRect
}
BackgroundView
接下来创建后景的容器BackgroundView,容器用来定时地创建、并移动障碍物。
通过列表barsList管理当前所有的障碍物,onLayout中,将障碍物分别布局到屏幕上方和下方
/**
* 后景容器类
*/
class BackgroundView(context: Context, attrs: AttributeSet?) : FrameLayout(context, attrs) {
internal val barsList = mutableListOf<Bars>()
override fun onLayout(changed: Boolean, left: Int, top: Int, right: Int, bottom: Int) {
barsList.flatMap { listOf(it.up, it.down) }.forEach {
val w = it.view.measuredWidth
val h = it.view.measuredHeight
when (it) {
is UpBar -> it.view.layout(0, 0, w, h)
else -> it.view.layout(0, height - h, w, height)
}
}
}
提供两个方法start和stop,控制游戏的开始和结束:
- 游戏结束时,要求所有障碍物停止移动。
- 游戏开始后会通过
Timer,定时刷新障碍物
/**
* 游戏结束,停止所有障碍物的移动
*/
@UiThread
fun stop() {
_timer.cancel()
_anims.forEach { it.cancel() }
_anims.clear()
}
/**
* 定时刷新障碍物:
* 1. 创建
* 2. 添加到视图
* 3. 移动
*/
@UiThread
fun start() {
_clearBars()
Timer().also { _timer = it }.schedule(object : TimerTask() {
override fun run() {
post {
_createBars(context, barsList.lastOrNull()).let {
_addBars(it)
_moveBars(it)
}
}
}
}, FIRST_APPEAR_DELAY_MILLIS, BAR_APPEAR_INTERVAL_MILLIS
)
}
/**
* 游戏重启时,清空障碍物
*/
private fun _clearBars() {
barsList.clear()
removeAllViews()
}
刷新障碍物
障碍物的刷新经历三个步骤:
- 创建:上下两个为一组创建障碍物
- 添加:将对象添加到barsList,同时将View添加到容器
- 移动:通过属性动画从右侧移动到左侧,并在移出屏幕后删除
创建障碍物时会为其设置随机高度,随机不能太过,要以前一个障碍物为基础进行适当调整,保证随机的同时兼具连贯性
/**
* 创建障碍物(上下两个为一组)
*/
private fun _createBars(context: Context, pre: Bars?) = run {
val up = UpBar(context, this).apply {
h = pre?.let {
val step = when {
it.up.h >= height - _gap - _step -> -_step
it.up.h <= _step -> _step
_random.nextBoolean() -> _step
else -> -_step
}
it.up.h + step
} ?: _barHeight
w = _barWidth
}
val down = DnBar(context, this).apply {
h = height - up.h - _gap
w = _barWidth
}
Bars(up, down)
}
/**
* 添加到屏幕
*/
private fun _addBars(bars: Bars) {
barsList.add(bars)
bars.asArray().forEach {
addView(
it.view,
ViewGroup.LayoutParams(
it.w.toInt(),
it.h.toInt()
)
)
}
}
/**
* 使用属性动画移动障碍物
*/
private fun _moveBars(bars: Bars) {
_anims.add(
ValueAnimator.ofFloat(width.toFloat(), -_barWidth)
.apply {
addUpdateListener {
bars.asArray().forEach { bar ->
bar.x = it.animatedValue as Float
if (bar.x + bar.w <= 0) {
post { removeView(bar.view) }
}
}
}
duration = BAR_MOVE_DURATION_MILLIS
interpolator = LinearInterpolator()
start()
})
}
}
前景(Foreground)
Boat
定会潜艇类Boat,创建自定义View,并提供方法移动到指定坐标
/**
* 潜艇类
*/
class Boat(context: Context) {
internal val view by lazy { BoatView(context) }
val h
get() = view.height.toFloat()
val w
get() = view.width.toFloat()
val x
get() = view.x
val y
get() = view.y
/**
* 移动到指定坐标
*/
fun moveTo(x: Int, y: Int) {
view.smoothMoveTo(x, y)
}
}
BoatView
自定义View中完成以下几个事情
- 通过两个资源定时切换,实现探照灯闪烁的效果
- 通过OverScroller让移动过程更加顺滑
- 通过一个Rotation Animation,让潜艇在移动时可以调转角度,更加灵动
internal class BoatView(context: Context?) : AppCompatImageView(context) {
private val _scroller by lazy { OverScroller(context) }
private val _res = arrayOf(
R.mipmap.boat_000,
R.mipmap.boat_002
)
private var _rotationAnimator: ObjectAnimator? = null
private var _cnt = 0
set(value) {
field = if (value > 1) 0 else value
}
init {
scaleType = ScaleType.FIT_CENTER
_startFlashing()
}
private fun _startFlashing() {
postDelayed({
setImageResource(_res[_cnt++])
_startFlashing()
}, 500)
}
override fun computeScroll() {
super.computeScroll()
if (_scroller.computeScrollOffset()) {
x = _scroller.currX.toFloat()
y = _scroller.currY.toFloat()
// Keep on drawing until the animation has finished.
postInvalidateOnAnimation()
}
}
/**
* 移动更加顺换
*/
internal fun smoothMoveTo(x: Int, y: Int) {
if (!_scroller.isFinished) _scroller.abortAnimation()
_rotationAnimator?.let { if (it.isRunning) it.cancel() }
val curX = this.x.toInt()
val curY = this.y.toInt()
val dx = (x - curX)
val dy = (y - curY)
_scroller.startScroll(curX, curY, dx, dy, 250)
_rotationAnimator = ObjectAnimator.ofFloat(
this,
"rotation",
rotation,
Math.toDegrees(atan((dy / 100.toDouble()))).toFloat()
).apply {
duration = 100
start()
}
postInvalidateOnAnimation()
}
}
ForegroundView
- 通过boat成员持有潜艇对象,并对其进行控制
- 实现CameraHelper.FaceDetectListener根据人脸识别的回调,移动潜艇到指定位置
- 游戏开始时,创建潜艇并做开场动画
/**
* 前景容器类
*/
class ForegroundView(context: Context, attrs: AttributeSet?) : FrameLayout(context, attrs),
CameraHelper.FaceDetectListener {
private var _isStop: Boolean = false
internal var boat: Boat? = null
/**
* 游戏停止,潜艇不再移动
*/
@MainThread
fun stop() {
_isStop = true
}
/**
* 接受人脸识别的回调,移动位置
*/
override fun onFaceDetect(faces: Array<Face>, facesRect: ArrayList<RectF>) {
if (_isStop) return
if (facesRect.isNotEmpty()) {
boat?.run {
val face = facesRect.first()
val x = (face.left - _widthOffset).toInt()
val y = (face.top + _heightOffset).toInt()
moveTo(x, y)
}
_face = facesRect.first()
}
}
}
开场动画
游戏开始时,将潜艇通过动画移动到起始位置,即y轴的二分之一处
/**
* 游戏开始时通过动画进入
*/
@MainThread
fun start() {
_isStop = false
if (boat == null) {
boat = Boat(context).also {
post {
addView(it.view, _width, _width)
AnimatorSet().apply {
play(
ObjectAnimator.ofFloat(
it.view,
"y",
0F,
this@ForegroundView.height / 2f
)
).with(
ObjectAnimator.ofFloat(it.view, "rotation", 0F, 360F)
)
doOnEnd { _ -> it.view.rotation = 0F }
duration = 1000
}.start()
}
}
}
}
相机(Camera)
相机部分主要有TextureView和CameraHelper组成。TextureView提供给Camera承载preview;工具类CameraHelper主要完成以下功能:
- 开启相机:通过CameraManger代开摄像头
- 摄像头切换:切换前后置摄像头,
- 预览:获取Camera提供的可预览尺寸,并适配TextureView显示
- 人脸识别:检测人脸位置,进行TestureView上的坐标变换
相机硬件提供的可预览尺寸与屏幕实际尺寸(即TextureView尺寸)可能不一致,所以需要在相机初始化时,选取最合适的PreviewSize,避免TextureView上发生画面拉伸等异常
class CameraHelper(val mActivity: Activity, private val mTextureView: TextureView) {
private lateinit var mCameraManager: CameraManager
private var mCameraDevice: CameraDevice? = null
private var mCameraCaptureSession: CameraCaptureSession? = null
private var canExchangeCamera = false //是否可以切换摄像头
private var mFaceDetectMatrix = Matrix() //人脸检测坐标转换矩阵
private var mFacesRect = ArrayList<RectF>() //保存人脸坐标信息
private var mFaceDetectListener: FaceDetectListener? = null //人脸检测回调
private lateinit var mPreviewSize: Size
/**
* 初始化
*/
private fun initCameraInfo() {
mCameraManager = mActivity.getSystemService(Context.CAMERA_SERVICE) as CameraManager
val cameraIdList = mCameraManager.cameraIdList
if (cameraIdList.isEmpty()) {
mActivity.toast("没有可用相机")
return
}
//获取摄像头方向
mCameraSensorOrientation =
mCameraCharacteristics.get(CameraCharacteristics.SENSOR_ORIENTATION)!!
//获取StreamConfigurationMap,它是管理摄像头支持的所有输出格式和尺寸
val configurationMap =
mCameraCharacteristics.get(CameraCharacteristics.SCALER_STREAM_CONFIGURATION_MAP)!!
val previewSize = configurationMap.getOutputSizes(SurfaceTexture::class.java) //预览尺寸
// 当屏幕为垂直的时候需要把宽高值进行调换,保证宽大于高
mPreviewSize = getBestSize(
mTextureView.height,
mTextureView.width,
previewSize.toList()
)
//根据preview的size设置TextureView
mTextureView.surfaceTexture.setDefaultBufferSize(mPreviewSize.width, mPreviewSize.height)
mTextureView.setAspectRatio(mPreviewSize.height, mPreviewSize.width)
}
选取preview尺寸的原则与TextureView的长宽比尽量一致,且面积尽量接近。
private fun getBestSize(
targetWidth: Int,
targetHeight: Int,
sizeList: List<Size>
): Size {
val bigEnough = ArrayList<Size>() //比指定宽高大的Size列表
val notBigEnough = ArrayList<Size>() //比指定宽高小的Size列表
for (size in sizeList) {
//宽高比 == 目标值宽高比
if (size.width == size.height * targetWidth / targetHeight
) {
if (size.width >= targetWidth && size.height >= targetHeight)
bigEnough.add(size)
else
notBigEnough.add(size)
}
}
//选择bigEnough中最小的值 或 notBigEnough中最大的值
return when {
bigEnough.size > 0 -> Collections.min(bigEnough, CompareSizesByArea())
notBigEnough.size > 0 -> Collections.max(notBigEnough, CompareSizesByArea())
else -> sizeList[0]
}
initFaceDetect()
}
initFaceDetect()用来进行人脸的Matrix初始化,后文介绍
人脸识别
为相机预览,创建一个CameraCaptureSession对象,会话通过CameraCaptureSession.CaptureCallback返回TotalCaptureResult,通过参数可以让其中包括人脸识别的相关信息
/**
* 创建预览会话
*/
private fun createCaptureSession(cameraDevice: CameraDevice) {
// 为相机预览,创建一个CameraCaptureSession对象
cameraDevice.createCaptureSession(
arrayListOf(surface),
object : CameraCaptureSession.StateCallback() {
override fun onConfigured(session: CameraCaptureSession) {
mCameraCaptureSession = session
session.setRepeatingRequest(
captureRequestBuilder.build(),
mCaptureCallBack,
mCameraHandler
)
}
},
mCameraHandler
)
}
private val mCaptureCallBack = object : CameraCaptureSession.CaptureCallback() {
override fun onCaptureCompleted(
session: CameraCaptureSession,
request: CaptureRequest,
result: TotalCaptureResult
) {
super.onCaptureCompleted(session, request, result)
if (mFaceDetectMode != CaptureRequest.STATISTICS_FACE_DETECT_MODE_OFF)
handleFaces(result)
}
}
通过mFaceDetectMatrix对人脸信息进行矩阵变化,确定人脸坐标以使其准确应用到TextureView。
/**
* 处理人脸信息
*/
private fun handleFaces(result: TotalCaptureResult) {
val faces = result.get(CaptureResult.STATISTICS_FACES)!!
mFacesRect.clear()
for (face in faces) {
val bounds = face.bounds
val left = bounds.left
val top = bounds.top
val right = bounds.right
val bottom = bounds.bottom
val rawFaceRect =
RectF(left.toFloat(), top.toFloat(), right.toFloat(), bottom.toFloat())
mFaceDetectMatrix.mapRect(rawFaceRect)
var resultFaceRect = if (mCameraFacing == CaptureRequest.LENS_FACING_FRONT) {
rawFaceRect
} else {
RectF(
rawFaceRect.left,
rawFaceRect.top - mPreviewSize.width,
rawFaceRect.right,
rawFaceRect.bottom - mPreviewSize.width
)
}
mFacesRect.add(resultFaceRect)
}
mActivity.runOnUiThread {
mFaceDetectListener?.onFaceDetect(faces, mFacesRect)
}
}
最后,在UI线程将包含人脸坐标的Rect通过回调传出:
mActivity.runOnUiThread {
mFaceDetectListener?.onFaceDetect(faces, mFacesRect)
}
FaceDetectMatrix
mFaceDetectMatrix是在获取PreviewSize之后创建的
/**
* 初始化人脸检测相关信息
*/
private fun initFaceDetect() {
val faceDetectModes =
mCameraCharacteristics.get(CameraCharacteristics.STATISTICS_INFO_AVAILABLE_FACE_DETECT_MODES) //人脸检测的模式
mFaceDetectMode = when {
faceDetectModes!!.contains(CaptureRequest.STATISTICS_FACE_DETECT_MODE_FULL) -> CaptureRequest.STATISTICS_FACE_DETECT_MODE_FULL
faceDetectModes!!.contains(CaptureRequest.STATISTICS_FACE_DETECT_MODE_SIMPLE) -> CaptureRequest.STATISTICS_FACE_DETECT_MODE_FULL
else -> CaptureRequest.STATISTICS_FACE_DETECT_MODE_OFF
}
if (mFaceDetectMode == CaptureRequest.STATISTICS_FACE_DETECT_MODE_OFF) {
mActivity.toast("相机硬件不支持人脸检测")
return
}
val activeArraySizeRect =
mCameraCharacteristics.get(CameraCharacteristics.SENSOR_INFO_ACTIVE_ARRAY_SIZE)!! //获取成像区域
val scaledWidth = mPreviewSize.width / activeArraySizeRect.width().toFloat()
val scaledHeight = mPreviewSize.height / activeArraySizeRect.height().toFloat()
val mirror = mCameraFacing == CameraCharacteristics.LENS_FACING_FRONT
mFaceDetectMatrix.setRotate(mCameraSensorOrientation.toFloat())
mFaceDetectMatrix.postScale(if (mirror) -scaledHeight else scaledHeight, scaledWidth)// 注意交换width和height的位置!
mFaceDetectMatrix.postTranslate(
mPreviewSize.height.toFloat(),
mPreviewSize.width.toFloat()
)
}
控制类(GameController)
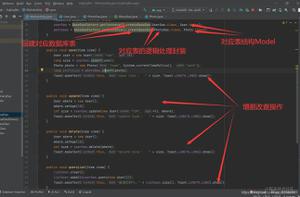
三大视图层组装完毕,最后需要一个总控类,对游戏进行逻辑控制
GameController
主要完成以下工作:
- 控制游戏的开启/停止
- 计算游戏的当前得分
- 检测潜艇的碰撞
- 对外(Activity或者Fragment等)提供游戏状态监听的接口
游戏开始时进行相机的初始化,创建GameHelper类并建立setFaceDetectListener回调到ForegroundView
class GameController(
private val activity: AppCompatActivity,
private val textureView: AutoFitTextureView,
private val bg: BackgroundView,
private val fg: ForegroundView
) {
private var camera2HelperFace: CameraHelper? = null
/**
* 相机初始化
*/
private fun initCamera() {
cameraHelper ?: run {
cameraHelper = CameraHelper(activity, textureView).apply {
setFaceDetectListener(object : CameraHelper.FaceDetectListener {
override fun onFaceDetect(faces: Array<Face>, facesRect: ArrayList<RectF>) {
if (facesRect.isNotEmpty()) {
fg.onFaceDetect(faces, facesRect)
}
}
})
}
}
}
游戏状态
定义GameState,对外提供状态的监听。目前支持三种状态
- Start:游戏开始
- Over:游戏结束
- Score:游戏得分
sealed class GameState(open val score: Long) {
object Start : GameState(0)
data class Over(override val score: Long) : GameState(score)
data class Score(override val score: Long) : GameState(score)
}
可以在stop、start的时候,更新状态
/**
* 游戏状态
*/
private val _state = MutableLiveData<GameState>()
internal val gameState: LiveData<GameState>
get() = _state
/**
* 游戏停止
*/
fun stop() {
bg.stop()
fg.stop()
_state.value = GameState.Over(_score)
_score = 0L
}
/**
* 游戏再开
*/
fun start() {
initCamera()
fg.start()
bg.start()
_state.value = GameState.Start
handler.postDelayed({
startScoring()
}, FIRST_APPEAR_DELAY_MILLIS)
}
计算得分
游戏启动时通过startScoring开始计算得分并通过GameState上报。
目前的规则设置很简单,存活时间即游戏得分
/**
* 开始计分
*/
private fun startScoring() {
handler.postDelayed(
{
fg.boat?.run {
bg.barsList.flatMap { listOf(it.up, it.down) }
.forEach { bar ->
if (isCollision(
bar.x, bar.y, bar.w, bar.h,
this.x, this.y, this.w, this.h
)
) {
stop()
return@postDelayed
}
}
}
_score++
_state.value = GameState.Score(_score)
startScoring()
}, 100
)
}
检测碰撞
isCollision根据潜艇和障碍物当前位置,计算是否发生了碰撞,发生碰撞则GameOver
/**
* 碰撞检测
*/
private fun isCollision(
x1: Float,
y1: Float,
w1: Float,
h1: Float,
x2: Float,
y2: Float,
w2: Float,
h2: Float
): Boolean {
if (x1 > x2 + w2 || x1 + w1 < x2 || y1 > y2 + h2 || y1 + h1 < y2) {
return false
}
return true
}
Activity
Activity的工作简单:
- 权限申请:动态申请Camera权限
- 监听游戏状态:创建GameController,并监听GameState状态
private fun startGame() {
PermissionUtils.checkPermission(this, Runnable {
gameController.start()
gameController.gameState.observe(this, Observer {
when (it) {
is GameState.Start ->
score.text = "DANGER\nAHEAD"
is GameState.Score ->
score.text = "${it.score / 10f} m"
is GameState.Over ->
AlertDialog.Builder(this)
.setMessage("游戏结束!成功推进 ${it.score / 10f} 米! ")
.setNegativeButton("结束游戏") { _: DialogInterface, _: Int ->
finish()
}.setCancelable(false)
.setPositiveButton("再来一把") { _: DialogInterface, _: Int ->
gameController.start()
}.show()
}
})
})
}
最后

项目结构很清晰,用到的大都是常规技术,即使是新入坑Android的同学看起来也不费力。在现有基础上还可以通过添加BGM、增加障碍物种类等,进一步提高游戏性。喜欢的话留个star鼓励一下作者吧 ^^
https://github.com/vitaviva/ugame
到此这篇关于Android 实现抖音小游戏潜艇大挑战的思路详解的文章就介绍到这了,更多相关android 抖音游戏潜艇大挑战内容请搜索以前的文章或继续浏览下面的相关文章希望大家以后多多支持!
以上是 Android 实现抖音小游戏潜艇大挑战的思路详解 的全部内容, 来源链接: utcz.com/p/242667.html