vue使用better-scroll实现滑动以及左右联动
本文实例为大家分享了vue实现滑动以及左右联动效果的具体代码,供大家参考,具体内容如下
一、首先需要在项目中引入better-scroll
1. 在package.json 直接写入 "better-scroll":"^1.15.1" 版本以github上为准(目前最新)
2.cpnm install 在node_modules 可以查看版本是否安装
3.直接在你的组件里面写入import BScroll from 'better-scroll';
二、better-scroll优点
1.体验像原生:滚动非常流畅,而且没有滚动条。
2.滚动位置固定:在vue中通过路由切换页面时组件会自动滚动到顶部,需要监听滚动行为才能让滚动位置固定,better-scroll解决了这个问题。
三、下面是在项目中的使用
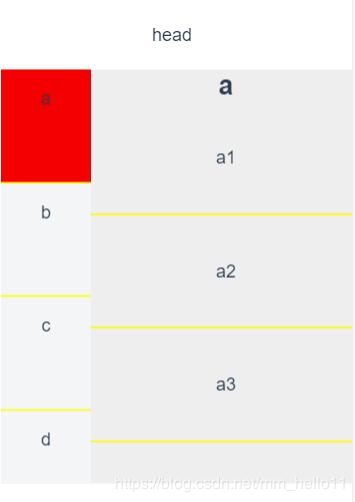
移动端很常见的效果,当滑动右边部分的时候,左边会联动显示与当前内容相符合的标题高亮,当点击左边某一个标题的时候,右边会自动滑动到相应的内容。
项目如下图:
实现及说明
1.滚动效果
better-scroll在使用的时候需要在dom元素渲染完成之后初始化better-scroll的实例,初始化的时候,先要获取需要滑动的元素,然后在初始化的时候将获取到的元素传递给初始化函数,此时便可实现滑动效果
2.左右联动效果
左右联动效果的实现,是better-scroll通过监听事件实现的。
首先获取到右边内容盒子的高度,然后获取到该盒子中每一项的高度并做前n项高度累加(第n项的高度是前n项的高度和)存储到listHeight数组中。在初始化的时候传递属性probeType=3 (探针的效果,时时获取滚动高度),并给右边的内容盒子对象监听scroll事件,从而时时获取Y轴位置,来与listHeight数组中的数据做比较,时时计算当前的索引值,并给对边对应索引值的项添加背景色高亮,从而实现右边滑动,联动左边。
当点击左边的每一项的时候,获取到当前的索引值,并根据当前的索引值获取到与右边内容盒子中对应索引的元素,右边的盒子元素通过监听scrollToElement,并传递获取到的对应索引元素和动画时间,从而实现点击左边,实现右边联动;
实现代码如下:
<template>
<section class="box">
<div class="head">
head
</div>
<div class="content">
<div class="left" ref="left">
<ul>
<li v-for="(item, index) in left" :key="item" :class="{current: currentIndex == index}" @click="selectItem(index, $event)">
<span class="left-item">{{item}}</span>
</li>
</ul>
</div>
<div class="right" ref="right">
<ul>
<li class="right-item right-item-hook" v-for="item in right" :key="item.name">
<h2>{{item.name}}</h2>
<ul>
<li v-for="num in item.content" :key="num.name">
<div>{{item.name+num}}</div>
</li>
</ul>
</li>
</ul>
</div>
</div>
</section>
</template>
<script>
import BScroll from 'better-scroll'
export default {
data () {
return {
left: ['a', 'b', 'c', 'd', 'e', 'f'],
right: [
{
name: 'a',
content: ['1', '2', '3', '4', '5']
},
{
name: 'b',
content: ['1', '2', '3', '4', '5']
},
{
name: 'c',
content: ['1', '2', '3', '4', '5']
},
{
name: 'd',
content: ['1', '2', '3', '4', '5']
},
{
name: 'e',
content: ['1', '2', '3', '4', '5']
},
{
name: 'f',
content: ['1', '2', '3', '4', '5']
},
],
listHeight: [],
scrollY: 0, //实时获取当前y轴的高度
clickEvent: false
}
},
methods: {
_initScroll () {
//better-scroll的实现原理是监听了touchStart,touchend事件,所以阻止了默认的事件(preventDefault)
//所以在这里做点击的话,需要在初始化的时候传递属性click,派发一个点击事件
//在pc网页浏览模式下,点击事件是不会阻止的,所以可能会出现2次事件,所以为了避免2次,可以在绑定事件的时候把$event传递过去
this.lefts = new BScroll(this.$refs.left, {
click: true
})
this.rights = new BScroll(this.$refs.right, {
probeType: 3 //探针的效果,实时获取滚动高度
})
//rights这个对象监听事件,实时获取位置pos.y
this.rights.on('scroll', (pos) => {
this.scrollY = Math.abs(Math.round(pos.y))
})
},
_getHeight () {
let rightItems = this.$refs.right.getElementsByClassName('right-item-hook')
let height = 0
this.listHeight.push(height)
for(let i = 0; i < rightItems.length; i++){
let item = rightItems[i]
height += item.clientHeight
this.listHeight.push(height)
}
},
selectItem(index,event){
this.clickEvent = true
//在better-scroll的派发事件的event和普通浏览器的点击事件event有个属性区别_constructed
//浏览器原生点击事件没有_constructed所以当时浏览器监听到该属性的时候return掉
if(!event._constructed){
return
}else{
let rightItems = this.$refs.right.getElementsByClassName('right-item-hook')
let el = rightItems[index]
this.rights.scrollToElement(el, 300)
}
}
},
mounted () {
this.$nextTick(() => {
this._initScroll()
this._getHeight()
})
},
computed: {
currentIndex () {
for(let i = 0; i < this.listHeight.length; i ++){
let height = this.listHeight[i]
let height2 = this.listHeight[i + 1]
//当height2不存在的时候,或者落在height和height2之间的时候,直接返回当前索引
//>=height,是因为一开始this.scrollY=0,height=0
if(!height2 || (this.scrollY >= height && this.scrollY < height2)){
return i
}
if(this.listHeight[this.listHeight.length - 1] - this.$refs.right.clientHeight <= this.scrollY){
if(this.clickTrue){
return this.currentNum
}else{
return (this.listHeight.length - 1)
}
}
}
//如果this.listHeight没有的话,就返回0
return 0
}
}
}
</script>
<style scoped>
.content{
display: flex;
position: absolute;
top:100px;
bottom:100px;
width:100%;
overflow: hidden;
background: #eee;
}
.left{
flex: 0 0 80px;
width:80px;
background-color: #f3f5f7;
}
.left li{
width: 100%;
height: 100%;
}
.current{
background-color: red;
}
.left-item{
display: block;
width:100%;
height:100px;
line-height: 50px;
text-align: center;
border-bottom:1px solid yellow;
}
.right{
flex: 1;
}
.right-item li{
width:100%;
height:100px;
line-height:100px;
text-align: center;
border-bottom: 1px solid yellow;
}
*{
list-style: none;
margin: 0;
padding: 0;
}
</style>
关于vue.js组件的教程,请大家点击专题vue.js组件学习教程进行学习。
以上就是本文的全部内容,希望对大家的学习有所帮助,也希望大家多多支持。
以上是 vue使用better-scroll实现滑动以及左右联动 的全部内容, 来源链接: utcz.com/p/237441.html