Vue实现左右菜单联动实现

源码传送门:Rain120/vue-study
根据掘金评论需求,更新了数据接口并修复了一些问题
转载https://rain120.github.io/2018/08/11/cascade-menu/
之前在外卖软件上看到这个左右联动的效果,觉得很有意思,所以就尝试使用Vue来实现,将这个联动抽离成为一个单独的组件,废话少说,先来一张效果图。
这个组件分为两个部分,1、左菜单;2、右菜单。
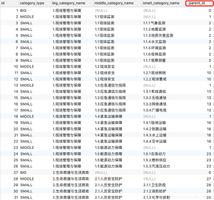
动态数据结构
12 3 4 5 6 7 8 9 10 11 12 13 14 15 16 17 18 19 20 21 22 23 24 25 | menus: [ { name: '菜单1', data: [ { name: '1.1' }, { name: '1.2' }, { name: '1.3' }, { name: '1.4' }, { name: '1.5' }, { name: '1.6' } ] } ] |
data数据是用户自定义增加一些内容,并渲染DOM
左菜单的DOM结构
12 3 4 5 6 7 8 9 10 11 12 13 14 15 16 17 18 | <scroll class="left-menu" :data="menus" ref="leftMenu"> <div class="left-menu-container"> <ul> <li class="left-item" ref="leftItem" :class="{'current': currentIndex === index}" @click="selectLeft(index, $event)" v-for="(menu, index) in menus" :key="index"> <p class="text">{{menu.name}}</p> </li> </ul> </div> </scroll> |
右菜单的DOM结构
12 3 4 5 6 7 8 9 10 11 12 13 14 15 16 17 18 19 20 21 22 | <scroll class="right-menu" :data="menus" ref="rightMenu" @scroll="scrollHeight" :listenScroll="true" :probeType="3"> <div class="right-menu-container"> <ul> <li class="right-item" ref="rightItem" v-for="(menu, i) in menus" :key="i"> <div class="title">{{menu.name}}</div> <ul> <li v-for="(item, j) in menu.data" :key="j"> <div class="data-wrapper"> <div class="data">{{item.name}}</div> </div> </li> </ul> </li> </ul> </div> </scroll> |
这里是为了做demo,所以在数据上只是单纯捏造。
当然因为这是个子组件,我们将通过父组件传递props,所以定义props
12 3 4 5 6 7 8 9 | props: { menus: { required: true, type: Array, default () { return [] } } }, |
在这个业务场景中,我们的实现方式是根据右边菜单滚动的高度来计算左边菜单的位置,当然左边菜单也可以通过点击来确定右边菜单需要滚动多高的距离,那么我们如何获得该容器滚动的距离呢?
之前一直在使用better-scroll,通过阅读文档,我们知道它有有scroll事件,我们可以通过监听这个事件来获取滚动的pos
12 3 4 5 6 | if (this.listenScroll) { let me = this this.scroll.on('scroll', (pos) => { me.$emit('scroll', pos) }) } |
所以我们在右边菜单的scroll组件上监听scroll事件
method
12 3 4 | scrollHeight (pos) { console.log(pos); this.scrollY = Math.abs(Math.round(pos.y)) }, |
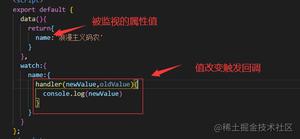
我们将监听得到的pos打出来看看
我们可以看到控制台打出了当前滚动的pos信息,因为在移动端开发时,坐标轴和我们数学中的坐标轴相反,所以上滑时y轴的值是负数
所以我们要得到每一块li的高度,我们可以通过拿到他们的DOM
12 3 4 5 6 7 8 9 10 | _calculateHeight() { let lis = this.$refs.rightItem; let height = 0 this.rightHeight.push(height) Array.prototype.slice.call(lis).forEach(li => { height += li.clientHeight this.rightHeight.push(height) }) console.log(this.rightHeight) } |
我们在created这个hook之后调用这个计算高度的函数
12 3 4 5 6 7 8 9 10 | _calculateHeight() { let lis = this.$refs.rightItem; let height = 0 this.rightHeight.push(height) Array.prototype.slice.call(lis).forEach(li => { height += li.clientHeight this.rightHeight.push(height) }) console.log(this.rightHeight) } |
当用户在滚动时,我们需要计算当前滚动距离实在那个区间内,并拿到他的index
12 3 4 5 6 7 8 9 | computed: { currentIndex () { const { scrollY, rightHeight } = this const index = rightHeight.findIndex((height, index) => { return scrollY >= rightHeight[index] && scrollY < rightHeight[index + 1] }) return index > 0 ? index : 0 } } |
所以当前应该是左边菜单index = 1的菜单项active
以上是左边菜单根据右边菜单的滑动联动的实现,用户也可以通过点击左边菜单来实现右边菜单的联动,此时,我们给菜单项加上click事件
1 | @click="selectLeft(index, $event)" |
这里加上$event是为了区分原生点击事件还是better-scroll派发的事件
12 3 4 5 6 7 8 | selectLeft (index, event) { if (!event._constructed) { return } let rightItem = this.$refs.rightItem let el = rightItem[index] this.$refs.rightMenu.scrollToElement(el, 300) }, |
使用
1 | <cascad-menu :menus="menus"></cascad-menu> |
到这里我们就基本上完成了这些需求了
以上是 Vue实现左右菜单联动实现 的全部内容,
来源链接:
utcz.com/z/377203.html