微信小程序实现签字功能
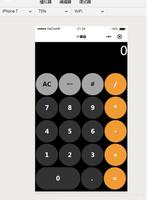
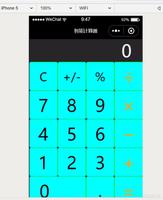
效果展示
准备工作
1.canvas的使用
主要用到了 bindtouchstart , bindtouchmove 两个属性,捕捉手指移动的同时,将移动前的坐标和移动后的坐标用canvas的画图api绘制出来
2.wx.createCanvasContext
这个api用于创建并获取指定canvas对象
代码说明
在wxml中声明一个canvas
指定canvas-id和触摸开始和移动函数
<canvas canvas-id="firstCanvas" id='firstCanvas' bindtouchstart="bindtouchstart" bindtouchmove="bindtouchmove"></canvas>
初始化canvas
onShow: function() {
const context = wx.createCanvasContext('firstCanvas')
this.setData({
context: context
})
context.draw()
},
给手指触摸绑定函数
// 开始触摸
bindtouchstart: function(e) {
console.log("bindtouchstart", e);
this.data.context.moveTo(e.changedTouches[0].x, e.changedTouches[0].y)
},
// 触摸移动
bindtouchmove: function(e) {
console.log("bindtouchstart", e);
this.data.context.lineTo(e.changedTouches[0].x, e.changedTouches[0].y);
this.data.context.stroke();
this.data.context.draw(true);
this.data.context.moveTo(e.changedTouches[0].x, e.changedTouches[0].y);
},
具体代码
index.wxml
<view class="container">
<canvas style="margin: 0 15rpx;width: 720rpx;height: 720rpx;border: 1px #333 solid;background-color: #fff;" canvas-id="firstCanvas" id='firstCanvas' bindtouchstart="bindtouchstart" bindtouchmove="bindtouchmove"></canvas>
<view class="btn">
<view bindtap='clear' class="clear">
清除
</view>
<view bindtap='export' class="submit">
提交
</view>
</view>
<image style="width:360rpx;height:360rpx;margin: 10rpx 0;" mode="aspectFill" src="{{imgUrl}}"></image>
</view>
index.js
Page({
data: {
context: null,
imgUrl: ""
},
/**记录开始点 */
bindtouchstart: function(e) {
this.data.context.moveTo(e.changedTouches[0].x, e.changedTouches[0].y)
},
/**记录移动点,刷新绘制 */
bindtouchmove: function(e) {
this.data.context.lineTo(e.changedTouches[0].x, e.changedTouches[0].y);
this.data.context.stroke();
this.data.context.draw(true);
this.data.context.moveTo(e.changedTouches[0].x, e.changedTouches[0].y);
},
/**清空画布 */
clear: function() {
this.data.context.draw();
},
/**导出图片 */
export: function() {
const that = this;
this.data.context.draw(false, wx.canvasToTempFilePath({
x: 0,
y: 0,
fileType: 'jpg',
canvasId: 'firstCanvas',
success(res) {
const {
tempFilePath
} = res;
that.setData({
imgUrl: tempFilePath,
})
},
fail() {
wx.showToast({
title: '导出失败',
icon: 'none',
duration: 2000
})
}
}))
},
onShow: function() {
const context = wx.createCanvasContext('firstCanvas')
this.setData({
context: context
})
context.draw()
},
})
总结
以上所述是小编给大家介绍的微信小程序实现签字功能,希望对大家有所帮助,如果大家有任何疑问请给我留言,小编会及时回复大家的。在此也非常感谢大家对网站的支持!
如果你觉得本文对你有帮助,欢迎转载,烦请注明出处,谢谢!
以上是 微信小程序实现签字功能 的全部内容, 来源链接: utcz.com/z/354558.html