Android实现Z轴布局效果
如果需要在布局中创造一个层叠的概念,那么使用Android系统中的ViewGroup是不够的,但是可以通过改变ViewGroup的绘制顺序实现
代码下载
继承自FrameLayout
FrameLayout已经帮我们实现了子View的measure和layout过程,我们只需在它的基础上改变绘制顺序即可
自定义LayoutParams
layoutParams的作用是向父布局请求布局参数(MeasureSpec),这个参数会在View inflate时添加到布局中,我们如果使用LayoutParams将会得到很大的方便
// 这里继承FrameLayout的LayoutParams即可
public static class LayoutParams extends FrameLayout.LayoutParams {
public final static int DEFAULT_ZORDER = 1;
public int zOrder;
public LayoutParams(@NonNull Context c, @Nullable AttributeSet attrs) {
super(c, attrs);
TypedArray a = c.obtainStyledAttributes(attrs, R.styleable.ZOrderLayout);
zOrder = a.getInt(R.styleable.ZOrderLayout_layout_zorder, DEFAULT_ZORDER);
a.recycle();
}
}
我们自定义个Attribute,那么就可以在XML中进行使用了
<declare-styleable name="ZOrderLayout">
<attr name="layout_zorder" format="integer"/>
</declare-styleable>
这样我们的View就可以这么使用
<!--layout_zorder 表示该View在第1层-->
<tianrui.viewgroup.MyTextView
android:text="0"
android:layout_width="50dp"
android:layout_height="50dp"
android:background="@android:color/holo_red_light"
app:layout_zorder="1"/>
<!--layout_zorder=2 表示该View在第2层-->
<tianrui.viewgroup.MyTextView
android:text="1"
android:layout_width="50dp"
android:layout_height="50dp"
android:layout_marginLeft="20dp"
android:background="@android:color/holo_blue_light"
app:layout_zorder="2"/>
同时需要重写ViewGroup的generateLayoutParams(),让它生成我们的LayoutParams
初始化绘制顺序
在所有的子View加载完成后初始化需要绘制的顺序(根据我们的ZorderLayoutParams)
@Override
protected void onFinishInflate() {
super.onFinishInflate();
initialZOrder();
}
private void initialZOrder() {
final int childCount = getChildCount();
View view;
ZOrderLayout.LayoutParams params;
for (int i = 0; i < childCount; i++) {
view = getChildAt(i);
params = (LayoutParams) view.getLayoutParams();
Pair<View, Integer> pair = new Pair<>(view, params.zOrder);
list.add(pair);
}
// 根据Zorder属性,进行排序
Collections.sort(list, new Comparator<Pair<View, Integer>>() {
@Override
public int compare(Pair<View, Integer> o1, Pair<View, Integer> o2) {
return o1.second - o2.second;
}
});
}
获取所有的子View,然后根据他们的ZOrder进行排序,onFinishInflate()会在装载完所有的子View后进行回调
改变View的绘制顺序
这里使用排好序的View绘制顺序就可以了, 记得调用setChildrenDrawingOrderEnabled(true);
@Override
protected int getChildDrawingOrder(int childCount, int i) {
return indexOfChild(list.get(i).first);
}
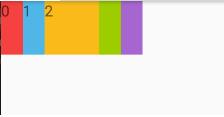
Demo演示
<?xml version="1.0" encoding="utf-8"?>
<tianrui.viewgroup.view.ZOrderLayout
xmlns:android="http://schemas.android.com/apk/res/android"
xmlns:app="http://schemas.android.com/apk/res-auto"
android:layout_width="match_parent"
android:layout_height="match_parent">
<tianrui.viewgroup.MyTextView
android:text="0"
android:layout_width="50dp"
android:layout_height="50dp"
android:background="@android:color/holo_red_light"
app:layout_zorder="1"/>
<tianrui.viewgroup.MyTextView
android:text="1"
android:layout_width="50dp"
android:layout_height="50dp"
android:layout_marginLeft="20dp"
android:background="@android:color/holo_blue_light"
app:layout_zorder="2"/>
<tianrui.viewgroup.MyTextView
android:text="2"
android:layout_width="50dp"
android:layout_height="50dp"
android:layout_marginLeft="40dp"
android:background="@android:color/holo_orange_light"
app:layout_zorder="3"/>
<tianrui.viewgroup.MyTextView
android:text="3"
android:layout_width="50dp"
android:layout_height="50dp"
android:layout_marginLeft="60dp"
android:background="@android:color/holo_green_light"
app:layout_zorder="2"/>
<tianrui.viewgroup.MyTextView
android:text="4"
android:layout_width="50dp"
android:layout_height="50dp"
android:layout_marginLeft="80dp"
android:background="@android:color/holo_purple"
app:layout_zorder="1"/>
</tianrui.viewgroup.view.ZOrderLayout>
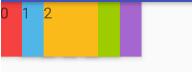
可以看出这个布局是中间的zorder最高,表示中间的会压在两边的上边,而最左(右)的绘制层级(zorder)为1, 表示会绘制在最下面
完整代码
public class ZOrderLayout extends FrameLayout {
private List<Pair<View, Integer>> list = new ArrayList<>();
public ZOrderLayout(@NonNull Context context) {
this(context, null);
}
public ZOrderLayout(@NonNull Context context, @Nullable AttributeSet attrs) {
this(context, attrs, 0);
}
public ZOrderLayout(@NonNull Context context, @Nullable AttributeSet attrs, @AttrRes int defStyleAttr) {
super(context, attrs, defStyleAttr);
setChildrenDrawingOrderEnabled(true);
}
@Override
protected int getChildDrawingOrder(int childCount, int i) {
return indexOfChild(list.get(i).first);
}
@Override
protected void onFinishInflate() {
super.onFinishInflate();
initialZOrder();
}
private void initialZOrder() {
final int childCount = getChildCount();
View view;
ZOrderLayout.LayoutParams params;
for (int i = 0; i < childCount; i++) {
view = getChildAt(i);
params = (LayoutParams) view.getLayoutParams();
Pair<View, Integer> pair = new Pair<>(view, params.zOrder);
list.add(pair);
}
Collections.sort(list, new Comparator<Pair<View, Integer>>() {
@Override
public int compare(Pair<View, Integer> o1, Pair<View, Integer> o2) {
return o1.second - o2.second;
}
});
}
/**
* 在解析xml时,会解析每个跟布局的LayoutParams
*/
@Override
public LayoutParams generateLayoutParams(AttributeSet attrs) {
return new LayoutParams(getContext(), attrs);
}
public static class LayoutParams extends FrameLayout.LayoutParams {
public final static int DEFAULT_ZORDER = 1;
public int zOrder;
public LayoutParams(@NonNull Context c, @Nullable AttributeSet attrs) {
super(c, attrs);
TypedArray a = c.obtainStyledAttributes(attrs, R.styleable.ZOrderLayout);
zOrder = a.getInt(R.styleable.ZOrderLayout_layout_zorder, DEFAULT_ZORDER);
a.recycle();
}
}
}
以上就是本文的全部内容,希望对大家的学习有所帮助,也希望大家多多支持。
以上是 Android实现Z轴布局效果 的全部内容, 来源链接: utcz.com/p/242960.html