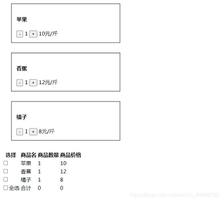
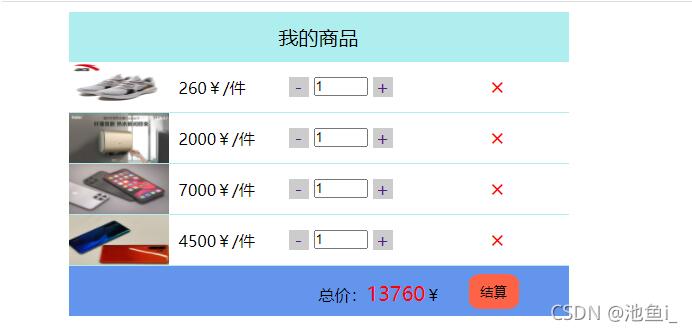
Vue模拟实现购物车结算功能
本文实例为大家分享了Vue实现购物车结算功能的具体代码,供大家参考,具体内容如下
<!DOCTYPE html>
<html lang="en">
<head>
<meta charset="UTF-8">
<meta http-equiv="X-UA-Compatible" content="IE=edge">
<meta name="viewport" content="width=device-width, initial-scale=1.0">
<title>Document</title>
<script src="js/vue.js" type="text/javascript"></script>
<script src="js/jquery-3.6.0.js" type="text/javascript"></script>
<style type="text/css">
* {
padding: 0;
margin: 0
}
a {
text-decoration: none;
}
.container {
width: 500px;
margin: 10px auto;
}
.title {
width: 500px;
height: 50px;
text-align: center;
line-height: 50px;
font-size: 20px;
background-color: paleturquoise;
}
.item {
position: relative;
height: 50px;
border-bottom: 1px solid paleturquoise;
}
.item img {
float: left;
width: 100px;
height: 50px;
}
.item .price {
position: absolute;
float: left;
width: 120px;
margin-left: 10px;
top: 15px;
left: 100px;
}
.item .change {
position: absolute;
left: 220px;
top: 15px;
float: left;
width: 200px;
}
.change a {
float: left;
display: block;
width: 20px;
height: 20px;
font-size: 18px;
text-align: center;
line-height: 20px;
background-color: #ccc;
}
.change input {
float: left;
width: 50px;
margin: 0 5px;
}
.item .del {
position: absolute;
top: 8px;
left: 420px;
color: red;
font-size: 24px;
}
.item .del:hover {
top: 0;
height: 50px;
background-color: blue;
}
.total {
position: relative;
width: 500px;
height: 50px;
background-color: cornflowerblue;
}
.total span {
position: absolute;
top: 14px;
left: 250px;
}
.total span em {
color: red;
font-style: normal;
font-size: 20px;
}
.total button {
position: absolute;
top: 8px;
left: 400px;
width: 50px;
height: 35px;
border-radius: 25%;
border: none;
outline: none;
background-color: tomato;
}
</style>
</head>
<body>
<div id="app">
<div>
<div class="container">
<my-cart></my-cart>
</div>
</div>
</div>
<script type="text/javascript">
// 三个子组件
var CartTitle = {
props: ['uname'],
template: `<div class="title">{{uname}}的商品</div>`
}
var CartList = {
props: ['list'],
template: ` <div class="list">
<div class="item" :key="item.id" v-for="item in list">
<img :src="item.img" alt="">
<div class="price">{{item.price}}¥/件</div>
<div class="change">
<a href="" @click.prevent=" sub(item.id)">-</a>
<input type="text" class="num" :value="item.num" @blur="changenum(item.id,$event)">
<a href="" @click.prevent=" add(item.id)">+</a>
</div>
<div class="del" @click="del(item.id)">×</div>
</div>
</div>
`,
methods: {
// 向父组件传递需要删除的id
del: function(id) {
// console.log(id);
this.$emit("del-cart", id);
},
// 修改表单输入的数量
changenum: function(id, event) {
//console.log(id, event.target.value);
// 向父组件传递然后再修改数量
this.$emit('change-num', {
id: id,
num: event.target.value
})
},
// 点击减号按钮
sub: function(id) {
this.$emit('sub-num', id);
},
//点击加号按钮
add: function(id) {
this.$emit('add-num', id);
}
}
}
var CartTotal = {
props: ['list'],
template: `<div class="total">
<span>总价:<em>{{total}}</em>¥</span>
<button>结算</button>
</div>`,
computed: {
total: function() {
var sum = 0;
this.list.forEach(item => {
sum += item.price * item.num;
});
return sum;
}
}
}
// 定义父组件
Vue.component('my-cart', {
data: function() {
return {
uname: '我',
list: [{
id: 1,
name: '安踏鞋子',
price: 260,
num: 1,
img: 'img/a.jpg'
}, {
id: 2,
name: '海尔热水器',
price: 2000,
num: 1,
img: 'img/hai.jpg'
}, {
id: 3,
name: 'iphone手机',
price: 7000,
num: 1,
img: 'img/iphone.jpg'
}, {
id: 4,
name: '华为手机',
price: 4500,
num: 1,
img: 'img/h.jpg'
}]
}
},
template: `<div class="mycart">
<cart-title :uname="uname"></cart-title>
<cart-list :list="list" @del-cart="delcart($event)" @change-num="changeNum($event)" @sub-num="subnum($event)" @add-num="addnum($event)"></cart-list>
<cart-total :list="list"></cart-total>
</div>`,
components: {
'cart-title': CartTitle,
'cart-list': CartList,
'cart-total': CartTotal,
},
methods: {
delcart: function(id) {
// 根据id删除list中对应的数据
// 1.找到id对应数据的索引
var index = this.list.findIndex(item => {
return item.id == id;
});
// 2.根据索引删除对应的数据
this.list.splice(index, 1);
},
// 根据id修改list中的数量num
changeNum: function(val) {
//console.log(val);
this.list.some(item => {
if (item.id == val.id) {
item.num = val.num;
}
})
},
//减号减少num
subnum: function(event) {
// console.log(event); event是点击的id号
this.list.some(item => {
if (item.id == event && item.num > 0) {
item.num--;
}
})
},
// 加号增加num
addnum: function(event) {
this.list.some(item => {
if (item.id == event) {
item.num++;
}
})
}
}
});
var vm = new Vue({
el: "#app",
data: {
}
});
</script>
</body>
</html>
以上就是本文的全部内容,希望对大家的学习有所帮助,也希望大家多多支持。
以上是 Vue模拟实现购物车结算功能 的全部内容, 来源链接: utcz.com/p/239662.html