五个简单的 Torch 例子
上一讲我们已经安装好了 Torch,接下来我们将会列出 5 个简单的 Torch 入门操作案例:
require 'torch'自动引入 Torch,代替你引入 th
1、定义正定二次型
rand()产生均匀分布的拉张量t()调换一个张量(注意,它返回一个新的视图)dot()执行2张量之间的点积eye()返回一个单位矩阵*运算符对矩阵(执行矩阵向量或矩阵矩阵乘法)
我们首先确保随机种子每个地方都是一样的。
torch.manualSeed(1234)-- choose a dimensionN = 5
-- create a random NxN matrix
A = torch.rand(N, N)
-- make it symmetric positive
A = A*A:t()
-- make it definite
A:add(0.001, torch.eye(N))
-- add a linear term
b = torch.rand(N)
-- create the quadratic form
function J(x)
return 0.5*x:dot(A*x)-b:dot(x)
end
可以很容易地用打印函数值(在一个随机点上):
print(J(torch.rand(N)))2、找到确切的最小值
我们可以逆矩阵(可能不是数值最优的)。
xs = torch.inverse(A)*bprint(string.format('J(x^*) = %g', J(xs)))
3.通过梯度下降搜索最小值
我们首先定义梯度关于w.r.t. x of J(x):
function dJ(x) return A*x-b
end
然后定义一些当前的解决方案:
x = torch.rand(N)然后应用梯度下降(给定的学习率lr)一段时间:
lr = 0.01for i=1,20000 do
x = x - dJ(x)*lr
-- we print the value of the objective function at each iteration
print(string.format('at iter %d J(x) = %f', i, J(x)))
end
你将会看到
...at iter 19995 J(x) = -3.135664
at iter 19996 J(x) = -3.135664
at iter 19997 J(x) = -3.135665
at iter 19998 J(x) = -3.135665
at iter 19999 J(x) = -3.135665
at iter 20000 J(x) = -3.135666
4. 使用优化软件包
想用更先进的优化技术,如共轭梯度或LBFGS?优化方案是有目的的!首先,我们需要安装它:
luarocks install optim定义一个局部变量 实际上,使用全局变量永远不是个好主意。到处使用本地。在我们的示例中,我们定义了全局中的所有内容,以便可以在解释器命令行中剪切和粘贴它们。的确,定义一个本地的:
local A = torch.rand(N, N)只对当前作用域可用,在运行解释器时,它仅限于当前输入行。后续行将无法访问此本地。
Lua可以用do...end指令定义一个范围:
do local A = torch.rand(N, N)
print(A)
end
print(A)
如果你剪切和粘贴命令行中,第一次打印将是一个5X5矩阵(因为当地是范围的持续时间定义do...end),但将零之后
定义一个闭包 我们需要定义一个返回j(x)和dj(x)的闭包。在这里,我们定义了一个范围do...end,使得局部变量神经是– JdJ(X):只有JdJ(x)会意识到它。值得注意的是,在一个脚本中,一个不需要do...end范围,作为神经的范围会在脚本文件结束(而不是直线命令行结束)。
do local neval = 0
function JdJ(x)
local Jx = J(x)
neval = neval + 1
print(string.format('after %d evaluations J(x) = %f', neval, Jx))
return Jx, dJ(x)
end
end
训练与优化 默认情况下,包没有加载,所以我们需要它:
require 'optim'我们首先定义共轭梯度的状态:
state = { verbose = true,
maxIter = 100
}
然后开始训练
x = torch.rand(N)optim.cg(JdJ, x, state)
你可以看到如下代码:
after 120 evaluation J(x) = -3.136835after 121 evaluation J(x) = -3.136836
after 122 evaluation J(x) = -3.136837
after 123 evaluation J(x) = -3.136838
after 124 evaluation J(x) = -3.136840
after 125 evaluation J(x) = -3.136838
5. Plot 绘图
可以通过多种方式实现绘图。例如,可以使用最近的itorch包。在这里,我们将使用gnuplot。
luarocks install gnuplot存储中间功能评价 我们稍微修改了以前的闭包,这样它就存储了中间函数的评估(以及到目前为止训练的实时性):
evaluations = {}time = {}
timer = torch.Timer()
neval = 0
function JdJ(x)
local Jx = J(x)
neval = neval + 1
print(string.format('after %d evaluations, J(x) = %f', neval, Jx))
table.insert(evaluations, Jx)
table.insert(time, timer:time().real)
return Jx, dJ(x)
end
接下来我们开始训练:
state = { verbose = true,
maxIter = 100
}
x0 = torch.rand(N)
cgx = x0:clone() -- make a copy of x0
timer:reset()
optim.cg(JdJ, cgx, state)
-- we convert the evaluations and time tables to tensors for plotting:
cgtime = torch.Tensor(time)
cgevaluations = torch.Tensor(evaluations)
增加对随机梯度下降的支持 让我们使用Optim添加随机梯度训练:
evaluations = {}time = {}
neval = 0
state = {
lr = 0.1
}
-- we start from the same starting point than for CG
x = x0:clone()
-- reset the timer!
timer:reset()
-- note that SGD optimizer requires us to do the loop
for i=1,1000 do
optim.sgd(JdJ, x, state)
table.insert(evaluations, Jx)
end
sgdtime = torch.Tensor(time)
sgdevaluations = torch.Tensor(evaluations)
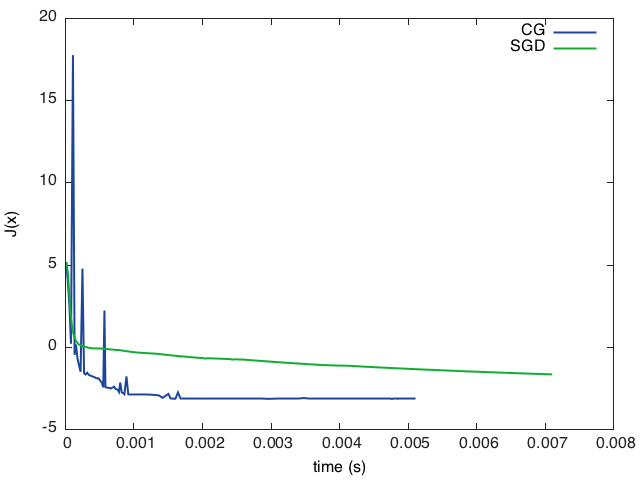
绘制图表 我们现在可以绘制图表了。一个简单的方法是使用gnuplot绘制(x,y)。在这里,我们先用gnuplot。figure()确保地块在不同的人物。
require 'gnuplot'gnuplot.figure(1)gnuplot.title('CG loss minimisation over time')
gnuplot.plot(cgtime, cgevaluations)
gnuplot.figure(2)
gnuplot.title('SGD loss minimisation over time')
gnuplot.plot(sgdtime, sgdevaluations)
更高级的方法是在同一个图上绘制所有的图,如下所示。这里我们将所有内容保存在PNG文件中。
gnuplot.pngfigure('plot.png')gnuplot.plot(
{'CG', cgtime, cgevaluations, '-'},
{'SGD', sgdtime, sgdevaluations, '-'})
gnuplot.xlabel('time (s)')
gnuplot.ylabel('J(x)')
gnuplot.plotflush()

以上是 五个简单的 Torch 例子 的全部内容, 来源链接: utcz.com/p/233590.html


