微信小程序实现加入购物车滑动轨迹
本文实例为大家分享了微信小程序实现加入购物车滑动轨迹的具体代码,供大家参考,具体内容如下
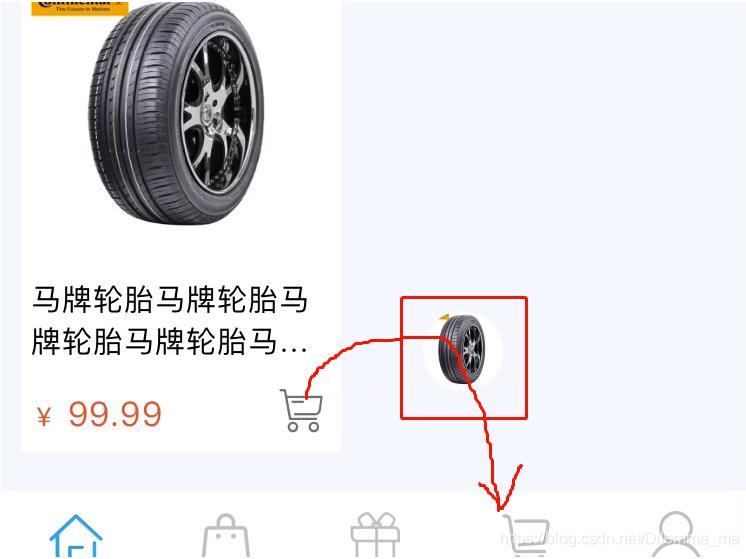
index.wxss
.good_box {
width: 80rpx;
height: 80rpx;
position: fixed;
border-radius: 50%;
overflow: hidden;
left: 50%;
top: 50%;
z-index: 99;
}
index.wxml
<view class="iconfont icongouwuche recommend_item_shopcar" bindtap="touchOnGoods"></view>
<view class="good_box" hidden="{{hide_good_box}}" style="left: {{bus_x}}px; top: {{bus_y}}px;">
<image class="image" src="/img/luntai2.png"></image>
</view>
**app.js **
//app.js
App({
onLaunch: function() {
//调用API从本地缓存中获取数据
// var logs = wx.getStorageSync('logs') || []
// logs.unshift(Date.now())
// wx.setStorageSync('logs', logs)
this.screenSize();
},
getUserInfo: function(cb) {
var that = this
if (this.globalData.userInfo) {
typeof cb == "function" && cb(this.globalData.userInfo)
} else {
//调用登录接口
wx.login({
success: function() {
wx.getUserInfo({
success: function(res) {
that.globalData.userInfo = res.userInfo
typeof cb == "function" && cb(that.globalData.userInfo)
}
})
}
})
}
},
//获取屏幕[宽、高]
screenSize: function() {
var that = this;
wx.getSystemInfo({
success: function(res) {
that.globalData.ww = res.windowWidth;
that.globalData.hh = res.windowHeight;
}
})
},
/**
* @param sx 起始点x坐标
* @param sy 起始点y坐标
* @param cx 控制点x坐标
* @param cy 控制点y坐标
* @param ex 结束点x坐标
* @param ey 结束点y坐标
* @param part 将起始点到控制点的线段分成的份数,数值越高,计算出的曲线越精确
* @return 贝塞尔曲线坐标
*/
bezier: function(points, part) {
let sx = points[0]['x'];
let sy = points[0]['y'];
let cx = points[1]['x'];
let cy = points[1]['y'];
let ex = points[2]['x'];
let ey = points[2]['y'];
var bezier_points = [];
// 起始点到控制点的x和y每次的增量
var changeX1 = (cx - sx) / part;
var changeY1 = (cy - sy) / part;
// 控制点到结束点的x和y每次的增量
var changeX2 = (ex - cx) / part;
var changeY2 = (ey - cy) / part;
//循环计算
for (var i = 0; i <= part; i++) {
// 计算两个动点的坐标
var qx1 = sx + changeX1 * i;
var qy1 = sy + changeY1 * i;
var qx2 = cx + changeX2 * i;
var qy2 = cy + changeY2 * i;
// 计算得到此时的一个贝塞尔曲线上的点
var lastX = qx1 + (qx2 - qx1) * i / part;
var lastY = qy1 + (qy2 - qy1) * i / part;
// 保存点坐标
var point = {};
point['x'] = lastX;
point['y'] = lastY;
bezier_points.push(point);
}
//console.log(bezier_points)
return {
'bezier_points': bezier_points
};
},
globalData: {
ww:'',
hh:''
}
})
index.js
//index.js
//获取应用实例
const app = getApp()
Page({
data: {
indicatorDots: true,
vertical: false,
autoplay: false,
interval: 2000,
duration: 500,
hide_good_box: true,
},
onLoad: function () {
this.busPos = {};
this.busPos['x'] = app.globalData.ww / 1.4; //1.4修改轨迹结束时x轴的位置,2是在正中心
this.busPos['y'] = app.globalData.hh - 10;
console.log('购物车坐标', this.busPos)
},
onShow(){
app.editTabBar(); //显示自定义的底部导航
},
tosearchpage(e){
wx.navigateTo({
url: '',
})
},
touchOnGoods: function (e) {
// 如果good_box正在运动
if (!this.data.hide_good_box) return;
this.finger = {};
var topPoint = {};
this.finger['x'] = e.touches["0"].clientX;
this.finger['y'] = e.touches["0"].clientY;
if (this.finger['y'] < this.busPos['y']) {
topPoint['y'] = this.finger['y'] - 150;
} else {
topPoint['y'] = this.busPos['y'] - 150;
}
topPoint['x'] = Math.abs(this.finger['x'] - this.busPos['x']) / 2;
if (this.finger['x'] > this.busPos['x']) {
topPoint['x'] = (this.finger['x'] - this.busPos['x']) / 2 + this.busPos['x'];
} else {
topPoint['x'] = (this.busPos['x'] - this.finger['x']) / 2 + this.finger['x'];
}
this.linePos = app.bezier([this.finger, topPoint, this.busPos], 20);
this.startAnimation();
},
startAnimation: function () {
var index = 0,
that = this,
bezier_points = that.linePos['bezier_points'],
len = bezier_points.length - 1;
this.setData({
hide_good_box: false,
bus_x: that.finger['x'],
bus_y: that.finger['y']
})
this.timer = setInterval(function () {
index++;
that.setData({
bus_x: bezier_points[index]['x'],
bus_y: bezier_points[index]['y']
})
if (index >= len) {
clearInterval(that.timer);
that.setData({
hide_good_box: true,
})
}
}, 15);
},
})
为大家推荐现在关注度比较高的微信小程序教程一篇:《微信小程序开发教程》小编为大家精心整理的,希望喜欢。
以上就是本文的全部内容,希望对大家的学习有所帮助,也希望大家多多支持。
以上是 微信小程序实现加入购物车滑动轨迹 的全部内容, 来源链接: utcz.com/p/218809.html

