React Native的学习之小练习-登录页

在项目中,有ios和Android的区别,不同的设备显示的内容也会有些差异,所以,布局时有时要改不同的样式才能显示一样的效果,所以可以把两个文件都映射到一个文件中只修改一个文件就可以达到这样的效果。先新建一个login.js.内容如下:
/** * Sample React Native App
* https://github.com/facebook/react-native
* @flow
*/
import React, { Component } from 'react';
import {
AppRegistry,
StyleSheet,
Text,
View,
Image,
TextInput
} from 'react-native';
class Login extends Component {
render() {
return (
<View style={styles.container}>
<Image style={styles.Icon} source={require('./imgs/hb.jpg')}/>
<TextInput
style={styles.userStyle}
placeholder='请输入用户名'
clearButtonMode='always' //never 永远不显示删除 always 一直显示
clearTextOnFocus={true} //获取焦点时是否清空文字 、
enablesReturnKeyAutomatically={false} //是否自动启用回车键,有内容就显示,没有就不启用
returnKeyType = 'go' //回车键上的文字: go前往 join加入 next 下一项 route路线 send 发送 search 搜索
onChangeText={()=>{console.warn('用户名是...')}} //文字修改完重新给state的query赋值
/>
<TextInput
style={styles.userStyle}
placeholder='请输入密码'
clearButtonMode='always' //never 永远不显示删除 always 一直显示
clearTextOnFocus={true} //获取焦点时是否清空文字
password={true}
enablesReturnKeyAutomatically={false} //是否自动启用回车键,有内容就显示,没有就不启用
returnKeyType = 'go' //回车键上的文字: go前往 join加入 next 下一项 route路线 send 发送 search 搜索
onChangeText={()=>{console.warn('用户名是...')}} //文字修改完重新给state的query赋值
/>
<View style={styles.loginStyle}>
<Text style={styles.instructions}>
登录
</Text>
</View>
<View style={styles.more}>
<Text style={styles.welcome}>
忘记密码
</Text>
<Text style={styles.instructions}>
注册
</Text>
</View>
<View style={styles.otherLoginStyle}>
<Text style={styles.instructions}>
其他登录方式:
</Text>
<Image style={styles.icons} source={require('./imgs/hb.jpg')}/>
<Image style={styles.icons} source={require('./imgs/hb.jpg')}/>
<Image style={styles.icons} source={require('./imgs/hb.jpg')}/>
</View>
</View>
);
}
}
const styles = StyleSheet.create({
container:{
flex: 1,
alignItems:'center',
backgroundColor:'#F5FCFF'
},
Icon:{
width:200,
height:200,
borderRadius:100,
marginTop:20,
marginBottom:20,
},
userStyle:{
width:300,
height:50,
textAlign:'center',
// borderWidth:1,
backgroundColor:'#ededed',
marginBottom:10,
},
loginStyle:{
width:200,
marginBottom:10,
alignItems:'center',
backgroundColor:'pink',
},
more:{
flexDirection:'row',
width:200,
justifyContent:'space-between',
},
otherLoginStyle:{
flexDirection:'row',
alignItems:'center',
position:'absolute',
left:10,
bottom:20,
},
icons:{
width:50,
height:50,
borderRadius:25,
marginLeft:5,
},
});
module.exports = Login
写完这个页面了,要在index.android.js和index.ios.js中引入这个组件,才能映射到这一个文件中,在这两个文件中可以直接这么写:
/** * Sample React Native App
* https://github.com/facebook/react-native
* @flow
*/
import React, { Component } from 'react';
import {
AppRegistry,
StyleSheet,
Text,
View
} from 'react-native';
import Login from './login.js';
export default class Project extends Component {
render() {
return (
<Login />
);
}
}
AppRegistry.registerComponent('Project', () => Project);
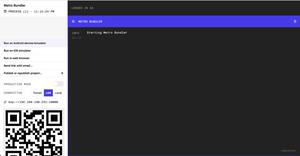
就可以一进来就到登录页了,贴张图:
可能样式有些不太好看,就先这样看着吧,TextInput组件在Android上有个线,想去掉的话,加上那个属性就可以,我的博客里有一个写TextInput的,想了解的小伙伴可以戳TextInput。
简单的登录页出来了。
有什么宝贵意见建议,可以在下方留言哦!十分感谢!
以上是 React Native的学习之小练习-登录页 的全部内容, 来源链接: utcz.com/z/382863.html