React Native登录之指纹登录篇的示例代码

React Native登录之指纹登录篇,具体内容如下所示:
最近在做react-native的APP,项目登录使用了普通账号密码登录、短信登录、手势登陆、指纹登录和人脸识别登录五种方式,所以准备做一个登录方式的合集。本篇是指纹登录篇,通过手机调用指纹传感器来获取用户指纹并做校验,校验成功则自动登录。
首先展示我们最后达成的成果,毕竟无图无真相,下方是真机录屏gif:
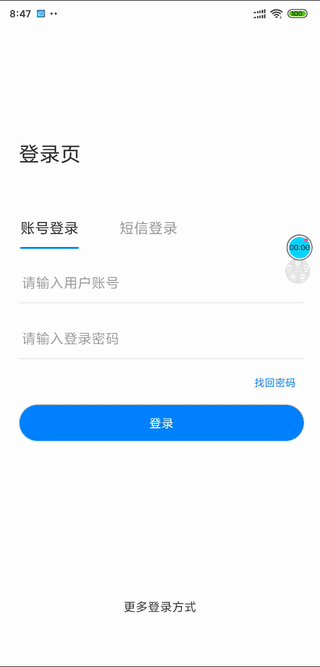
分析下gif所展示的功能点:
1,通过点击操作选项来弹出指纹识别界面,点击取消/上方空白处取消指纹识别
2,切换到其他登录方式时,仍然可以调用"更多操作方式"来唤起指纹识别
经过功能点分析,我们可以看出,现在需要一个指纹识别的组件,通过操作弹出项来唤起/切换指纹识别的组件。操作项组件我们可以选择antd-mobile-rn的ActionSheet组件,指纹识别组件使用react-native-fingerprint-scanner,在github上有642个star,想必是值得信任的,附上组件地址https://github.com/hieuvp/react-native-fingerprint-scanner。(多句嘴,模拟器是没有指纹识别的功能的,请使用真机调试)。
接下来按照文档一通操作,下载,跑demo,不出所料有问题出现了。
官方demo使用的是react16之前的class写法,并且对于唤起/隐藏指纹识别的地方写的有些模糊,所以我们需要仔细梳理并用新的函数式组件写法来重写一次。
指纹识别的过程应该如下:
1,判断设备是否支持指纹识别
2,判断android API是否低于23,因为android 6.0之后官方才支持了指纹识别的api接口,所以如果android API<23我们需要对低版本手机做适配
3,从指纹组件react-native-fingerprint-scanner引入FingerprintScanner,调用FingerprintScanner.authenticate方法来唤起指纹组件
4,点击取消/上方空白处隐藏指纹组件
5,指纹识别成功写对应的事件,如登录事件
按照指纹识别的流程,我们在FingerPrint/index.tsx下写指纹组件,关键代码都写了注释:
import React, {Component, useState, useCallback} from 'react';
import {
Alert,
Image,
Text,
TouchableOpacity,
View,
ViewPropTypes,
Platform,
StyleSheet,
} from 'react-native';
import FingerprintScanner from 'react-native-fingerprint-scanner';
import ShakingText from './ShakingText.component';
import {connector, ModelState} from '@/models/connect';
import {useFocusEffect} from "@react-navigation/native";
interface Props extends ModelState{
fingerPrint,
setFingerPrint,
}
const FingerPrintPopup: React.FC<Props> = React.memo(props => {
let {fingerPrint, setFingerPrint,dispatch} = props;
const description = null;
const [LegacyInfo, setLegacyInfo] = useState({
errorMessageLegacy: undefined,
biometricLegacy: undefined
})
useFocusEffect(
React.useCallback(() => {
console.log("进入指纹组件");
//判断设备是否支持指纹识别
detectFingerprintAvailable();
//判断Android API是不是<23,高于此版本使用标准指纹解锁api;低于此版本使用兼容适配版本
if (requiresLegacyAuthentication()) {
authLegacy();
} else {
authCurrent();
}
return () => {
console.log("离开指纹组件");
//组件卸载,停止指纹监听指纹扫描器并释放内部缓存
FingerprintScanner.release();
}
}, [])
)
//判断安卓版本
function requiresLegacyAuthentication() {
return Platform.Version < 23;
}
//控制指纹组件消失
const handleFingerprintDismissed = () => {
setFingerPrint({
...fingerPrint,
popupShowed: false
});
};
//检测手机是否支持指纹识别
const detectFingerprintAvailable = () => {
FingerprintScanner
.isSensorAvailable()
.catch(error => {
Alert.alert("您的设备不支持指纹识别,请选择其他方式登录")
setFingerPrint({
...fingerPrint,
errorMessage: error.message,
biometric: error.biometric,
popupShowed: false,
})
});
}
//android API>23时,调用authCurrent
const authCurrent = () => {
FingerprintScanner
.authenticate({title: '指纹登录', cancelButton: '取消'})
.then(() => {
//离开页面时将popupShowed置为false
handleFingerprintDismissed();
//指纹验证成功后的事件,比如登录
successVerify();
})
.catch(() => {
//点击取消或上方空白区隐藏组件后,将popupShowed置为false
//这里是控制指纹组件切换显示/隐藏的关键!
handleFingerprintDismissed();
})
}
//指纹验证成功后的事件,比如登录
const successVerify = () => {
dispatch({
type: 'user/login',
payload: {
username: "张三",
password: '123456',
}
});
}
//android API<23时调用指纹组件的兼容写法
const authLegacy = () => {
FingerprintScanner
.authenticate({onAttempt: handleAuthenticationAttemptedLegacy})
.then(() => {
//指纹验证成功
handleFingerprintDismissed();
Alert.alert('指纹身份验证', '身份验证成功');
successVerify();
})
.catch((error) => {
//指纹验证失败
setLegacyInfo({errorMessageLegacy: error.message, biometricLegacy: error.biometric});
description.shake();
handleFingerprintDismissed();
});
}
//当用户尝试扫描指纹但失败时的回调函数
const handleAuthenticationAttemptedLegacy = (error) => {
setLegacyInfo({
...LegacyInfo,
errorMessageLegacy: error.message
});
description.shake();
};
//手动写一个指纹验证的组件
const renderLegacy = (
<View style={styles.container}>
<View style={styles.contentContainer}>
<Image
style={styles.logo}
source={require('../../../assets/login/finger_print.png')}
/>
<Text style={styles.heading}>
生物识别{'\n'}身份验证
</Text>
<ShakingText
ref={(instance) => {
description = instance;
}}
style={styles.description(!!LegacyInfo.errorMessageLegacy)}>
{LegacyInfo.errorMessageLegacy || `Scan your ${LegacyInfo.biometricLegacy} on the\ndevice scanner to continue`}
</ShakingText>
<TouchableOpacity
style={styles.buttonContainer}
onPress={handleFingerprintDismissed}
>
<Text style={styles.buttonText}>
返回
</Text>
</TouchableOpacity>
</View>
</View>
);
return () => {
//android API>23时,不需要渲染;否则渲染renderLegacy的组件
if (requiresLegacyAuthentication()) {
return renderLegacy
}
return null;
}
})
export default connector(FingerPrintPopup);
const styles = StyleSheet.create({
container: {
position: 'absolute',
top: 0,
bottom: 0,
left: 0,
right: 0,
backgroundColor: 'rgba(0, 164, 222, 0.9)',
flexDirection: 'column',
justifyContent: 'center',
alignItems: 'center',
},
contentContainer: {
flexDirection: 'column',
justifyContent: 'center',
alignItems: 'center',
backgroundColor: '#ffffff',
},
logo: {
marginVertical: 45,
},
heading: {
textAlign: 'center',
color: '#00a4de',
fontSize: 21,
},
description: (error) => {
return {
textAlign: 'center',
color: error ? '#ea3d13' : '#a5a5a5',
height: 65,
fontSize: 18,
marginVertical: 10,
marginHorizontal: 20,
}
},
buttonContainer: {
padding: 20,
},
buttonText: {
color: '#8fbc5a',
fontSize: 15,
fontWeight: 'bold',
},
});
可以看出来,android API在23以上版本是不需要渲染指纹识别组件的,23以下版本需要自己手动写一个渲染的组件,引用了一个ShakingText组件,这个组件官网有给,我们直接复制过来就可以,在ShakingText.component.js写:
import PropTypes from 'prop-types';
import React, { Component } from 'react';
import {
Animated,
Text,
} from 'react-native';
class ShakingText extends Component {
componentWillMount() {
this.shakedValue = new Animated.Value(0);
}
get animatedStyle() {
return {
transform: [
{
translateY: this.shakedValue.interpolate({
inputRange: [0, 0.1, 0.2, 0.3, 0.4, 0.5, 0.6, 0.7, 0.8, 0.9, 1],
outputRange: [0, 10, -15, 12, -9, 18, -7, 10, -11, 5, 0],
}),
},
{
translateX: this.shakedValue.interpolate({
inputRange: [0, 0.1, 0.2, 0.3, 0.4, 0.5, 0.6, 0.7, 0.8, 0.9, 1],
outputRange: [0, 2, -3, 4, -4, 3, -3, 4, -5, 2, 0],
}),
},
],
};
}
shake = () => {
this.shakedValue.setValue(0);
Animated.spring(this.shakedValue, {
toValue: 1,
friction: 3,
tension: 10,
}).start(() => this.shakedValue.setValue(0));
};
render() {
return (
<Animated.Text
{...this.props}
style={[this.animatedStyle, this.props.style]}
/>
);
}
}
ShakingText.propTypes = {
children: PropTypes.oneOfType([
PropTypes.arrayOf(PropTypes.node),
PropTypes.node
]),
style:Text.propTypes.style,
};
export default ShakingText;
写好了指纹组件,接下来我们需要使用ActionSheet组件来切换和控制指纹组件的显示隐藏。控制指纹组件的显示隐藏我们使用popupShowed这个变量来控制,将它放在state中。我们在LoginSheet/index.tsx下写:
import React,{useState} from 'react';
import {View, Text, StyleSheet} from 'react-native';
import {px2rem} from "@/utils/px2rem";
import {ActionSheet} from "@ant-design/react-native";
import {navigateReplace} from "@/utils/navigation";
import FingerprintPopup from "@/pages/Account/FingerPrint";
import {connector,ModelState} from '@/models/connect';
interface Props {
}
const LoginSheet: React.FC<Props> = React.memo(props => {
const {dispatch} = props;
const [fingerPrint,setFingerPrint] = useState({
errorMessage: undefined,
biometric: undefined,
popupShowed: false,
})
//点击指纹登录选项时,将popupShowed置为true
const handleFingerprintShowed = () => {
setFingerPrint({
...fingerPrint,
popupShowed: true
});
}
const showActionSheet = () =>{
const BUTTONS = [
'账号 / 短信登录',
'手势登录',
'指纹登录',
'人脸识别登录',
'取消',
];
ActionSheet.showActionSheetWithOptions(
{
options: BUTTONS,
cancelButtonIndex: 4,
},
buttonIndex => {
const clickOption = BUTTONS[buttonIndex];
console.log('clicked: ',clickOption);
switch (clickOption){
case '账号 / 短信登录':
navigateReplace("Login");
return;
case '手势登录':
navigateReplace("GestureUnlock");
return;
case '指纹登录':
//显示指纹登录
handleFingerprintShowed();
return;
case '人脸识别登录':
navigateReplace("Login");
return;
}
}
);
}
return (
<View style={styles.container}>
<View style={styles.more}>
<Text style={styles.moreText} onPress={showActionSheet}>更多登录方式</Text>
</View>
{fingerPrint.popupShowed ? (
<FingerprintPopup
fingerPrint={fingerPrint}
setFingerPrint={setFingerPrint}
/>
) : null}
</View>
);
})
export default connector(LoginSheet);
const styles = StyleSheet.create({
container:{
},
more:{
width:'100%',
alignItems:'center',
height:px2rem(50),
marginBottom:px2rem(30),
},
moreText:{
// color:'#a1a1a1'
}
});
这样就完成了react-native 的指纹登录功能,总结一下,关键点在于:
切换指纹组件显示隐藏在于控制popupShowed的true/false状态来切换FingerprintPopup组件的展示与否每次唤醒组件都要通过显示FingerprintPopup组件,在初始化期间进行判断可用、版本然后调用组件展示每次隐藏组件都要通过隐藏FingerprintPopup组件,在组件卸载阶段释放指纹组件监听器FingerprintScanner.release();操作指纹组件时不管是指纹识别成功还是点击取消,都一定要将popupShowed置为false;指纹识别失败不做操作。
总结
到此这篇关于React Native登录之指纹登录篇的文章就介绍到这了,更多相关React Native指纹登录内容请搜索以前的文章或继续浏览下面的相关文章希望大家以后多多支持!
以上是 React Native登录之指纹登录篇的示例代码 的全部内容, 来源链接: utcz.com/p/218526.html