Vue商城项目03

发表评论
把文本框做双向数据绑定
<textarea placeholder="请输入内容" maxlength="120" v-model="msg"></textarea>
data中 msg: “” // 评论 输入的内容为发表按钮绑定一个事件
<mt-button type="primary" size="large" @click="postComment">发表评论</mt-button>校验评论内容是否为空,如果为空,则Toast提示用户 评论内容不能为空
main.js中Vue.http.options.root下面写
//使用ajax的post方式时,第三个参数一般都是一样的,所以每次都重写,还不如全局定义一下,就省略这个重复写的过程。// 全局设置 post 时候表单数据格式组织形式 application/x-www-form-urlencoded
Vue.http.options.emulateJSON = true;
- 通过 vue-resource 发送一个请求,把评论内容提交给 服务器
- 当发表评论OK后,重新刷新列表,以查看最新的评论
- 如果调用 getComments 方法重新刷新评论列表的话,可能只能得到 最后一页的评论,前几页的评论获取不到
- 换一种思路: 当评论成功后,在客户端,手动拼接出一个 最新的评论对象,然后 调用 数组的 unshift 方法, 把最新的评论,追加到 data 中 comments 的开头;这样,就能 完美实现刷新评论列表的需求;
postComment() { // 校验是否为空内容 trim() 方法去除字符串的头尾空格:
if (this.msg.trim().length === 0) {
return Toast("评论内容不能为空!");
}
// 发表评论
// 参数1: 请求的URL地址
// 参数2: 提交给服务器的数据对象 { content: this.msg }
// 参数3: 定义提交时候,表单中数据的格式 { emulateJSON:true }
this.$http
.post("api/postcomment/" + this.$route.params.id, {
content: this.msg.trim()
})
.then(function(result) {
if (result.body.status === 0) {
// 1. 拼接出一个评论对象
var cmt = {
user_name: "匿名用户",
add_time: Date.now(),
content: this.msg.trim()
};
this.comments.unshift(cmt);
this.msg = "";
}
});
}
}
改造图片分析 按钮为 路由的链接并显示对应的组件页面
<router-link to="/home/photolist"><img src="../../images/menu2.png" alt="">
<div class="mui-media-body">图片分享</div>
</router-link>
import PhotoInfo from \'./components/photos/PhotoInfo.vue\'{ path: \'/home/photoinfo/:id\', component: PhotoInfo }
绘制 图片列表 组件页面结构并美化样式
- 制作 顶部的滑动条
- 制作 底部的图片列表
制作顶部滑动条
- 需要借助于 MUI 中的 tab-top-webview-main.html
- 由于滑动条在最顶部全屏展示,需要把 slider 区域的 mui-fullscreen类 去掉
- 滑动条无法正常触发滑动,通过检查官方文档,发现这是JS组件,需要被初始化一下
- 先导入 mui 的JS文件:
import mui from \'../../../lib/mui/js/mui.min.js\'- 在 组件的
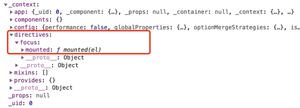
mounted事件钩子中,注册 mui 的滚动事件:
mounted() { // 当 组件中的DOM结构被渲染好并放到页面中后,会执行这个 钩子函数
// 如果要操作元素了,最好在 mounted 里面,因为,这里时候的 DOM 元素 是最新的
// 2. 初始化滑动控件
mui(".mui-scroll-wrapper").scroll({
deceleration: 0.0005 //flick 减速系数,系数越大,滚动速度越慢,滚动距离越小,默认值0.0006
});
}
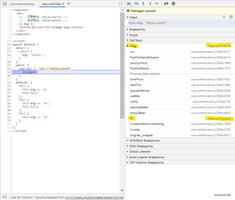
我们在初始化 滑动条 的时候,导入的 mui.js ,但是,控制台报错:
Uncaught TypeError: \'caller\', \'callee\', and \'arguments\' properties may not be accessed on strict mode
解决方案:
cnpm install babel-plugin-transform-remove-strict-mode -D
在 .babelrc中"plugins":["transform-remove-strict-mode"]当 滑动条 调试OK后,发现, tabbar 无法正常工作了。App.vue 中的
router-link身上的类名mui-tab-item存在兼容性问题,导致tab栏失效,可以把mui-tab-item改名为mui-tab-item1,并复制相关的类样式,来解决这个问题;
.mui-bar-tab .mui-tab-item1.mui-active { color: #007aff;
}
.mui-bar-tab .mui-tab-item1 {
display: table-cell;
overflow: hidden;
width: 1%;
height: 50px;
text-align: center;
vertical-align: middle;
white-space: nowrap;
text-overflow: ellipsis;
color: #929292;
}
.mui-bar-tab .mui-tab-item1 .mui-icon {
top: 3px;
width: 24px;
height: 24px;
padding-top: 0;
padding-bottom: 0;
}
.mui-bar-tab .mui-tab-item1 .mui-icon~.mui-tab-label {
font-size: 11px;
display: block;
overflow: hidden;
text-overflow: ellipsis;
}
滑动的时候报警告:
Unable to preventDefault inside passive event listener due to target being treated as passive. See https://www.chromestatus.com/features/5093566007214080
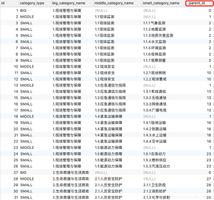
解决方法,可以加上* { touch-action: pan-y; } 这句样式去掉。获取所有分类,并渲染 分类列表;
<!-- :class="[\'mui-control-item\', item.id == 0 ? \'mui-active\' : \'\']" 绑定样式,并集类,第二个类是表达式来判断 --><!-- MUI同时也封装好了,滑动栏点击另外一个就会高亮显示 -->
<a :class="[\'mui-control-item\', item.id == 0 ? \'mui-active\' : \'\']" v-for="item in cates" :key="item.id" @tap="getPhotoListByCateId(item.id)">
{{ item.title }}
</a>
制作图片列表区域
图片列表需要使用懒加载技术,我们可以使用 Mint-UI 提供的现成的 组件
lazy-load
需要全局引入
import MintUI from ‘mint-ui’
Vue.use(MintUI)
import ‘mint-ui/lib/style.css’根据
lazy-load的使用文档,尝试使用渲染图片列表数据
<a :class="[\'mui-control-item\', item.id == 0 ? \'mui-active\' : \'\']" v-for="item in cates" :key="item.id" @tap="getPhotoListByCateId(item.id)">
实现了 图片列表的 懒加载改造和 样式美化
z-index: 99 //z-index 属性设置元素的堆叠顺序。z-index的值越大,就越靠上
//实际的图片
img {
width: 100%; //占满全屏
vertical-align: middle;//垂直对齐方式。
}
实现了 点击图片 跳转到 图片详情页面
- 在改造 li 成 router-link 的时候,默认是a标签,需要使用 tag 属性指定要渲染为 哪种元素
冒号 : 是绑定元素,后面是表达式<router-link v-for="item in list" :key="item.id" :to="\'/home/photoinfo/\' + item.id" tag="li">import PhotoInfo from \'./components/photos/PhotoInfo.vue\'{ path: \'/home/photoinfo/:id\', component: PhotoInfo },
实现 详情页面的布局和美化,同时获取数据渲染页面
引入子组件
// 1. 导入评论子组件import comment from "../subcomponents/comment.vue";
// 2. 注册 评论子组件
components: { "cmt-box": comment
}
// 3.放置一个现成的 评论子组件<cmt-box :id="id"></cmt-box>
//4. 所用的组件里传值props: ["id"]
实现 图片详情中 缩略图的功能
vue-preview看此文档使用 https://github.com/LS1231/vue-preview
一个Vue集成PhotoSwipe图片预览插件,使用 vue-preview 这个缩略图插件
获取到所有的图片列表,然后使用 v-for 指令渲染数据
注意: img标签上的class不能去掉
注意: 每个 图片数据对象中,必须有 w 和 h 属性
- npm i vue-preview -S
- import VuePreview from ‘vue-preview’
Vue.use(VuePreview)
<div class="thumbs"> <img class="preview-img" v-for="(item, index) in list" :src="item.src" height="100" @click="$preview.open(index, list)" :key="item.src"> //添加内容:Key需要绑定一下,其他代码都是拷贝过来的
</div>
放在div为 thumbs中可以添加额外的样式如:
.thumbs{
img{
margin: 10px;
box-shadow: 0 0 8px #999;
}
}
getThumbs() {
// 获取缩略图
this.$http.get("api/getthumimages/" + this.id).then(result => {
if (result.body.status === 0) {
// 循环每个图片数据,可以加上额外的属性,补全图片的宽和高
result.body.message.forEach(item => {
item.w = 600;
item.h = 400;
});
// 把完整的数据保存到 list 中
this.list = result.body.message;
}
});
}
以上是 Vue商城项目03 的全部内容, 来源链接: utcz.com/z/379386.html