Unity3D UGUI实现翻书特效
本文实例为大家分享了Unity3D UGUI翻书展示的具体代码,供大家参考,具体内容如下
参考大佬的,链接找不到了,找到了再加在这。
下边是Shader代码:
// Upgrade NOTE: replaced 'mul(UNITY_MATRIX_MVP,*)' with 'UnityObjectToClipPos(*)'
Shader "Personal/PageTurning" {
Properties
{
_Color ("Color", Color) = (1,1,1,1)
_MainTex("MainTex",2D)="White"{}
_SecTex("SecTex",2D)="White"{}
_Angle("Angle",Range(0,180))=0
_Warp("Warp",Range(0,10))=0
_WarpPos("WarpPos",Range(0,1))=0
_Downward("Downward",Range(0,1))=0
}
SubShader
{
pass
{
Cull Back
CGPROGRAM
#pragma vertex vert
#pragma fragment frag
#include "UnityCG.cginc"
struct v2f
{
float4 pos : POSITION;
float2 uv : TEXCOORD0;
};
fixed4 _Color;
float _Angle;
float _Warp;
float _Downward;
float _WarpPos;
sampler2D _MainTex;
float4 _MainTex_ST;
v2f vert(appdata_base v)
{
v2f o;
v.vertex += float4(5,0,0,0);
float s;
float c;
sincos(radians(-_Angle),s,c);
float4x4 rotate={
c,s,0,0,
-s,c,0,0,
0,0,1,0,
0,0,0,1};
float rangeF=saturate(1 - abs(90-_Angle)/90);
v.vertex.y += -_Warp*sin(v.vertex.x*0.4-_WarpPos* v.vertex.x)*rangeF;
v.vertex.x -= rangeF * v.vertex.x*_Downward;
v.vertex = mul(rotate,v.vertex);
v.vertex += float4(-5,0,0,0);
o.pos = UnityObjectToClipPos(v.vertex);
o.uv = TRANSFORM_TEX(v.texcoord,_MainTex);
return o;
}
fixed4 frag(v2f i):COLOR
{
fixed4 color = tex2D(_MainTex,-i.uv);
return _Color * color;
}
ENDCG
}
pass
{
Cull Front
CGPROGRAM
#pragma vertex vert
#pragma fragment frag
#include "UnityCG.cginc"
struct v2f
{
float4 pos : POSITION;
float2 uv : TEXCOORD0;
};
fixed4 _Color;
float _Angle;
float _Warp;
float _Downward;
float _WarpPos;
sampler2D _SecTex;
float4 _MainTex_ST;
v2f vert(appdata_base v)
{
v2f o;
v.vertex += float4(5,0,0,0);
float s;
float c;
sincos(radians(-_Angle),s,c);
float4x4 rotate={
c,s,0,0,
-s,c,0,0,
0,0,1,0,
0,0,0,1};
float rangeF=saturate(1 - abs(90-_Angle)/90);
v.vertex.y += -_Warp*sin(v.vertex.x*0.4-_WarpPos* v.vertex.x)*rangeF;
v.vertex.x -= rangeF * v.vertex.x*_Downward;
v.vertex = mul(rotate,v.vertex);
v.vertex += float4(-5,0,0,0);
o.pos = UnityObjectToClipPos(v.vertex);
o.uv = TRANSFORM_TEX(v.texcoord,_MainTex);
return o;
}
fixed4 frag(v2f i):COLOR
{
float2 uv = i.uv;
uv.x = -uv.x;
fixed4 color = tex2D(_SecTex,-uv);
return _Color * color;
}
ENDCG
}
}
}
下面是UI代码:
using System.Collections;
using UnityEngine;
using UnityEngine.UI;
public class FanShuUI : UIBase
{
private GameObject Plane;
private Material m_Material;
private Coroutine effect;
private Image LeftPage;
private Image RightPage;
private void Awake()
{
InitUI();
}
public override void InitUI()
{
Plane = GetGameObject("Plane");
LeftPage = GetComp<Image>("LeftPage");
RightPage = GetComp<Image>("RightPage");
Plane.SetActive(false);
m_Material = Plane.GetComponent<MeshRenderer>().material;
}
public void PlayPageTurnEffect(bool isLeft = true)
{
if (!gameObject.activeSelf)
{
return;
}
if (effect != null)
{
StopCoroutine(effect);
}
effect = StartCoroutine(FanShuEffect(0.5f, isLeft));
}
public void ShowRightImage(string right)
{
RightPage.gameObject.SetActive(true);
RightPage.sprite = ResourcesMgr.Instance.LoadObj<Sprite>(right);
}
public void ShowLeftImage(string left)
{
LeftPage.gameObject.SetActive(true);
LeftPage.sprite = ResourcesMgr.Instance.LoadObj<Sprite>(left);
}
private IEnumerator FanShuEffect(float time, bool isLeft)
{
LeftPage.gameObject.SetActive(false);
RightPage.gameObject.SetActive(false);
Plane.SetActive(true);
int angle = (int)(180 * 0.1f);
for (int i = 0; i < 10; i++)
{
if (isLeft)
{
m_Material.SetFloat("_Angle", angle * i);
}
else
{
m_Material.SetFloat("_Angle", 180 - angle * i);
}
yield return new WaitForSeconds(time * 0.1f);
}
if (isLeft)
{
m_Material.SetFloat("_Angle", 180);
}
else
{
m_Material.SetFloat("_Angle", 0);
}
Plane.SetActive(false);
OnEffectOver();
}
private void OnEffectOver()
{
//--callback
}
}
左右两页纸可以在翻书结束动态加载图片。
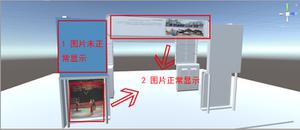
下边是Plane的面板信息:
以上是 Unity3D UGUI实现翻书特效 的全部内容, 来源链接: utcz.com/z/359574.html