微信小程序自定义单项选择器样式
本文实例为大家分享了微信小程序自定义单项选择器样式的具体代码,供大家参考,具体内容如下
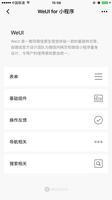
效果:
wxml:
<view bindchange="radioChange">
<view class='list_item' wx:for="{{radioValues}}" data-index="{{index}}" bindtap='radioChange' style="{{index == radioValues.length-1?'border-bottom:0':''}}">
<text style='color:rgb(96,96,96)'>{{item.value}}</text>
<view wx:if="{{item.selected}}" class='item'>
<view style='width:20rpx;height:20rpx;background-color:rgb(144,144,144);border-radius:100%;'></view>
</view>
<view wx:else class='item'></view>
</view>
</view>
wcss:
.list_item{
display: flex;
justify-content: space-between;
align-items: center;
margin:0 25rpx;
width:700rpx;
font-size: 30rpx;
color: rgb(79,79,79);
padding: 28rpx 0;
border-bottom:1px solid rgb(209,209,209);
}
.item{
width: 28rpx;
height: 28rpx;
border: 2px solid rgb(144,144,144);
border-radius: 100%;
display: flex;
align-items: center;
justify-content: center;
}
js:
Page({
data: {
radioValues: [
{ 'value': '未付款订单', 'selected': false },
{ 'value': '进行中的订单', 'selected': false },
{ 'value': '完成了的订单', 'selected': false },
{ 'value': '所有订单', 'selected': true },
]
},
onLoad: function (options) {
},
radioChange:function(e){
var index = e.currentTarget.dataset.index;
var arr = this.data.radioValues;
for (var v in arr){
if (v == index){
arr[v].selected = true;
}else{
arr[v].selected = false;
}
}
this.setData({
radioValues:arr
})
}
})
以上是 微信小程序自定义单项选择器样式 的全部内容, 来源链接: utcz.com/z/347979.html