springboot整合redis实现发送邮箱并验证
1.起步
pom文件
<!--集成redis--><groupId>org.springframework.boot</groupId>
<artifactId>spring-boot-starter-redis</artifactId>
<version>1.4.1.RELEASE</version>
</dependency>
<!--邮箱-->
<dependency>
<groupId>org.springframework.boot</groupId>
<artifactId>spring-boot-starter-mail</artifactId>
</dependency>
下面是yml配置
#设置端口号
server:
port: 8080
#配置数据源
spring:
mail:
#QQ邮箱这不用改
host: smtp.qq.com
#你的邮箱
username: XX@qq.com
#你的授权码
password: XXXXXX
default-encoding: UTF-8
redis:
#redis服务器地址
host: XXXXXX
#Redis服务器连接端口
port: 6379
#Redis服务器连接密码(默认为空)
password: XXX
jedis:
pool:
#连接池最大阻塞等待时间(使用负值表示没有限制)
max-wait: 1000
#连接池最大连接数(使用负值表示没有限制)
max-active: 100
#连接池中的最大空闲连接
max-idle: 20
#连接池中的最小空闲连接
min-idle: 0
#连接超时时间(毫秒)
timeout: 30000
邮箱授权码不知道的话QQ邮箱开通一下

2.工具类
邮箱工具类
package com.example.demo.util;/**
* @Classname MailServiceUtils
* @Description TODO
* @Author 86176
* @Date 2021-12-17 15:04
* @Version 1.0
**/
import org.slf4j.Logger;
import org.slf4j.LoggerFactory;
import org.springframework.beans.factory.annotation.Autowired;
import org.springframework.mail.MailException;
import org.springframework.mail.SimpleMailMessage;
import org.springframework.mail.javamail.JavaMailSender;
import org.springframework.stereotype.Component;
@Component
public class MailServiceUtils{
private final Logger logger = LoggerFactory.getLogger(this.getClass());
@Autowired
private JavaMailSender mailSender;
/**
* @param from 发送人
* @param to 接收人
* @param subject 主题
* @param content 内容
*/
public void sendMail(String from,String to, String subject, String content){
SimpleMailMessage message = new SimpleMailMessage();
message.setFrom(from);
message.setTo(to);
message.setSubject(subject);
message.setText(content);
try {
mailSender.send(message); logger.info("邮件成功发送!");
} catch (MailException e) {
logger.error("发送邮件错误:",e);
}
}
}
redis乱码解决
package com.example.demo.config;import org.springframework.context.annotation.Bean;
import org.springframework.context.annotation.Configuration;
import org.springframework.data.redis.connection.RedisConnectionFactory;
import org.springframework.data.redis.core.RedisTemplate;
import org.springframework.data.redis.serializer.RedisSerializer;
import org.springframework.data.redis.serializer.StringRedisSerializer;
/**
* @Classname Redisconfig
* @Description TODO
* @Author 86176
* @Date 2021-12-06 10:02
* @Version 1.0
**/
@Configuration
public class Redisconfig {
@Bean(name="redisTemplate")
public RedisTemplate<String, String> redisTemplate(RedisConnectionFactory factory) {
RedisTemplate<String, String> template = new RedisTemplate<>();
RedisSerializer<String> redisSerializer = new StringRedisSerializer();
template.setConnectionFactory(factory);
//key序列化方式
template.setKeySerializer(redisSerializer);
//value序列化
template.setValueSerializer(redisSerializer);
//value hashmap序列化
template.setHashValueSerializer(redisSerializer);
//key haspmap序列化
template.setHashKeySerializer(redisSerializer);
//
return template;
}
}
3.controller搭建
按要求更改
package com.example.demo.controller;import com.example.demo.util.MailServiceUtils;
import org.springframework.data.redis.core.RedisTemplate;
import org.springframework.scheduling.annotation.Async;
import org.springframework.stereotype.Controller;
import org.springframework.util.Assert;
import org.springframework.web.bind.annotation.PostMapping;
import org.springframework.web.bind.annotation.RequestMapping;
import org.springframework.web.bind.annotation.ResponseBody;
import javax.annotation.Resource;
/**
* @Classname EmailController
* @Description TODO 邮箱发送
* @Author 86176
* @Date 2021-12-17 15:28
* @Version 1.0
**/
@Controller
public class EmailController {
@Resource
private MailServiceUtils mailServiceUtils;
@Resource
private RedisTemplate<String, Object> redisTemplate;
/**
* 发送验证码 redis存储验证码
* @param to 被发送的邮箱账号
* @return
*/
@PostMapping("/fasong")
@ResponseBody
public String email(String to) {
try {
//生成6位随机数
String i = String.valueOf((int) ((Math.random() * 9 + 1) * 100000));
//发送邮箱
mailServiceUtils.sendMail("XXXXXX@qq.com", to, "验证码", i);
//redis保存验证码
redisTemplate.opsForValue().set(to, i);
} catch (Exception e) {
return "报错";
}
return "OK";
}
/**
* 邮箱验证
* @param to 被发送的邮箱账号
* @param yzm 输入的验证码判断
* @return
*/
@PostMapping("/yz")
@ResponseBody
public String yz(String to, String yzm) {
//根据邮箱帐号取出验证码
String o = (String) redisTemplate.opsForValue().get(to);
if (o.equals(yzm)){
return "OK";
}
return "No";
}
@RequestMapping("/abc")
public String abc() {
return "QQemail";
}
}
4.前端搭建
<!DOCTYPE html><html lang="en">
<head>
<meta charset="UTF-8">
<title>Title</title>
</head>
<body>
<div>
接收方邮箱号 <input type="text" id="to">
<input type="button" value="发送验证码" id="yzm">
验证码<input type="text" id="yz">
<input type="submit" value="验证" id="y">
</div>
<script type="text/javascript" src="../static/jquery-1.8.3.js"></script>
<script>
/**
* 发送验证码
*/
$("#yzm").click(function() {
$.ajax({
url : "/fasong",
type : "post",
data : {
"to":$("#to").val()
},
success : function(data) {
alert(data)
}
})
})
/**
* 验证码判断
*/
$("#y").click(function() {
$.ajax({
url: "/yz",
type: "post",
data: {
"to": $("#to").val(),
"yzm": $("#yz").val()
},
success: function (data) {
alert(data)
}
})
})
</script>
</body>
</html>
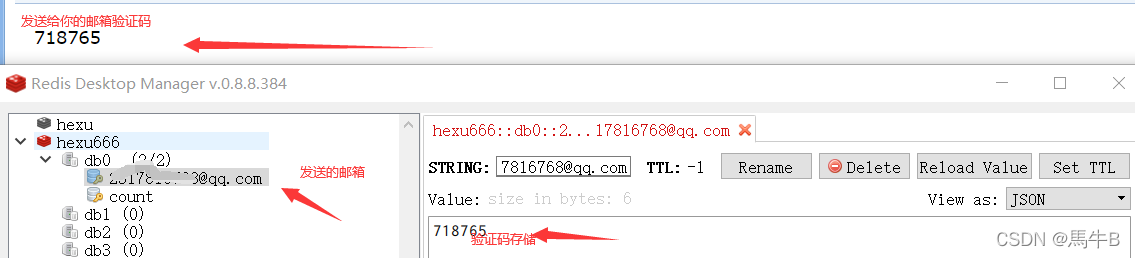
结果

总结
到此这篇关于springboot整合redis实现发送邮箱并验证的文章就介绍到这了,更多相关springboot redis发送邮箱内容请搜索以前的文章或继续浏览下面的相关文章希望大家以后多多支持!
以上是 springboot整合redis实现发送邮箱并验证 的全部内容, 来源链接: utcz.com/p/251959.html