vue基础入门之vuex安装与使用
本教程为入门教程,如有错误,请各位前端大佬指出。
1.什么是vuex
Vuex 是一个专为 Vue.js 应用程序开发的状态管理模式。它采用集中式存储管理应用的所有组件的状态,并以相应的规则保证状态以一种可预测的方式发生变化.详细介绍可以参照官网文档vuex.vuejs.org/zh/
下面简单介绍vuex
2.安装和引入
先安装vuex。
npm install vuex --save
在main.js中引入后即可使用。
// The Vue build version to load with the `import` command
// (runtime-only or standalone) has been set in webpack.base.conf with an alias.
import Vue from 'vue'
import App from './App'
import router from './router'
//vuex使用
import Vuex from 'vuex'
Vue.use(Vuex)
const store = new Vuex.Store({
state: {
//全局变量
count: 31231
}
})
Vue.config.productionTip = false
/* eslint-disable no-new */
new Vue({
el: '#app',
router,
//vuex必须加入
store,
components: { App },
template: '<App/>'
})
3.vuex的使用
<template>
<div>
老大有{{showData}}
<HelloWorld2/>
</div>
</template>
<script>
import HelloWorld2 from './HelloWorld2'
import son from './son'
export default {
name: 'HelloWorld',
data () {
return {
message2:"",
cou
}
},
components:{
HelloWorld2,
son
},computed: {
showData(){
return this.$store.state.count;
}
}
}
</script>
<template>
<div>
老二有{{$store.state.count}}
</div>
</template>
<script>
export default {
name: 'HelloWorld2',
data() {
return {
}
}
}
</script>
4.流程介绍
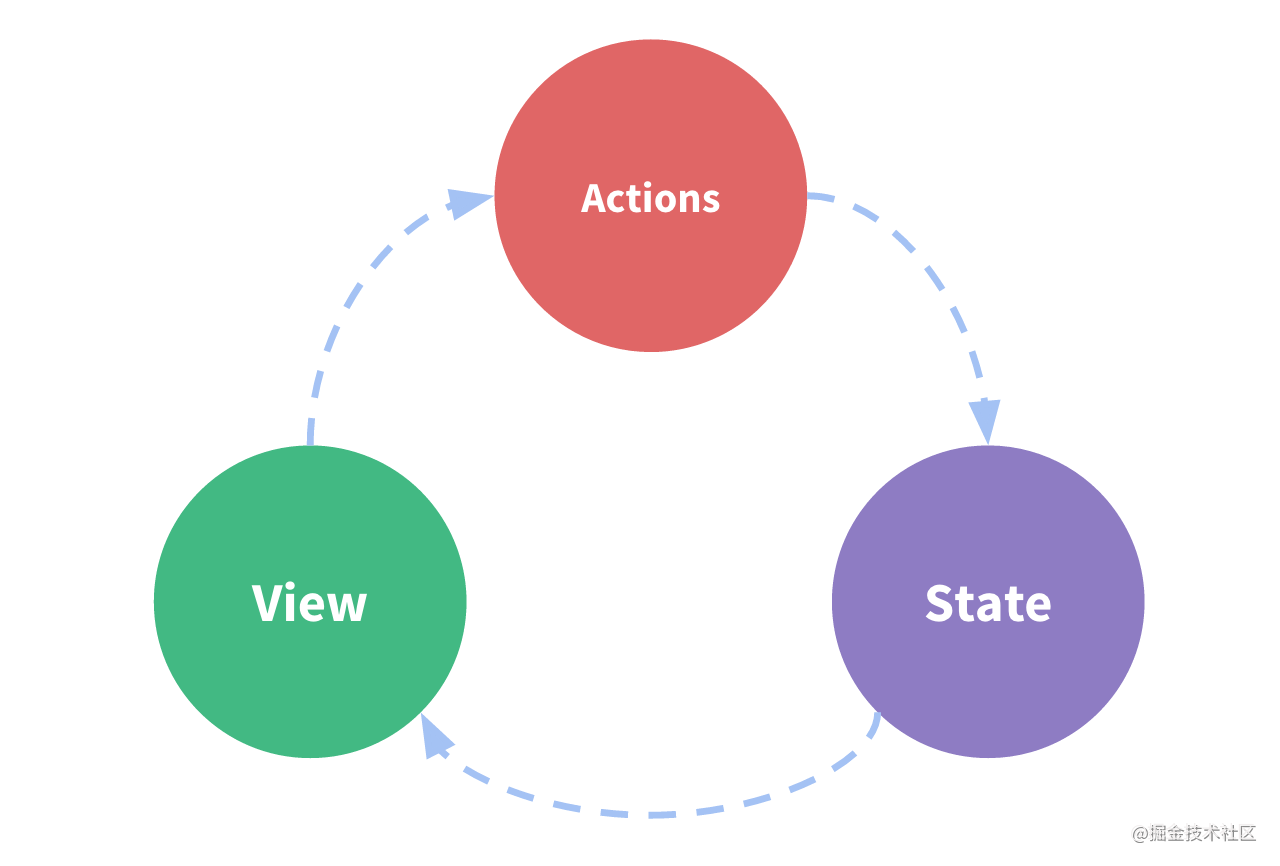
如图当没有使用vuex时流程为: view->actions->state->view
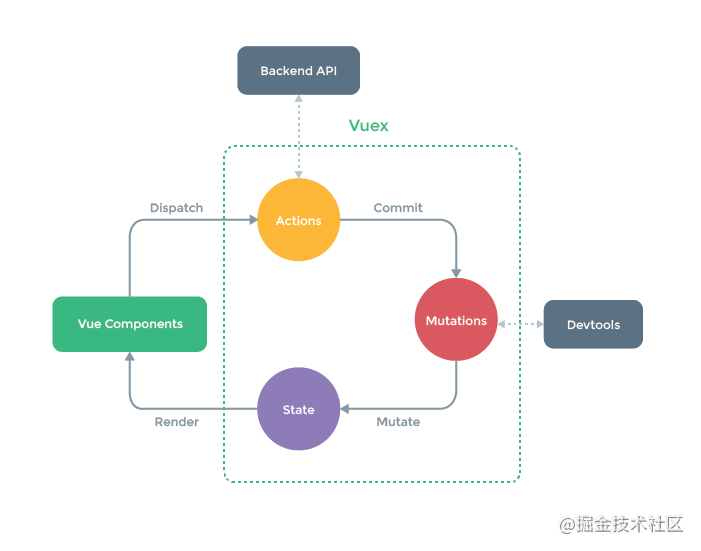
使用了vuex后流程为vuecomponent->(dispatch)actions->(commit)mutations->(mutate)state->(render)->vuecomponent
5.mutation
状态更改,更改 Vuex 的 store 中的状态的唯一方法是提交mutation。Vuex 中的 mutation 非常类似于事件:每个 mutation 都有一个字符串的事件类型 (type)和一个回调函数 (handler)。这个回调函数就是我们实际进行状态更改的地方,并且它会接受 state 作为第一个参数。
// The Vue build version to load with the `import` command
// (runtime-only or standalone) has been set in webpack.base.conf with an alias.
import Vue from 'vue'
import App from './App'
import router from './router'
//vuex使用
import Vuex from 'vuex'
Vue.use(Vuex)
const store = new Vuex.Store({
state: {
//全局变量
count: 31231
},
//更改状态方法
mutations: {
//state为上面的state
addData(state) {
// 变更状态
state.count++
}
}
})
Vue.config.productionTip = false
/* eslint-disable no-new */
new Vue({
el: '#app',
router,
//vuex必须加入
store,
components: { App },
template: '<App/>'
})
然后执行更改
<template>
<div>
老大有{{showData}}
<HelloWorld2/>
<button type = "button" v-on:click = "changeData"> 修改按钮 </button>
</div>
</template>
<script>
import HelloWorld2 from './HelloWorld2'
import son from './son'
export default {
name: 'HelloWorld',
data () {
return {
message2:"",
}
},
components:{
HelloWorld2,
son
},computed: {
showData(){
return this.$store.state.count;
}
},
methods: {
//执行更改
changeData(event){
this.$store.commit("addData");
}
}
}
</script>
6.getters过滤
可以限制mutation 比如小于0就不能减少了
// The Vue build version to load with the `import` command
// (runtime-only or standalone) has been set in webpack.base.conf with an alias.
import Vue from 'vue'
import App from './App'
import router from './router'
//vuex使用
import Vuex from 'vuex'
Vue.use(Vuex)
const store = new Vuex.Store({
state: {
//全局变量
count: 0
},
//更改状态方法
mutations: {
//state为上面的state
addData(state) {
// 变更状态
state.count++
}
},
//过滤
getters: {
getState(state) {
if (state.count >= 5) {
return 5
} else {
return state.count
}
}
}
})
Vue.config.productionTip = false
/* eslint-disable no-new */
new Vue({
el: '#app',
router,
//vuex必须加入
store,
components: { App },
template: '<App/>'
})
调用时
<template>
<div>
老二有{{$store.getters.getState}}
</div>
</template>
<script>
export default {
name: 'HelloWorld2',
data() {
return {
}
}
}
</script>
7.Action--异步处理
Action 类似于 mutation,不同在于:
Action 提交的是 mutation,而不是直接变更状态。 Action 可以包含任意异步操作。 mutation只能同步处理
main.js。示例如下:
// The Vue build version to load with the `import` command
// (runtime-only or standalone) has been set in webpack.base.conf with an alias.
import Vue from 'vue'
import App from './App'
import router from './router'
//vuex使用
import Vuex from 'vuex'
Vue.use(Vuex)
const store = new Vuex.Store({
state: {
//全局变量
count: 0
},
//更改状态方法
mutations: {
//state为上面的state
addData(state) {
// 变更状态
state.count++
}
},
//过滤
getters: {
getState(state) {
if (state.count >= 5) {
return 5
} else {
return state.count
}
}
},
actions: {
//action触发的mutations方法 优势是异步处理
addData(context) {
//模拟异步
setTimeout(() => {
context.commit('addData')
}, 1000)
}
}
})
Vue.config.productionTip = false
/* eslint-disable no-new */
new Vue({
el: '#app',
router,
//vuex必须加入
store,
components: { App },
template: '<App/>'
})
在发送时 应该调用action。
<template>
<div>
老大有{{showData}}
<HelloWorld2/>
<button type = "button" v-on:click = "changeData"> 修改按钮 </button>
</div>
</template>
<script>
import HelloWorld2 from './HelloWorld2'
import son from './son'
export default {
name: 'HelloWorld',
data () {
return {
message2:"",
}
},
components:{
HelloWorld2,
son
},computed: {
showData(){
return this.$store.getters.getState;
}
},
methods: {
//执行更改
changeData(event){
//操作mutations方法
//this.$store.commit("addData");
//应该操作action而不是action触发的mutations方法
this.$store.dispatch("addData");
}
}
}
</script>
8.Module
由于使用单一状态树,应用的所有状态会集中到一个比较大的对象。当应用变得非常复杂时,store 对象就有可能变得相当臃肿。
为了解决以上问题,Vuex 允许我们将 store 分割成模块(module)。每个模块拥有自己的 state、mutation、action、getter、甚至是嵌套子模块——从上至下进行同样方式的分割:
如路由可以分割文件 不在main.js中放入vuex 新建store/index.js
//vuex使用
import Vue from 'vue'
import Vuex from 'vuex'
Vue.use(Vuex)
export default new Vuex.Store({
state: {
//全局变量
count: 0
},
//更改状态方法
mutations: {
//state为上面的state
addData(state) {
// 变更状态
state.count++
}
},
//过滤
getters: {
getState(state) {
if (state.count >= 5) {
return 5
} else {
return state.count
}
}
},
actions: {
//action触发的mutations方法 优势是异步处理
addData(context) {
//模拟异步
setTimeout(() => {
context.commit('addData')
}, 1000)
}
}
})
修改main.js
// The Vue build version to load with the `import` command
// (runtime-only or standalone) has been set in webpack.base.conf with an alias.
import Vue from 'vue'
import App from './App'
import router from './router'
import store from './store'
Vue.config.productionTip = false
/* eslint-disable no-new */
new Vue({
el: '#app',
router,
//vuex必须加入
store,
components: { App },
template: '<App/>'
})
我们还能把main.js中的state拿出 新建store/state.js
export default {
count: 0
}
然后index.js可以改成
//vuex使用
import Vue from 'vue'
import Vuex from 'vuex'
import state from './state'
Vue.use(Vuex)
export default new Vuex.Store({
state: state,
//更改状态方法
mutations: {
//state为上面的state
addData(state) {
// 变更状态
state.count++
}
},
//过滤
getters: {
getState(state) {
if (state.count >= 5) {
return 5
} else {
return state.count
}
}
},
actions: {
//action触发的mutations方法 优势是异步处理
addData(context) {
//模拟异步
setTimeout(() => {
context.commit('addData')
}, 1000)
}
}
})
总结
到此这篇关于vue入门之vuex安装与使用的文章就介绍到这了,更多相关vuex安装与使用内容请搜索以前的文章或继续浏览下面的相关文章希望大家以后多多支持!
以上是 vue基础入门之vuex安装与使用 的全部内容, 来源链接: utcz.com/p/239577.html