Vue图片放大镜组件的封装使用详解
基于Vue的图片放大镜组件封装,供大家参考,具体内容如下
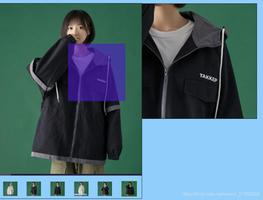
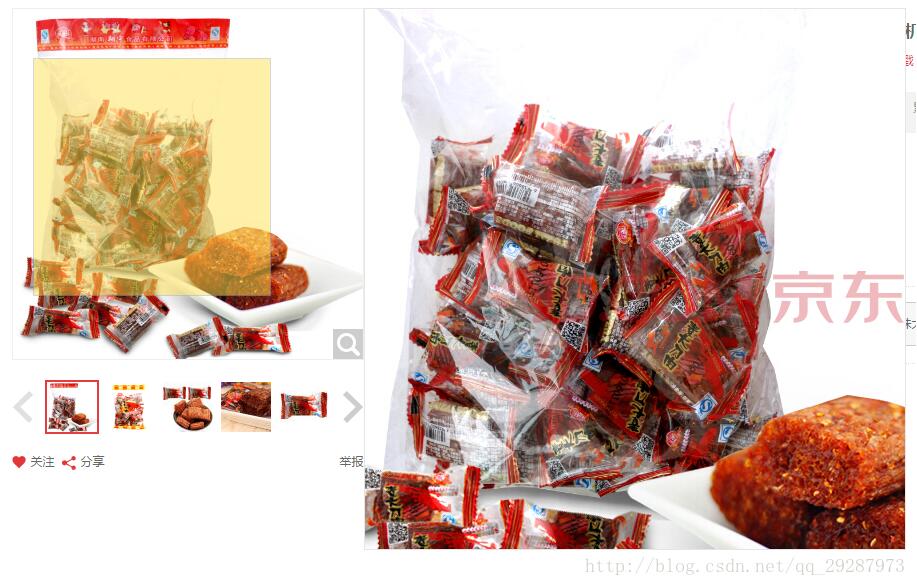
图片放大镜的实现过程是将一个小图放置在一个盒子里,当鼠标在小图盒子里移动时,出现一个移动块(阴影区域/遮罩层),右侧大图片盒子出现一个等比例放大的在小图盒子移动块中的图片内容。效果图如下:
实现图片放大镜效果的Vue组件代码如下:
<template>
<div>
<div class="move" @mouseover="over()" @mouseout="out()" @mousemove="move($event)">
<div id="small"> //小图片以及遮罩层容器
<div id="float"></div> //遮罩层
<img :src="item" id="smallimg"> //需要放大的图片
</div>
</div>
<div id="big">
<img :src="item"> //放大以后的图片
</div>
</div>
</template>
<script>
var float,smallimg,big,bigImg,small,float_maxJL_t,float_maxJL_l,bigImg_maxJL_t,bigImg_maxJL_l;
export default{
props: {
item: {
type: String
}
},
data() {
return{
}
},
mounted(){
float = document.getElementById("float"); //左侧遮罩层
smallimg = document.getElementById("smallimg"); //左边的小图
big = document.getElementById("big"); //右侧可视区域
bigImg = big.getElementsByTagName("img")[0]; //右侧大图
small = document.getElementById("small");// 左侧的容器
//得到右侧可视区的宽高
var bigW = big.clientWidth;
var bigH = big.clientHeight;
//右侧大图的宽高
var bigImgW = bigImg.offsetWidth;
var bigImgH = bigImg.offsetHeight;
//左侧的小图的宽高
var smallImgW = smallimg.offsetWidth;
var smallImgH = smallimg.offsetHeight;
//左侧遮罩层的宽高
float.style.width = bigW/bigImgW * smallImgW + "px"; //175
float.style.height = bigH/bigImgH * smallImgH/3*2 + "px";
//遮罩层运动的最大距离
float_maxJL_l = small.clientWidth -float.offsetWidth-10;
float_maxJL_t = small.clientHeight - float.offsetHeight-5;
//右侧图片运动的最大距离
bigImg_maxJL_l = bigImg.clientWidth - big.offsetWidth;
bigImg_maxJL_t = bigImg.clientHeight - big.offsetHeight;
big.style.display = "none";
float.style.visibility ="hidden"; //鼠标未移入左侧区域使遮罩层以及右侧大图均不可见
},
methods: {
//鼠标移入左侧区域使遮罩层以及右侧大图可见
over: function () {
float.style.visibility ="visible";
big.style.visibility ="visible";
big.style.display = "block";
},
//鼠标移出左侧区域使遮罩层以及右侧大图不可见
out: function () {
float.style.visibility ="hidden";
big.style.display = "none";
},
//鼠标移动时遮罩层随鼠标的移动而移动
move: function (ev) {
var l = ev.clientX - small.offsetLeft - float.offsetWidth/2;
var t = ev.clientY - small.offsetTop - float.offsetHeight/2;
if( l < 0 ) l = 0; // 超出左边界赋值为0
if( t < 0 ) t = 0; // 超出上边界赋值为0
if( l > float_maxJL_l ) l = float_maxJL_l; //限制其运动范围在容器之内
if( t > float_maxJL_t ) t = float_maxJL_t;
//求出来一个比例
var scaleL = l/float_maxJL_l;
var scaleT = t/float_maxJL_t;
//遮罩层运动位置
float.style.left = l + "px";
float.style.top = t + "px";
//右侧大图运动位置
bigImg.style.left = -scaleL * bigImg_maxJL_l + "px";
bigImg.style.top = -scaleT * bigImg_maxJL_t + "px";
},
},
}
</script>
//css样式
<style lang="scss" rel="stylesheet/scss" scoped>
@import 'src/assets/scss/variable.scss';
#float {
width: 120px;
height: 120px;
position: absolute; //必须
background: $primary;
border: 1px solid #ccc;
opacity: 0.5;
cursor:move ;
}
#big {
position: absolute; //必须
top: 260px;
left: 37.6%;
width: 350px;
height: 500px;
overflow: hidden;
border: 1px solid #ccc;
background: #ffffff;
z-index: 1;
visibility: hidden;
}
#small {
position: relative; //必须
z-index: 1;
img{
width:340px;
height:320px;
}
}
#big img {
position: absolute; //必须
z-index: 5;
width:700px;
height:700px;
}
</style>
在css中需要注意设置各个图片以及遮罩层的位置即position。
遮罩层分析:
左侧遮罩层的宽(高) = 右侧可视区域的宽(高)/右侧大图的宽(高)*左侧小图的宽(高)
(遮罩层可以理解为模拟右侧大图盒子,在右侧大图盒子中放置的是一张大的图片,然后根据一定比例得到浮动区域,同时将盒子设置成溢出隐藏。右侧大图相对于右侧容器的呈现比例和左侧遮罩层相对于左侧容器的比例相对应)
遮罩层运动的距离=左侧容器的宽(高)-遮罩层的宽(高);(使其总是在左侧容器中运动)
当鼠标移动到左侧小图盒子的时候我们需要实现鼠标始终在遮罩层中,并且遮罩层会随着鼠标的移动而移动(言外之意:遮罩层的位置和鼠标移动时的坐标息息相关,且不能使它溢出左边容器,计算方法见代码)。
注意:这里有一个潜藏的bug,即当你的界面滚动的时候,遮罩层不会随界面的滚动而移动,当界面向下滚动的时候,鼠标在左侧容器内但却不再在遮罩层区域里,且无法再移动遮罩层。解决办法如下:
move = function (ev){
var scroll = this.getClientHeight(); //得到当前界面移动的位置
var l = ev.clientX - small.offsetLeft - float.offsetWidth/2;
var t = ev.clientY - small.offsetTop - float.offsetHeight/2;
t=t+scroll; //遮罩层移动的高度应该相应的加上界面滚动的高度
if( l < 0 ) l = 0;
if( t < 0 ) t = 0;
if( l > float_maxJL_l ) l = float_maxJL_l;
if( t > float_maxJL_t ) t = float_maxJL_t;
var scaleL = l/float_maxJL_l;
var scaleT = t/float_maxJL_t;
float.style.left = l + "px";
float.style.top = t + "px";
bigImg.style.left = -scaleL * bigImg_maxJL_l + "px";
bigImg.style.top = -scaleT * bigImg_maxJL_t + "px";
},
//获取界面滚动的高度的方法
getClientHeight: function(){
var scrollTop=0;
if(document.documentElement&&document.documentElement.scrollTop)
{
scrollTop=document.documentElement.scrollTop;
}
else if(document.body)
{
scrollTop=document.body.scrollTop;
}
return scrollTop;
}
以上就是本文的全部内容,希望对大家的学习有所帮助,也希望大家多多支持。
以上是 Vue图片放大镜组件的封装使用详解 的全部内容, 来源链接: utcz.com/p/239572.html