vant时间控件使用方法详解
本文实例为大家分享了vant时间控件的使用方法,供大家参考,具体内容如下
代码:
<template>
<div class="shoukuan">
<!-- 头部公共搜索框 -->
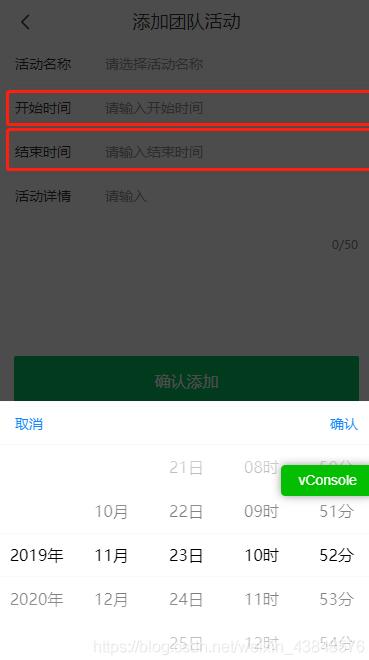
<tabbar title="添加团队活动"></tabbar>
<div class="con">
<van-cell-group>
<van-field v-model="name" clearable label="活动名称" placeholder="请选择活动名称" />
<van-field v-model="starttime" clearable label="开始时间" placeholder="请输入开始时间" @focus="start" />
<van-field v-model="endtime" clearable label="结束时间" placeholder="请输入结束时间" @focus="end" />
</van-cell-group>
<van-cell-group>
<van-field
v-model="message"
rows="2"
autosize
label="活动详情"
type="textarea"
maxlength="50"
placeholder="请输入"
show-word-limit
/>
</van-cell-group>
</div>
<van-button type="primary" size="large" @click="add">确认添加</van-button>
<!-- 开始时间控件 -->
<van-popup v-model="show" position="bottom">
<van-datetime-picker
v-model="currentDate"
type="datetime"
:min-date="minDate"
:max-date="maxDate"
@confirm="confirm"
@cancel="cancel"
:formatter="formatter"
/>
</van-popup>
<!-- 结束时间控件 -->
<van-popup v-model="show1" position="bottom">
<van-datetime-picker
v-model="currentDate1"
type="datetime"
:min-date="minDate"
:max-date="maxDate"
@confirm="confirm1"
@cancel="cancel1"
:formatter="formatter"
/>
</van-popup>
</div>
</template>
<script>
import tabbar from "../../components/navbar";
export default {
data() {
return {
name: "", //活动名称
message: "", //活动详情
show: false, //开始时间弹窗
show1: false, //结束时间弹窗
minHour: 10,
maxHour: 20,
minDate: new Date(),
maxDate: new Date(2020, 11, 31),
currentDate: new Date(), //开始标准时间
currentDate1: new Date(), //结束标准时间
starttime: "", //开始时间
starttime1: "", //开始时间时间戳
endtime: "", //结束时间
endtime1: "" //结束时间时间戳
};
},
components: {
tabbar
},
mounted() {},
methods: {
// 选择开始时间
start() {
this.show = true;
},
// 选择结束时间
end() {
this.show1 = true;
},
// 点击确定
confirm() {
this.show = false;
this.starttime =
this.currentDate.getFullYear() +
"年" +
(Number(this.currentDate.getMonth()) + 1) +
"月" +
this.currentDate.getDate() +
"日 " +
this.currentDate.getHours() +
":" +
this.currentDate.getMinutes();
this.starttime1 = new Date(this.currentDate).getTime() / 1000;
},
// 点击取消
cancel() {
this.show = false;
},
confirm1() {
this.show1 = false;
this.endtime =
this.currentDate1.getFullYear() +
"年" +
(Number(this.currentDate1.getMonth()) + 1) +
"月" +
this.currentDate1.getDate() +
"日 " +
this.currentDate1.getHours() +
":" +
this.currentDate1.getMinutes();
this.endtime1 = new Date(this.currentDate1).getTime() / 1000;
},
cancel1() {
this.show1 = false;
},
// 处理控件显示的时间格式
formatter(type, value) {
// 格式化选择器日期
if (type === "year") {
return `${value}年`;
} else if (type === "month") {
return `${value}月`;
} else if (type === "day") {
return `${value}日`;
} else if (type === "hour") {
return `${value}时`;
} else if (type === "minute") {
return `${value}分`;
}
return value;
},
// 点击添加按钮
add() {
if (
!this.name.trim() ||
!this.starttime.trim() ||
!this.starttime.trim() ||
!this.message.trim()
) {
this.$toast("请输入完整的活动信息");
} else {
this.axios
.post("/api/agent_team/addTeamActivity", {
activity_name: this.name,
activity_content: this.message,
start_time: this.starttime1,
end_time: this.endtime1
})
.then(data => {
this.$toast("添加活动成功");
setTimeout(() => {
this.$router.go(-1);
}, 1000);
});
}
}
}
};
</script>
<style lang="less" scoped>
.shoukuan {
padding-top: 44px;
.van-button--large {
width: 92%;
margin-left: 4%;
margin-top: 25%;
}
}
</style>
以上就是本文的全部内容,希望对大家的学习有所帮助,也希望大家多多支持。
以上是 vant时间控件使用方法详解 的全部内容, 来源链接: utcz.com/p/238749.html