基于Vue全局组件与局部组件的区别说明
1、组件声明
<!-- 全局组件模板father模板 -->
<template id="father">
<div>
<h3>这是{{name}}</h1>
<div>
<p>这是{{data}}</p>
</div>
</div>
</template>
var FATHER = {
template: "#father",
data: function() {
return {
name: "一个全局组件-模板-",
data: "数据:18892087118"
}
}
};
2、组件注册
Vue.component('father', FATHER);
3、组件挂载
<h5>全局组件1</h5>
<father></father>
4、组件实例
<!DOCTYPE html>
<html>
<head>
<title>vue2.0 --- 局部组件与全局组件</title>
</head>
<body>
<h3>vue2.0局部组件与全局组件</h3>
<div id='app'>
<h5>局部组件</h5>
<fatherlocal></fatherlocal>
<hr>
<h5>全局组件1</h5>
<father></father>
<hr>
<h5>全局组件2</h5>
<child :fromfather='giveData'></child>
</div>
<!-- 局部组件模板fatherlocal -->
<template id="father-local">
<div>
<h3>这是{{name}}</h1>
<div>
<p>这是{{data}}</p>
</div>
</div>
</template>
<!-- 全局组件模板father -->
<template id="father">
<div>
<h3>这是{{name}}</h1>
<div>
<p>这是{{data}}</p>
</div>
</div>
</template>
<template id="child">
<div>
<h3>这是{{name}}</h3>
<div>
<p>{{cmsgtwo}}</p>
<p>{{cmsg}}</p>
<p>{{fromfather}}</p>
<p>{{fromfather.fmsg}}</p>
<p><input type="button" value="按钮" @click=" "></p>
</div>
</div>
</template>
<script src="vue_2.2.2_vue.min.js"></script>
<script type="text/javascript">
// 定义组件
var FATHER = {
template: "#father",
data: function() {
return {
name: "一个全局组件-模板-",
data: "数据:18892087118"
}
}
};
var CHILD = {
template: "#child",
data: function() {
return {
name: "子组件",
cmsg: "子组件里的第一个数据",
cmsgtwo: "子组件里的第二个数据"
}
},
methods: {
change: function() {
this.fromfather.fmsg = "子组件数据被更改了"
}
},
mounted: function() {
this.cmsg = this.fromfather;
},
props: ["fromfather"],
};
// 注册组件
Vue.component('father', FATHER);
Vue.component("child", CHILD);
var vm = new Vue({
data: {
fmsg: "data里的数据",
giveData: {
fmsg: "这是父组件里的数据"
}
},
methods: {},
// 局部组件fatherlocal
components: {
'fatherlocal': {
template: '#father-local',
data: function() {
return {
name: "局部-父组件",
data: "局部-父组件里的数据"
}
}
}
}
}).$mount('#app');
</script>
</body>
</html>
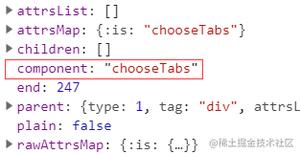
6、特殊的属性is
当使用 DOM 作为模板时 (例如,将el选项挂载到一个已存在的元素上),你会受到 HTML 的一些限制,因为 Vue 只有在浏览器解析和标准化 HTML 后才能获取模板内容。尤其像这些元素<ul>,<ol>,<table>,<select>限制了能被它包裹的元素,而一些像<option>这样的元素只能出现在某些其它元素内部。
自定义组件<my-row>被认为是无效的内容,因此在渲染的时候会导致错误。变通的方案是使用特殊的is属性:
<body>
<div id="app1">
<ul>
<li is="my-component"></li>
</ul>
</div>
<script>
Vue.component("my-component",{
template:"<h1>{{message}}</h1>",
data:function(){
return {
message:"hello world"
}
}
});
new Vue({
el:"#app1"
})
</script>
</body>
补充知识:Vue组件之入门:全局组件三种定义
不论我们使用哪种方式创建出来的组件,组件中的template属性指向的模板内容中,必须有且只有一个根元素,其他元素必须在这个根元素下面。
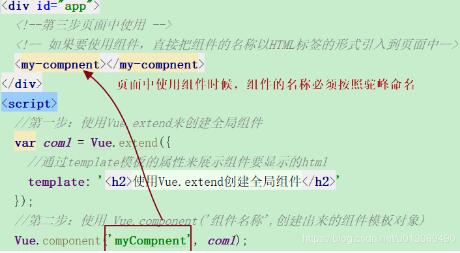
1.使用Vue.extend配合Vue.component定义全局组件
在使用Vue.extend配合Vue.component定义全局组件时,Vue.extend里面定义template模板,而Vue.component里面是要注册一个组件。
<body>
<div id="app">
<!--第三步页面中使用 -->
<!-- 如果要使用组件,直接把组件的名称以HTML标签的形式引入到页面中-->
<my-compnent></my-compnent>
</div>
<script>
//第一步:使用Vue.extend来创建全局组件
var com1 = Vue.extend({
//通过template模板的属性来展示组件要显示的html
template: '<h2>使用Vue.extend创建全局组件</h2>'
});
//第二步:使用 Vue.component('组件名称',创建出来的组件模板对象)
Vue.component('myCompnent', com1);
// 创建 Vue 实例,得到 ViewModel
var vm = new Vue({
el: '#app',
data: {},
methods: {}
});
</script>
</body>
【注意】在定义注册组件时,组件的名称不需要按照驼峰命名,但是在页面引入组件时,组件的名称必须按照驼峰命名。
简写如下:
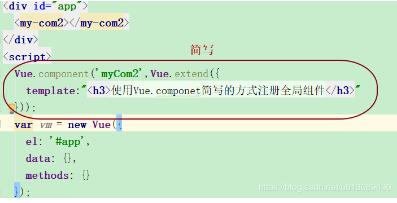
2.直接使用Vue.component定义全局组件
这里是直接使用Vue.component直接创建一个组件
<div id="app">
<my-com2></my-com2>
</div>
<script>
Vue.component('myCom2', {
template: '<h2>直接使用Vue.component创建组件</h2>'
});
// 创建 Vue 实例,得到 ViewModel
var vm = new Vue({
el: '#app',
data: {},
methods: {}
});
</script>
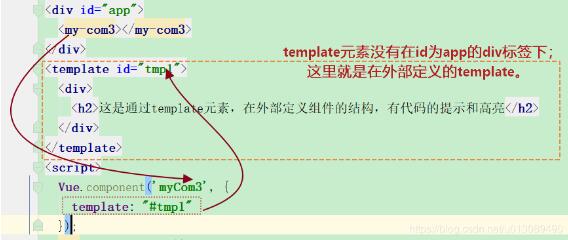
3.Vue外部直接定义template
<body>
<div id="app">
<my-com3></my-com3>
</div>
<template id="tmp1">
<div>
<h2>这是通过template元素,在外部定义组件的结构,有代码的提示和高亮</h2>
</div>
</template>
<script>
Vue.component('myCom3', {
template: "#tmp1"
});
var vm = new Vue({
el: '#app',
data: {},
methods: {}
});
</script>
</body>
以上这篇基于Vue全局组件与局部组件的区别说明就是小编分享给大家的全部内容了,希望能给大家一个参考,也希望大家多多支持。
以上是 基于Vue全局组件与局部组件的区别说明 的全部内容, 来源链接: utcz.com/p/237854.html