vue实现购物车案例
本文实例为大家分享了vue实现购物车的具体代码,供大家参考,具体内容如下
<!DOCTYPE html>
<html lang="en">
<head>
<meta charset="UTF-8">
<meta name="viewport" content="width=device-width, initial-scale=1.0">
<meta http-equiv="X-UA-Compatible" content="ie=edge">
<title>购物车案例</title>
<script src="https://cdn.jsdelivr.net/npm/vue/dist/vue.js"></script>
</head>
<style>
*{
padding: 0;
margin:0
}
ul li{
width: 1200px;
display: flex;
align-items: center;
justify-content: center;
}
li div,.total{
display: inline-block;
width:200px;
height: 50px;
line-height: 50px;
text-align: center;
}
button{
width: 60px;
height: 40px;
text-align: center;
line-height: 40px;
}
</style>
<body>
<div id="app">
<ul>
<goodsitem
v-for="item in goodslist"
:item="item"
:key="item.id"
@onchange="(type)=>{handleCount(type,item)}"
@ondelete="()=>{handleDelete(item.id)}">
</goodsitem>
<div class="total" style="padding-left: 113px">总价:{{total}}</div>
</ul>
</div>
</body>
<script>
var computed={
props:{
count:{
type:Number,
require:true
}
},
methods:{
handleCount(type){
this.$emit('onchange',type)
}
},
template:`<div style="width:200px">
<button @click="handleCount('sub')">-</button>
<span>{{count}}</span>
<button @click="handleCount('add')" >+</button>
</div>
`
}
var goodsitem={
props:{
item:{
type:Object,
require:true
}
},
methods:{
handleCount(type){
this.$emit('onchange',type)
},
handleDelete(){
this.$emit('ondelete')
}
},
components:{
computed
},
template:`<li>
<div>{{item.goodsName}}</div>
<div>{{item.price}}</div>
<computed :count="item.count" @onchange="handleCount"></computed>
<div>{{item.sum}}</div>
<div><button @click="handleDelete">删除</button></div>
</li>
`
}
var app=new Vue({
el:"#app",
data:{
goodslist:[{
id:1,
goodsName:"小可爱",
price:100,
count:1,
sum:100
},{
id:2,
goodsName:"小可爱",
price:200,
count:2,
sum:400
},{
id:3,
goodsName:"小可爱",
price:300,
count:3,
sum:900
},{
id:4,
goodsName:"小可爱",
price:400,
count:1,
sum:400
},
]
},
methods:{
handleCount(type,item){
if(type=='add'){
item.count+=1
}else{
if(item.count==1){
this.handleDelete(item.id)
return
}
item.count-=1
}
item.sum=item.count*item.price
},
handleDelete(id){
return this.goodslist=this.goodslist.filter((item)=>{
return id!=item.id
})
}
},
computed:{
total(){
return this.goodslist.reduce((total,item)=>{
return total+=item.sum
},0)
}
},
components:{
goodsitem
}
})
</script>
</html>
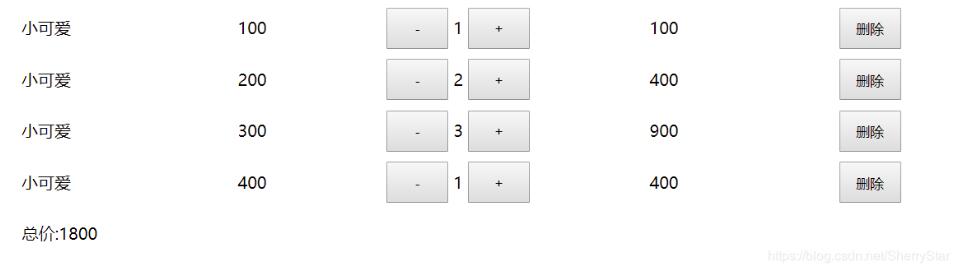
实现效果图:
小编再为大家分享一段收藏的vue购物车逻辑代码,也谢谢原作者的分享
<template>
<div class="hello">
<div class="main">
<div v-if="hasList">
<div class="cart-box">
<div class="cart-list" v-for="(item,index) in carts" :key="index">
<!-- <icon v-if="item.selected" type="success" color="red" data-index="index" class="cart-pro-select" @click="selectList"/>
<icon v-else type="circle" class="cart-pro-select" data-index="index" @click="selectList"/> -->
<router-link to="/"><img class="cart-thumb" :src="item.image" /></router-link>
<p class="cart-pro-name">{{item.title}}</p>
<p class="cart-pro-price">¥{{item.price}}</p>
<div class="cart-count-box">
<p class="cart-count-down" @click="minusCount(item.id)" data-obj="obj" data-index="index">-</p>
<p class="cart-count-num">{{item.num}}</p>
<p class="cart-count-add" @click="addCount(item.id)" data-index="index">+</p>
</div>
<p class="cart-del" @click="deleteList" data-index="index">×</p>
</div>
</div>
<div class="cart-footer">
<!-- <icon v-if="selectAllStatus" type="success_circle" color="#fff" class="total-select" @click="selectAll"/>
<icon v-else type="circle" color="#fff" class="total-select" @click="selectAll"/> -->
<div class="order-icon">
<router-link to="/"><img src="../../static/image/icon3.png" /></router-link>
</div>
<p>全选</p>
<p class="cart-toatl-price">¥{{totalPrice}}</p>
</div>
</div>
<div v-else>
<div class="cart-no-data">购物车是空的哦~</div>
</div>
</div>
</div>
</template>
<script>
// import {Toast} from 'vant'
export default {
data () {
return {
carts: [{id: 1, title: '新鲜芹菜 半斤', image: '../../static/image/s5.png', num: 4, price: 0.01, selected: true},
{id: 2, title: '素米 500g', image: '../../static/image/s6.png', num: 1, price: 0.03, selected: true}],
hasList: true,
totalPrice: 0,
selectAllStatus: true,
obj: {
name: 'hello'
}
}
},
created () {
// this.$set({
// hasList: true,
// carts: [
// {id: 1, title: '新鲜芹菜 半斤', image: '../../static/image/s5.png', num: 4, price: 0.01, selected: true},
// {id: 2, title: '素米 500g', image: '../../static/image/s6.png', num: 1, price: 0.03, selected: true}
// ]
// })
this.getTotalPrice()
},
methods: {
selectList (e) {
console.log(e)
let carts = this.carts
let index = 1
const selected = carts[index].selected
carts[index].selected = !selected
this.setData({
carts: carts
})
this.getTotalPrice()
},
deleteList (e) {
const index = e.currentTarget.dataset.index
let carts = this.carts
carts.splice(index, 1)
this.$set({
carts: carts
})
if (!carts.length) {
this.$set({
hasList: false
})
} else {
this.getTotalPrice()
}
},
selectAll (e) {
let selectAllStatus = this.data.selectAllStatus
selectAllStatus = !selectAllStatus
let carts = this.carts
for (let i = 0; i < carts.length; i++) {
carts[i].selected = selectAllStatus
}
this.$set({
selectAllStatus: selectAllStatus,
carts: carts
})
this.getTotalPrice()
},
addCount (e) {
let carts = this.carts
let num = carts[e - 1].num
num = num + 1
carts[e - 1].num = num
this.$set(this.carts, carts)
this.getTotalPrice()
},
minusCount (e) {
// const obj = e.currentTarget.dataset.obj
let carts = this.carts
let num = carts[e - 1].num
if (num <= 1) {
return false
}
num = num - 1
carts[e - 1].num = num
this.$set(this.carts, carts)
this.getTotalPrice()
},
getTotalPrice () {
let carts = this.carts
let total = 0
for (let i = 0; i < carts.length; i++) {
if (carts[i].selected) {
total += carts[i].num * carts[i].price
}
}
this.$set({
carts: carts,
totalPrice: total.toFixed(2)
})
}
}
}
</script>
<!-- Add "scoped" attribute to limit CSS to this component only -->
<!-- scoped css样式仅仅在当前模板使用-->
<style scoped>
.cart-box{
padding-bottom: 50px;
}
.cart-list{
position: relative;
padding: 10px 10px 10px 142px;
height: 92px;
border-bottom: 1px solid #e9e9e9;
}
.cart-list .cart-pro-select{
position: absolute;
left: 10px;
top: 45px;
width: 25px;
height: 25px;
}
.cart-list .cart-thumb{
position: absolute;
top: 10px;
left: 42px;
width: 92px;
height: 92px;
}
.cart-list .cart-pro-name{
display: inline-block;
width: 150px;
height: 52px;
line-height: 25px;
overflow: hidden;
}
.cart-list .cart-pro-price{
display: inline-block;
float: right;
height: 52px;
line-height: 25px;
}
.cart-list .cart-count-box{
position: absolute;
left: 142px;
bottom: 10px;
width: 125px;
height: 40px;
}
.cart-list .cart-count-box p{
display: inline-block;
line-height: 40px;
p-align: center;
}
.cart-count-down,.cart-count-add{
position: absolute;
top:-5px;
font-size: 22px;
width: 25px;
height: 100%;
}
.cart-count-num{
margin-left: 17px;
width: 75px;
}
.cart-del{
position: absolute;
right: 10px;
bottom: 0px;
width: 40px;
height: 40px;
line-height: 40px;
p-align: center;
font-size: 22px;
}
.cart-footer{
position: fixed;
bottom: 15%;
left: 0;
width: 100%;
height: 45px;
line-height: 45px;
box-sizing: border-box;
background: #AB956D;
color: #fff;
}
.total-select{
position: absolute;
left: 10px;
top: 12px;
width: 22px;
height: 22px;
}
.order-icon{
position: absolute;
right: 20px;
top: 12px;
width: 24px;
height: 24px;
}
.order-icon image,.order-icon navigator{
display: block;
width: 24px;
height: 24px;
}
.cart-toatl-price{
float: right;
width: 60px;
}
.cart-no-data{
padding:20px 0;
color: #999;
p-align: center;
}
</style>
更多文章可以点击《Vue.js前端组件学习教程》学习阅读。
关于vue.js组件的教程,请大家点击专题vue.js组件学习教程进行学习。
更多vue学习教程请阅读专题《vue实战教程》
以上就是本文的全部内容,希望对大家的学习有所帮助,也希望大家多多支持。
以上是 vue实现购物车案例 的全部内容, 来源链接: utcz.com/p/237329.html