js canvas实现随机粒子特效
本文实例为大家分享了js canvas随机粒子特效的具体代码,供大家参考,具体内容如下
前言
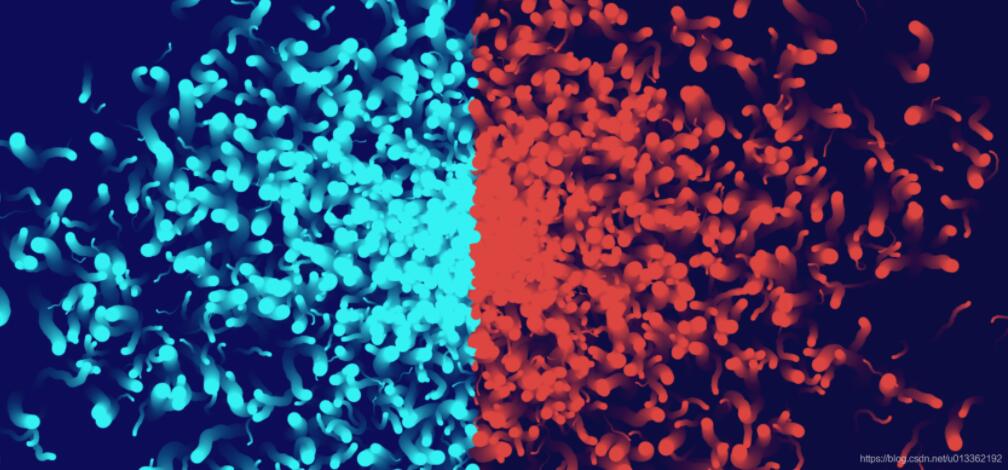
canvas实现前端的特效美术
结果展示

代码
html
<!DOCTYPE html>
<html lang="en">
<head>
<meta charset="UTF-8">
<meta http-equiv="X-UA-Compatible" content="IE=edge">
<meta name="viewport" content="width=device-width, initial-scale=1.0">
<title>Document</title>
</head>
<body>
<script src="./main.js"></script>
</body>
</html>
main.js
/*
*粒子化类构造
*类功能:
*1.初始化。创建画布,规定粒子属性等;
*2.创建图像并且进行绘制
*3.区域颜色定义
*4.粒子移动和偏射角度
*/
// 生成粒子
let Particle = function(context, options){
let random = Math.random();
this.context = context;
// 在画布里的x坐标
this.x = options.x;
// 在画布里的y坐标
this.y = options.y;
// 取随机数的1/2,对角度进行随机放大
this.s = 0.5 + Math.random();
// this.s = 1 + Math.random();
// 粒子运动的变化角度
this.a = 0;
// 宽度
this.w = window.innerWidth;
// 高度
this.h = window.innerHeight;
// 半径
this.radius = options.radius || 0.5 + Math.random() * 10;
// 颜色
this.color = options.color || "#E5483F";
// console.log(this.color);
// 指定3秒后调用;
// 如果粒子的半径大于0.5,加入新的粒子。
setTimeout(function(){
if(this.radius > 0.5){
particles.push(
new Particle(context, {
x: this.x,
y: this.y,
color: this.radius / 2 > 1 ? "#d6433b" : "#FFFFFF",
radius: this.radius / 2.2 })
);
}
}.call(Particle), 3000);
};
// 渲染图像
Particle.prototype.render = function() {
//从(0,0)开始新的路径;
this.context.beginPath();
// 创建曲线弧
this.context.arc(this.x, this.y, this.radius, 0, 2 * Math.PI);
// 绘图的线条宽度
this.context.lineWidth = 2;
//颜色填充
this.context.fillStyle = this.color;
// 填充当前图像的路径
this.context.fill();
// 返回初始点,并且绘制线条到初始位置
this.context.closePath();
};
Particle.prototype.swapColor = function() {
// 排除白色
if (this.color != "#FFFFFF") {
// 判断左右界面,并且赋颜色的值
if (this.x < this.w / 2) {
// 左半边
this.color = "#36fcfa";
} else {
// 右半边
this.color = "#E5483F";
}
}
};
Particle.prototype.move = function() {
// 颜色定义
this.swapColor();
// 横坐标按照cos角度进行变换,并且对其进行随机数放大;
// 偏射角度以便两个半界分开
this.x += Math.cos(this.a) * this.s;
this.y += Math.sin(this.a) * this.s;
// this.y += Math.cos(this.a) * this.s;
// this.x += Math.sin(this.a) * this.s;
// 在变化后,对随机角度进行再重取;
this.a += Math.random() * 0.8 - 0.4;
// 判断全为0,粒子横坐标无移动;
if (this.x < 0 || this.x > this.w - this.radius) {
return false;
}
// 粒子纵坐标无移动;
if (this.y < 0 || this.y > this.h - this.radius) {
return false;
}
// 重新绘制图像
this.render();
return true;
};
let canvas = document.createElement('canvas');
canvas.width = window.innerWidth - 20;
canvas.height = window.innerHeight - 30;
document.body.insertBefore(canvas, null);
let context = canvas.getContext('2d');
const conf = {
frequency: 50,
x: canvas.width,
y: canvas.height
};
let particles = [],
frequency = conf.frequency;
setInterval(function(){
popolate();
}.bind(null), frequency);
function popolate(){
particles.push(
new Particle(context, {
x: conf.x / 2,
y: conf.y / 2
})
);
return particles.length;
}
function clear() {
context.globalAlpha = 0.04;
context.fillStyle = '#000042';
context.fillRect(0,0,canvas.width, canvas.height);
context.globalAlpha = 1;
}
function update(){
particles = particles.filter(p => p.move());
clear();
requestAnimationFrame(arguments.callee);
}
update();
以上就是本文的全部内容,希望对大家的学习有所帮助,也希望大家多多支持。
以上是 js canvas实现随机粒子特效 的全部内容, 来源链接: utcz.com/p/220051.html


