Vue3配置axios跨域实现过程解析
实现跨域共3个步骤:
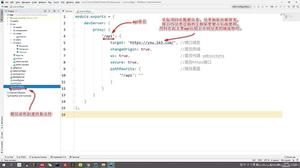
1,vue3.0根目录下创建vue.config.js文件;
module.exports = {
devServer: {
proxy: {
'/api': {
target: 'https://you.163.com/', //接口域名
changeOrigin: true, //是否跨域
ws: true, //是否代理 websockets
secure: true, //是否https接口
pathRewrite: { //路径重置
'^/api': ''
}
}
}
}
};
2,将上述代码块写入其中;
如图:

3,将api接口放入请求的url中;
使用页面的代码块:
<template>
<div>
<H1>TEST</H1>
<p>{{data}}</p>
</div>
</template>
<script>
import axis from 'axios';
export default {
name: 'Test',
data() {
return {
data: {},
};
},
methods: {
getData() {
axis.get('/api/xhr/search/queryHotKeyWord.json')//axis后面的.get可以省略;
.then(
(response) => {
console.log(response);
this.data = response;
})
.catch(
(error) => {
console.log(error);
});
},
},
mounted() {
this.getData();
},
};
</script>
<style scoped>
</style>
代码解析:

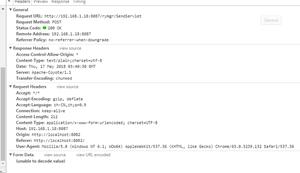
浏览器页面:

剩下的就是把数据渲染到页面了。
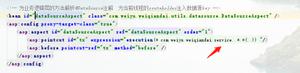
实际示例
vue3 8080端口请求flask8081端口服务数据:
module.exports = {
devServer: {
host: '0.0.0.0',
port: 8080,
open: true,
proxy: {
'/api/testcase/': {
target: 'http://127.0.0.1:8081/', //接口域名
changeOrigin: true, //是否跨域
ws: true, //是否代理 websockets
secure: true, //是否https接口
pathRewrite: { //路径重置
'^/api/testcase/': '/api/testcase/'
}
}
},
},
}
flask接口地址:
# http://127.0.0.1:8081/api/testcase/@app.route('/api/testcase/')def alltestcase(): pass
以上就是本文的全部内容,希望对大家的学习有所帮助,也希望大家多多支持。
以上是 Vue3配置axios跨域实现过程解析 的全部内容, 来源链接: utcz.com/p/218905.html