Nuxt 嵌套路由nuxt-child组件用法(父子页面组件的传值)
Nuxt嵌套路由官网上的API详解:点击链接
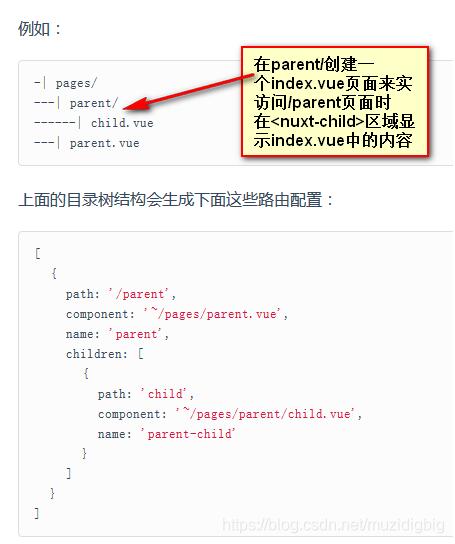
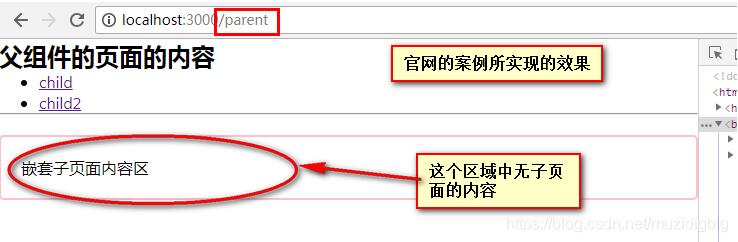
看了官网上的api实现了官网的案例你会发现访问父页面中只能显示父页面中的内容,要想默认的在<nuxt-child>区域显示一个页面内容怎么办?
自己案例代码:
pages/parent.vue
<template>
<div>
<h2>父组件的页面的内容</h2>
<ul>
<!-- 进行切换子页面,写法同vue.js -->
<li><nuxt-link to='/parent/child'>child</nuxt-link></li>
<li><nuxt-link to='/parent/child2'>child2</nuxt-link></li>
</ul>
<hr>
<div class="box">
<p>嵌套子页面内容区</p>
<!-- <nuxt-child>标签在父页面组件中相当于是子页面组件的占位符;嵌套中这个不可少 -->
<nuxt-child keep-alive :foobar="123"></nuxt-child>
</div>
</div>
</template>
<script>
export default {
}
</script>
<style scoped>
.box{
margin-top: 20px;
padding: 20px;
border: 2px solid pink;
border-radius: 5px;
}
</style>
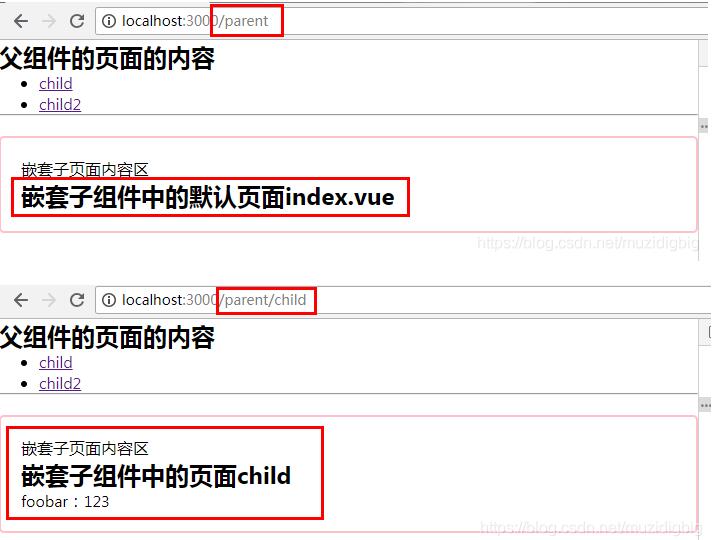
pages/parent/index.vue
<template>
<div>
<h2>嵌套子组件中的默认页面index.vue</h2>
</div>
</template>
<script>
export default {
}
</script>
<style scoped>
</style>
pages/parent/child.vue
<template>
<div>
<h2>嵌套子组件中的页面child</h2>
<p>foobar:{{foobar}}</p>
</div>
</template>
<script>
export default {
props:['foobar']
}
</script>
<style scoped>
</style>
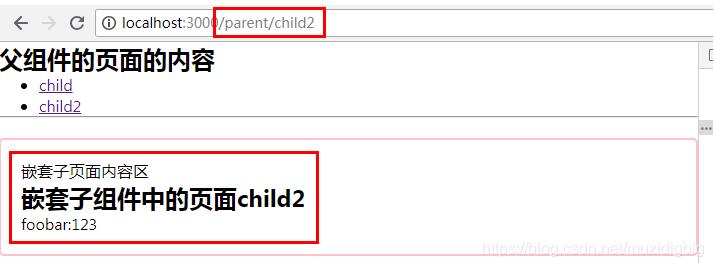
pages/parent/child2.vue
<template>
<div>
<h2>嵌套子组件中的页面child2</h2>
<p>foobar:{{foobar}}</p>
</div>
</template>
<script>
export default {
props: ['foobar']
}
</script>
<style scoped>
</style>
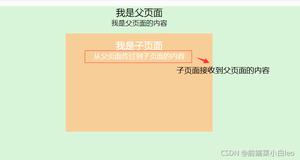
效果如下:
补充知识:nuxt二级路由
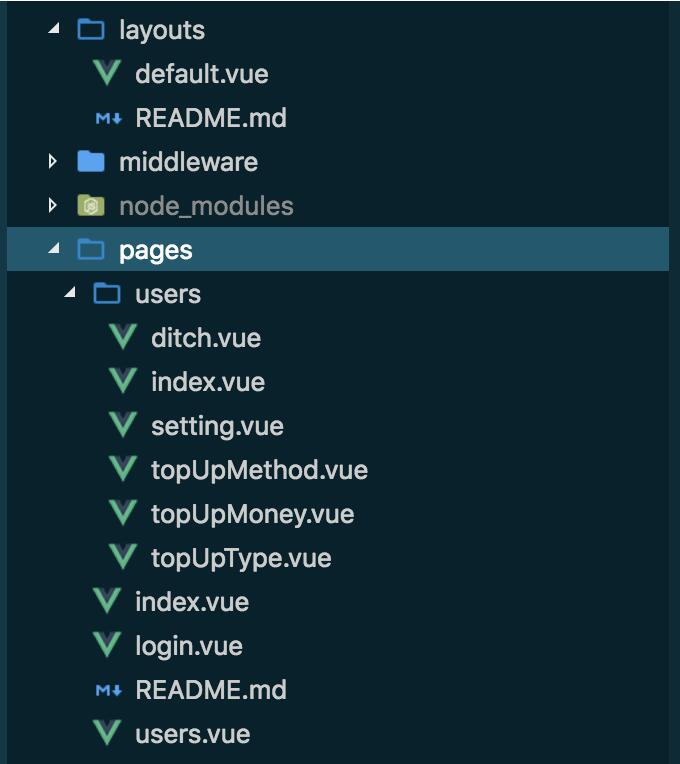
耗费了大半天的时间,终于把页面的二级路由配置好了
先看我的目录
如果没有登陆页,根本就不用考虑嵌套路由的问题,主要的menu跳转和<nuxt />可以直接写到layouts/default.vue中,首页可以放到pages/index.vue,就可以了。
好了,步入核心的
情景,在中间件middleware/authenticated.js
// 定义了一个中间件, 如果用户未登录, 则跳转登录页。
export default function ({
store,
redirect
}) {
if (!store.state.user) {
return redirect('/login')
}
}
首先,需要知道,pages/index.vue这个文件必须有,这是给路由'/',定义的页面,但是我真正的首页是在user/index.vue
pages/index.vue下
<template>
<div style="height:100%;">
</div>
</template>
<script>
export default {
created () {
console.log(this.$router)
this.$router.push('/login') // 页面加载时跳转
}
}
</script>
意思是加载二级路由的pages/users.vue页面
<template>
<div style="height:100%;">
<el-container style="height:100%">
<el-header class="theme-bg-color">
<my-head />
</el-header>
<el-container style="height:100%;">
<my-side />
<el-main>
<NuxtChild :key="key"/>
</el-main>
</el-container>
</el-container>
</div>
</template>
<script>
import MySide from '~/components/MySide.vue'
import MyHead from '~/components/MyHead.vue'
export default {
components: {
MySide,
MyHead
},
computed: {
key() {
return this.$route.name !== undefined? this.$route.name +new Date(): this.$route +new Date()
}
}
}
</script>
注意,在pages/users/index.vue页面中
export default {
name: 'users'
}
其他页面,比如pages/users/ditch.vue页面中
export default {
name: 'users-ditch'
}
一定要这样去写name,官网上也是这样说明的。
总结,嵌套路由(二级路由写法)
一,页面有个user.vue,文件夹也要有个同名的user;
二,最好有index.vue页面;
三,name格式。
源码地址:
https://github.com/besswang/rj-payadmin-nuxt
以上这篇Nuxt 嵌套路由nuxt-child组件用法(父子页面组件的传值)就是小编分享给大家的全部内容了,希望能给大家一个参考,也希望大家多多支持。
以上是 Nuxt 嵌套路由nuxt-child组件用法(父子页面组件的传值) 的全部内容, 来源链接: utcz.com/p/218582.html