python pytest接口自动化框架搭建
1.首先安装pytest
pip install pytest
2.编写单测用例
在pytest框架中,有如下约束:
所有的单测文件名都需要满足
test_*.py格式或*_test.py格式。在单测文件中,可以包含
test_开头的函数,也可以包含Test开头的类。在单测类中,可以包含一个或多个
test_开头的函数。
此时,在执行pytest命令时,会自动从当前目录及子目录中寻找符合上述约束的测试函数来执行。

import pytest
content of test_sample.py
def func(x):
return x + 1
def test_answer():
assert func(3) == 5

运行 pytest 或 指定特定文件 pytest -q test_sample.py
2.1 运行pytest 则遍历当前目录及子目录

看红色圈住的部分,可以得出它是循环遍历它当前目录和子目录
2.2 pytest -q test_class.py 指定文件运行
3.测试用例搜索
定义是:搜索测试文件和测试用例的过程称为测试搜索.
想要被搜到,必须遵守pyteset的命名规则:
所有的单测文件名都需要满足
test_*.py格式或*_test.py格式。在单测文件中,可以包含
test_开头的函数,也可以包含Test开头的类。在单测类中,可以包含一个或多个
test_开头的函数。
为了好记,测试文件和测试函数必须以 test_开头,类是Test 开头.
4.控制台信息讲解
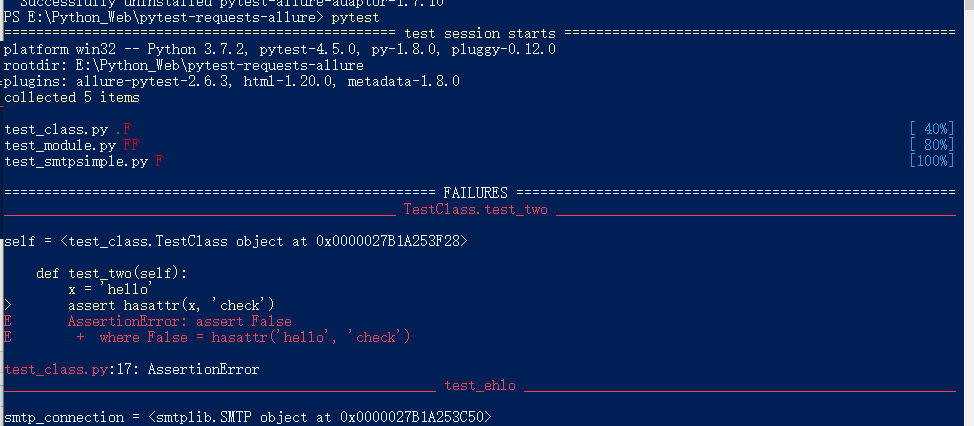

4.1. test session starts
这个是每次运行的分割线
4.2. platform 信息
1.win32 代表用的是windows ,MAC 显示的是darwin
2.接着显示的是Python 和 pytest的版本 , py 和pluggy是pytest包
3.rootdir 当前的起始目录, inifile是指配置文件,后边章节我会详细讲解.
* 4. collected 5 itemes *一共搜集了多少测试用例.
* 5. test_run01.py …
测试文件后边的“.” 代表测试通过, F(Fail),E(error),s(skip),X(xpass)>预期失败但是成功了
x(xfail)>预期失败执行也失败了.(下边我讲解具体详情)
6. 4 fail,1passed in 0.06 seconds======
表示通过的数量,没有通过也会总结数量 ,以及花费得时间.
*
5.使用命令行选项
有了命令行选项使其操作我们的用例变的非常灵活。Unittest 框架如果想执行复杂的场景
变得很鸡肋,这是pytest 优胜Unittest的地方.
以下列举的是常用的命令行选项,已经可以满足我们使用,如果个人想扩展,可以用
pytest –help 可以查到全部的命令 自己可以尝试下,在这不截图了
5.1 -–collect-only
从图片可以看出 一共搜集了5 个测试用例,在执行结果 是 no tests ran 说明只是搜集并不执行。
5.2. -k 选项
重要功能是利用你使用的表达式来 指定希望运行的测试用例.
比如:你用 pytest -k “表达式”
pytest 根据 你输入的表达式内容进行去匹配 测试用例的名字里是否有这个表达式内容进行过滤.
然后再运行. 如果想查找多个内容,可以用 or 进行连接 ,请看下边的截图:

5.3.-m 选项
m 是marker的缩写,功能是执行自己标记的测试用例,我先讲解如何标记测试用例
如果我们想执行带有 first_case 怎么标记呢
请看下边的实例, 用到了@pytest.mark.first_case, 其中first_case 是装饰器用于标记的内容.

import pytest
def inc(x):
return x + 1
def test_answer():
assert inc(3) == 5
@pytest.mark.first_case
def test_task01():
assert 1 == 1
def test_task02():
assert 1 == 1
def test_task03():
assert 1 == 1

pytest -m “first_case” –collect-only 或者
pytest -m “first_case”
| 1234567891011121314151617 | PS E:\Python_Web\pytest-requests-allure> pytest -m ``"first_case"--collect-only``================================================= test session starts =================================================``platform win32 -- Python 3.7.2, pytest-4.5.0, py-1.8.0, pluggy-0.12.0``rootdir: E:\Python_Web\pytest-requests-allure``plugins: allure-pytest-2.6.3, html-1.20.0, metadata-1.8.0``collected 8 items / 6 deselected / 2 selected``================================================== warnings summary ===================================================``d:\software\python\python37\lib\site-packages\_pytest\mark\structures.py:324``d:\software\python\python37\lib\site-packages\_pytest\mark\structures.py PytestUnknownMarkWarning: Unknown pytest.mark.first_case - ``is
thisa typo? You can register custom marks to avoid ``thiswarning - ``fordetails, see https:``//docs.pytest.org/en/latest/mark.html``PytestUnknownMarkWarning,``-- Docs: https:``//docs.pytest.org/en/latest/warnings.html``====================================== 6 deselected, 1 warnings ``in0.11 seconds ======================================= |
如果想用多个marker ,可以这么写 “marker1 or marker2” 意思是执行 mark1 和mark2所有测试用例
也可以用not 过滤, “marker1 and not marker2” 意思是 执行marker1 并且不包含marker2用例.
6. -x 选项
这个选项是为debug 准备的,正常的流程 是如果断言失败,它会继续执行并不会断掉.如果想在第一个断言失败我就不让继续执行,就可以用-x选项. 遇到断言失败就停止执行.有利于我们查找原因.
***7.–lf 选项 (lf 是 last failed 的缩写)***
这个选项用处很大,直接过滤出最后一个fail 的测试用例,有利于我们查找失败的用例,解决好,**我们再运行这个if 选项 ,可以再找出最后一个fail,省了我们再执行成功的用例,节省我们的时间 .
8.–ff (是 failed first)
和 –lf 不同是的是,它优先运行失败的case ,再把之前运行通过的也要运行. 自己尝试下,这里不做演示
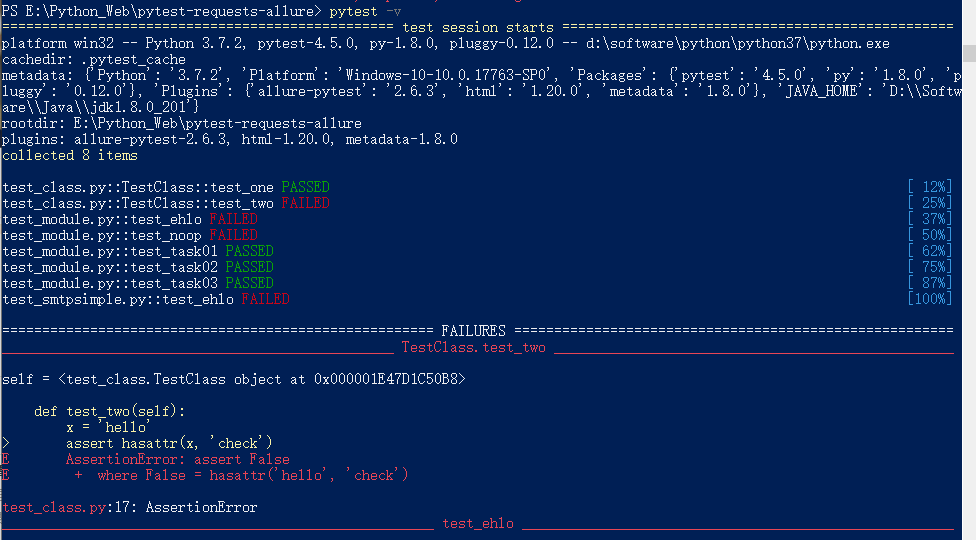
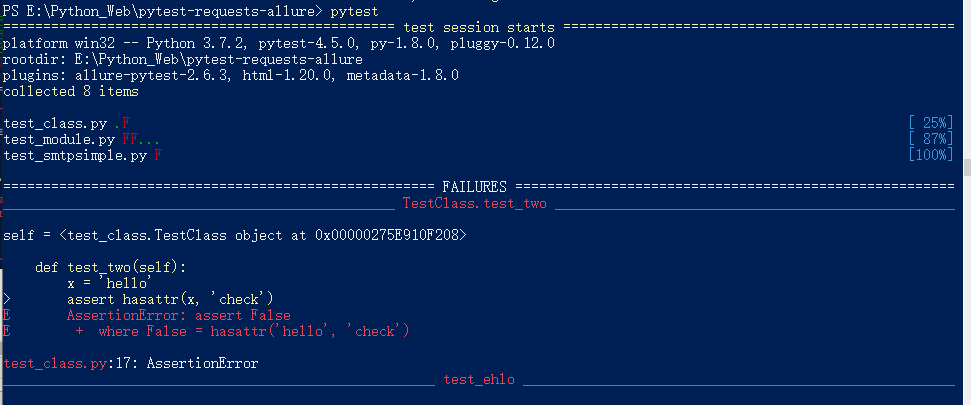
9.-v 选项
这个会在控制台输出更多的内容,最明显的区别就是每个文件中的每个测试用例都占一行(先前是每个文件占一行)
*我把这两种情况都打印出来,看下
*
* 10 –tb=style 选项***
这个选项用于对失败输出信息的显示方式,
输出的信息一般包括 1. 失败出现在哪一行2.是什么失败 3.怎么失败的 这三要素是信息追溯
我们常用的style 有 short ,no, line
实例如下:
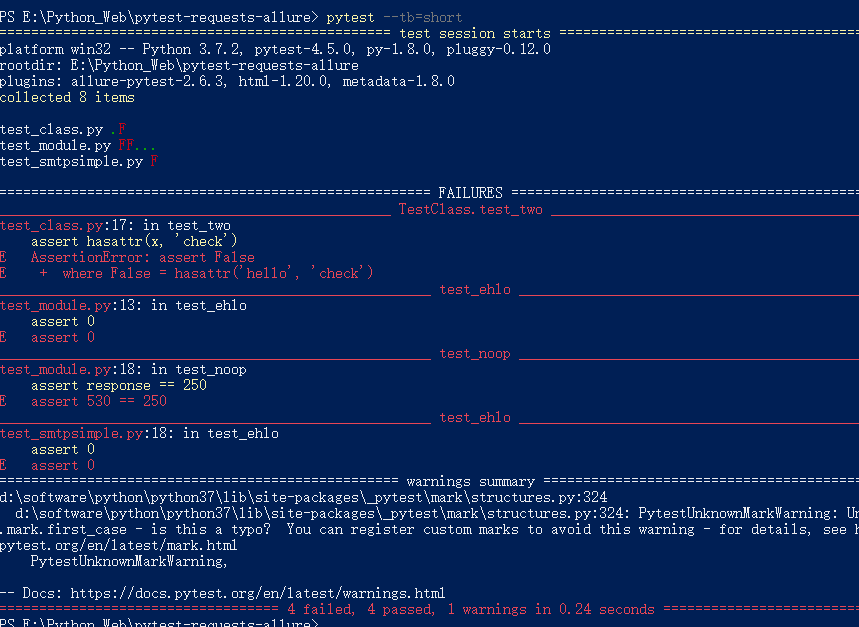
no 屏蔽所有的回溯信息,只是显示哪个文件哪个case 失败,
line 具体到哪个assert
short 具体到哪个参数,列举出更详细的失败信息.
实际工作中 -q 和 –tb=line 组合 已经够用.
以上是 python pytest接口自动化框架搭建 的全部内容, 来源链接: utcz.com/p/217216.html


