使用Python的OpenCV绘制矩形并提取对象
OpenCV的是一个开放源代码的计算机视觉和机器学习软件库。借助它可以完成各种图像处理操作, 例如处理图像和应用大量滤镜。它广泛用于对象检测, 面部检测和其他图像处理任务。
让我们看看如何在图像上绘制矩形并使用OpenCV提取对象。
# Python program to extract rectangular# Shape using OpenCV in Python3
import cv2
import numpy as np
drawing = False # true if mouse is pressed
mode = True # if True, draw rectangle.
ix, iy = - 1 , - 1
# mouse callback function
def draw_circle(event, x, y, flags, param):
global ix, iy, drawing, mode
if event = = cv2.EVENT_LBUTTONDOWN:
drawing = True
ix, iy = x, y
elif event = = cv2.EVENT_MOUSEMOVE:
if drawing = = True :
if mode = = True :
cv2.rectangle(img, (ix, iy), (x, y), ( 0 , 255 , 0 ), 3 )
a = x
b = y
if a ! = x | b ! = y:
cv2.rectangle(img, (ix, iy), (x, y), ( 0 , 0 , 0 ), - 1 )
else :
cv2.circle(img, (x, y), 5 , ( 0 , 0 , 255 ), - 1 )
elif event = = cv2.EVENT_LBUTTONUP:
drawing = False
if mode = = True :
cv2.rectangle(img, (ix, iy), (x, y), ( 0 , 255 , 0 ), 2 )
else :
cv2.circle(img, (x, y), 5 , ( 0 , 0 , 255 ), - 1 )
img = np.zeros(( 512 , 512 , 3 ), np.uint8)
cv2.namedWindow( 'image' )
cv2.setMouseCallback( 'image' , draw_circle)
while ( 1 ):
cv2.imshow( 'image' , img)
k = cv2.waitKey( 1 ) & 0xFF
if k = = ord ( 'm' ):
mode = not mode
elif k = = 27 :
break
cv2.destroyAllWindows()
输出如下:
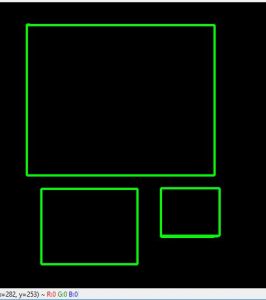
上面的代码仅适用于黑色背景图像。但是可以在任何图像上绘制矩形。我们可以编写一个程序, 使我们能够选择图像中的所需部分并提取所选部分。任务包括以下内容–
- 在任何图像上绘制形状
- 重新选择提取部分, 以防选择错误
- 从图像中提取特定对象
# Write Python code here# import the necessary packages
import cv2
import argparse
# now let's initialize the list of reference point
ref_point = []
crop = False
def shape_selection(event, x, y, flags, param):
# grab references to the global variables
global ref_point, crop
# if the left mouse button was clicked, record the starting
# (x, y) coordinates and indicate that cropping is being performed
if event = = cv2.EVENT_LBUTTONDOWN:
ref_point = [(x, y)]
# check to see if the left mouse button was released
elif event = = cv2.EVENT_LBUTTONUP:
# record the ending (x, y) coordinates and indicate that
# the cropping operation is finished
ref_point.append((x, y))
# draw a rectangle around the region of interest
cv2.rectangle(image, ref_point[ 0 ], ref_point[ 1 ], ( 0 , 255 , 0 ), 2 )
cv2.imshow( "image" , image)
# construct the argument parser and parse the arguments
ap = argparse.ArgumentParser()
ap.add_argument( "-i" , "--image" , required = True , help = "Path to the image" )
args = vars (ap.parse_args())
# load the image, clone it, and setup the mouse callback function
image = cv2.imread(args[ "image" ])
clone = image.copy()
cv2.namedWindow( "image" )
cv2.setMouseCallback( "image" , shape_selection)
# keep looping until the 'q' key is pressed
while True :
# display the image and wait for a keypress
cv2.imshow( "image" , image)
key = cv2.waitKey( 1 ) & 0xFF
# press 'r' to reset the window
if key = = ord ( "r" ):
image = clone.copy()
# if the 'c' key is pressed, break from the loop
elif key = = ord ( "c" ):
break
if len (ref_point) = = 2 :
crop_img = clone[ref_point[ 0 ][ 1 ]:ref_point[ 1 ][ 1 ], ref_point[ 0 ][ 0 ]:
ref_point[ 1 ][ 0 ]]
cv2.imshow( "crop_img" , crop_img)
cv2.waitKey( 0 )
# close all open windows
cv2.destroyAllWindows()
运行:将文件另存为capture_events.py为了进行测试, 请选择位于同一目录中的演示图片。现在, 执行以下命令–
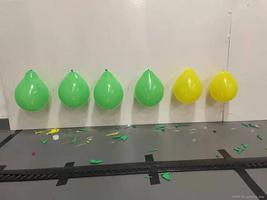
python capture_events.py --image demo.jpg输出如下:首先从图像中选择所需的部分。此外, 我们可以按编程时按” r”来删除错误的选择, 以进行新的正确选择。
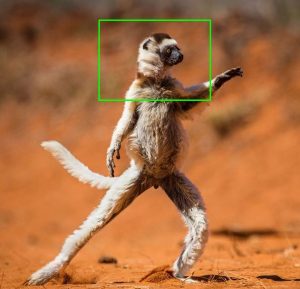
图:选择的部分
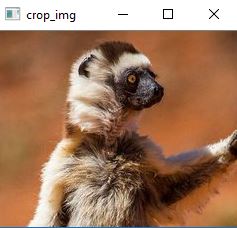
现在, 在选择了上述合适的选项后, 只需按编程按” c”提取即可。
无花果:切部分
首先, 你的面试准备可通过以下方式增强你的数据结构概念:Python DS课程。
以上是 使用Python的OpenCV绘制矩形并提取对象 的全部内容, 来源链接: utcz.com/p/204322.html