【JS】现在开始为你的Angular应用编写测试(二)
")
引言
在上一篇文章中,我们以Angular官方自带的测试用例为引,介绍了如何在20分钟内将单元测试集成到已有项目中;并提出从公共方法、管道等逻辑相对简单又比较稳定的代码块入手,开启书写单元测试之路。这一篇文章,主要来回答以下两个问题:
- 运行测试代码时看到的四种测试覆盖度分别是怎么计算的
- 如何从零开始,为一个组件完成100%的测试代码覆盖
01 测试覆盖度是怎么算的?
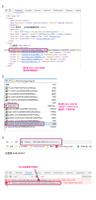
当我们在code-coverage 的报告中查看自己项目中的测试覆盖报告时,可以看到类似下图中的信息,所以文章的第一部分,我们对报告中的各种覆盖度做一个简短的介绍。
")
1、语句覆盖度(Statements)
语句覆盖度 = 测试覆盖到的语句数 / 代码文件的总语句数
2、分支覆盖度(Branches)
分支覆盖度 = 测试覆盖到的分支数 / 代码文件的总分支数
3、函数覆盖度(Functions)
函数覆盖度 = 测试覆盖到的函数数量 / 代码文件的总函数数量,哪怕被覆盖的函数只覆盖到一行代码也算
4、行覆盖度(Lines)
行覆盖度 = 测试覆盖到的行数 / 代码文件的总行数
这里所谓的“行”的概念,跟我们在代码编辑器中看到的是不一样的。在代码编辑器中一个四五百行的文件,在行覆盖度的计算中,分母可能只有两三百。比如说,下面我们认为是很多行的代码实际上只是一行。
")
5、看个例子
看到这里,知识似乎并没有增加,因为上面只是把几种覆盖度计算的公式简单罗列了一下。
所以我们不妨来看一个例子。假设有一个简单的颜色计算pipe,代码如下。
先花30s,自己算一算,上述代码的语句、分支、函数、行数分别为多少。
import { Pipe, PipeTransform } from '@angular/core';@Pipe({name: 'scoreColor'})
export class ScoreColorPipe implements PipeTransform {
transform(value: number): string {
if(value >= 80) return 'score-green';
if(value >= 60) return 'score-yellow';
return 'score-red';
}
}
算完了,公布一下答案。按照下方代码的注释部分进行计算,可以得知该代码文件包含7条语句,4个分支,1个函数,4行。
import { Pipe, PipeTransform } from '@angular/core';// 行 + 1,语句 + 2
@Pipe({name: 'scoreColor'})
export class ScoreColorPipe implements PipeTransform {
// 函数 + 1
transform(value: number): string {
// 行 + 1,语句 + 2,分支 + 2
if(value >= 80) return 'score-green';
// 行 + 1,语句 + 2,分支 + 2
if(value >= 60) return 'score-yellow';
// 行 + 1,语句 + 1
return 'score-red';
}
}
除了这四种覆盖之外,还有条件覆盖、路径覆盖、判定条件覆盖、组合覆盖等其他四种覆盖,如何用测试用例完成上述维度的覆盖,这里不深入展开,想了解的话,可以参考:https://www.jianshu.com/p/8814362ea125
6、其他
另外,团队中如果有多个成员一同开发,可以通过配置karma.conf.js 的方式来强制最低单元测试覆盖率。
coverageIstanbulReporter: {reports: [ 'html', 'lcovonly' ],
fixWebpackSourcePaths: true,
thresholds: {
statements: 80,
lines: 80,
branches: 80,
functions: 80
}
}
配置以后,运行测试的时候如果没有达到目标覆盖率,就会有相关提醒。
")
02 完成一个组件的100%测试覆盖
讲完测试覆盖度及其计算方式,我们来看一个公共业务组件(header.component.ts),通过介绍各种场景下如何编写测试用例将上述四种测试覆盖度提升到100%。
1、新建测试文件 *.spec.ts
假设我们要为一个名为header.component.ts的公共组件添加100%的测试覆盖,该组件中包含了常规的业务逻辑,代码的具体内容我们先不看,会在下面的场景分析中逐渐给出。
首先我们来创建一个测试文件header.component.spec.ts。
注意:TestBed.configureTestingModule方法就是在声明一个Module,需要添加该组件对应的Module中所有imports和provide中的依赖。
import { TestBed, async } from '@angular/core/testing';import { HeaderComponent } from './header.component';
import { DatePipe } from '@angular/common';
import { DevUIModule } from '@avenueui/ng-devui';
describe('Header Component', () => {
let fixture: any;
let theComp: HeaderComponent;
beforeEach(async(() => {
TestBed.configureTestingModule({
declarations: [
HeaderComponent
],
imports: [
DevUIModule
],
providers: [
DatePipe
]
}).compileComponents().then(() => {
fixture = TestBed.createComponent(HeaderComponent);
theComp = fixture.debugElement.componentInstance;
});
}));
it('should create header', () => {
expect(theComp).toBeDefined();
});
});
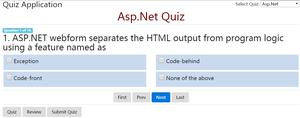
运行ng test,如果能看到以下页面,说明组件初始化成功,接下来我们就分场景来讨论在书写单元测试过程中可能要处理的各种情况
![]()
2、测试ngOnInit
header.component.ts中ngOnInit 的代码如下所示:
ngOnInit() {this.subscribeCloseAlert();
}
(1)写法一:行覆盖
要对这一行代码或者说这个函数进行测试覆盖,其实很简单,这样写就完事了:
describe('ngOnInit', () => {it(`ngOnInit should be called`, () => {
theComp.ngOnInit();
})
})
但是这里的测试覆盖只相当于在测试用例中执行了一遍ngOnInit,顺便调用了里面的所有函数,却不能保证里面所有函数的行为是没有问题的。我们心里可能也会犯嘀咕,好像什么都没做,这就算完成测试了吗?
(2)写法二:看起来还是行覆盖
同样是对ngOnInit 实现行覆盖,我们还可以这样写。
describe('ngOnInit', () => {it(`functions should be called on init`, () => {
spyOn(theComp, 'subscribeCloseAlert');
theComp.ngOnInit();
expect(theComp.subscribeCloseAlert).toHaveBeenCalled();
})
})
稍加对比,我们可以看到第二种写法虽然写完之后,覆盖度的结果跟第一种是一样的,但是多了一层更为精准的逻辑,即验证ngOnInit 被调用时,其中调用的函数确实也被调用了,这也是我们推荐的写法。至于spyOn,如果看着比较陌生的话,可以暂时跳过,在第8点里面会比较详细地介绍其用法。
从这里我们也可以看出,行覆盖和函数覆盖对于代码质量的保障其实是很低的,只能证明测试用例有执行到这些代码,没办法保障执行的结果没问题,为了测试函数的行为,我们需要用大量的expect 对函数执行前后的变量和结果进行检查,建议每一个测试函数都配置对应的expect。如果你的测试函数中没有expect,你也会在这里收到反馈。
")
3、使用Mock 模拟组件依赖的服务(service)
组件中经常会依赖服务中的变量或者方法,如下所示的代码,在组件中大概比比皆是。
this.commonService.getCloseAlertSub().subscribe((res) => {...
});
针对组件的单元测试只需要保障组件自身的行为可靠,不需要也不应该覆盖到所依赖的服务,因此我们需要对依赖的服务进行mock 或者stub。
(1)使用mock
作为前端开发者,对mock 数据应该不陌生。单元测试中的mock 与之类似,即制造一个假的外部依赖对象,并假设当前组件对该对象的依赖都是可靠的(至于被依赖对象是否可靠,会靠它自己的单元测试代码进行保障),在此基础之上,完成当前组件的单元测试书写,代码写出来就像下面这样:
class CommonServiceMock {getCloseAlertSub() {
return {
observable: function() {}
}
};
}
providers: [
{ provide: CommonService, useClass: CommonServiceMock }
...
}
(2)使用mock + stub
要实现同样的目的,我们也可以使用sinon的stub来做,代码如下:
import sinon from 'sinon/pkg/sinon-esm';...
class CommonServiceMock {
getCloseAlertSub() { };
}
let observable = { subscribe: function () { } };
beforeEach(
...
.compileComponents().then(() => {
...
sandbox = sinon.createSandbox();
sandbox.stub(commonService, 'getCloseAlertSub')
.withArgs().returns(observable);
});
)
在使用stub 的时候我们同样也mock 了组件所依赖的服务,与上述只使用mock相比,这种方法的特点在于,mock 类中只需要声明函数,函数的具体表现可以通过stub来定义。
另外注意一点,stub 只能模拟函数,无法模拟变量,所以如果你正在考虑如何模拟依赖对象中的变量,那么最好先停一下,看看这篇文章:https://stackoverflow.com/questions/47029151/how-to-mock-variable-with-sinon-mocha-in-node-js
4、测试一个函数
假设我现在要为如下函数编写单元测试
subscribeCloseAlert() {this.closeAlertSub = this.commonService.getCloseAlertSub().subscribe((res) => {
if (res) {
this.timeChangeTopVal = '58px';
}
});
}
在编写出的测试代码中既要保证所有代码都被执行,还要保证执行的结果是符合预期的,因此需要检查以下几点:
- commonService中的getCloseAlertSub方法被调用
- getCloseAlertSub方法的回调中调用processCloseAlert(特别细的逻辑了,我也还没写……)
- processCloseAlert中的逻辑符合预期
基于这几点假设,我们不妨对以上函数进行重构,得到两个更小、逻辑独立性更强、更容易测试的函数:
subscribeCloseAlert() {// subscribe 回调用必须添加bind(this),否则this的指向会丢失
this.closeAlertSub = this.commonService.getCloseAlertSub().subscribe(this.processCloseAlert.bind(this));
}
processCloseAlert(res) {
if (res) {
this.timeChangeTopVal = '58px';
}
}
如果你在“测试ngOnInit”中是使用的方法一覆盖ngOnInit,你会发现,subscribeCloseAlert 函数已经被覆盖了。因为方法一对ngOnInit的调用,已经对这个函数实施了行覆盖及函数覆盖。(不推荐这样做)
如果你用的是方法二,那么可能还要加一个测试函数给subscribeCloseAlert 做下行覆盖。
// TODO: 先凑合这这么写吧,有点懒,还没看这个应该怎么写比较好// 比较明确的一点是,这不是好的写法,因为就像我们上文提到的,这个测试函数没有expect
describe('subscribeCloseAlert', () => {
it(`should be called`, () => {
theComp.subscribeCloseAlert();
})
})
接着,我们来覆盖第二个函数。还是那个经典的语句,describe-it-should,写出来的测试代码就像下面这样:
describe('processCloseAlert', () => {it(`should change timeChangeTopVal to 58 if input is not null or false`, () => {
theComp.processCloseAlert(true);
expect(theComp.timeChangeTopVal).toBe('58px');
})
})
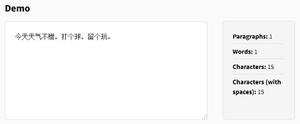
这个时候,你打开coverage 中的index.html 会发现这两个函数附近的代码覆盖率检测如下所示。可以看到,第五行代码前面标记了一个黑底黄色的E,这个E是在告诉我们“else path not taken”,再看看上面我们给出的测试代码,确实没有覆盖的,但是实际上else 里面也不需要采取什么行为,所以这里大家可以根据需要看是否要添加else 的测试代码。
")
5、测试window.location
我花了两个小时的时间去尝试,然后扔下几天,又花了一个小时的时间去尝试,才写出可以测试window.location 的代码。
假设组件中有一个涉及到获取当前url参数的函数,内容如下:
// 公共函数声明(被测函数)getUrlQueryParam(key: string): string {
if (!decodeURIComponent(location.href).split('?')[1]) return '';
const queryParams = decodeURIComponent(location.href).split('?')[1].split('&');
const res = queryParams.filter((item) => item.split('=')[0] === key);
return res.length ? res[0].split('=')[1] : '';
}
// 调用方
hasTimeInUrl(): boolean {
const sTime = this.getUrlQueryParam('sTime');
const eTime = this.getUrlQueryParam('eTime');
return !!(sTime && eTime);
}
这个函数比较难测,原因在于我们没办法通过改变location.href 的值来覆盖函数中的所有分支。在Google 上搜寻了良久,大概有以下三个思路来测试location.href:
- 用Object.defineProperty 来改变location.href 的值 (不可行)
- 通过with 改变运行上下文模拟自定义location 对象 (不可行 & 不推荐)
- 把window 作为一个InjectionToken 注入到调用方,在组件中注入的是真实window,在测试代码中注入的则是mock window (可行 but 操作不出来)
上面三个思路只有第三个看起来靠谱一点,而且有一篇看起来很靠谱的文章专门讲这个:https://jasminexie.github.io/...
细品几遍,上述思路没有问题,但是着手实施了半天,一直抛出服务未注入的错误。再加上文章里提到的代码改动有点多,理解起来也有一丢丢费劲,所以我就依据文章的思路对改动做了简化。
最终用于测试window 系列的的方法及代码如下:
(1)header.component.ts
// 声明变量window,默认复制为window 对象,并把组件中所有用到window 的地方改为调用this.windowwindow = window;
...
// 公共函数声明
getUrlQueryParam(key: string): string {
// 注意这里的变化,用this.window.location 取代了原来的location.href
if (!decodeURIComponent(this.window.location.href).split('?')[1]) return '';
const queryParams = decodeURIComponent(this.window.location.href).split('?')[1].split('&');
const res = queryParams.filter((item) => item.split('=')[0] === key);
return res.length ? res[0].split('=')[1] : '';
}
(2)header.component.spec.ts
// 在代码顶部添加一个window 的mock 对象const mockWindow = {
location: {
href: 'http://localhost:9876/?id=66290461&appId=12345'
}
}
beforeEach((() => {
...
theComp.window = mockWindow;
}))
// 然后测试的部分这样写
describe('getUrlQueryParam', () => {
it(`shold get the value of appId if the url has a param named appId`, () => {
theComp.window.location.href = 'http://localhost:9876/?id=66290461&appId=12345'
const res = theComp.getUrlQueryParam('appId');
expect(res).toBe('12345');
})
it(`shold get '' if the url does not have a param named appId`, () => {
theComp.window.location.href = 'http://localhost:9876/?id=66290461'
const res = theComp.getUrlQueryParam('appId');
expect(res).toBe('');
})
})
6、样式检查
比如对于一个Button 组件,我需要保证他携带了应有的class。
import { By } from '@angular/platform-browser';..
beforeEach((() => {
...
buttonDebugElement = fixture.debugElement.query(By.directive(ButtonComponent));
buttonInsideNativeElement = buttonDebugElement.query(By.css('button')).nativeElement;
}))
describe('button default behavior', () => {
it('Button should apply css classes', () => {
expect(buttonInsideNativeElement.classList.contains('devui-btn')).toBe(true);
expect(buttonInsideNativeElement.classList.contains('devui-btn-primary')).toBe(true);
});
});
想了解By.css()?往这里看:https://angular.cn/guide/testing-components-basics#bycss
7、测试@Output
@Input() 和@Output 我们是再熟悉不过了,直接来看代码:
@Output() timeDimChange = new EventEmitter<any>();...
dimensionChange(evt) {
this.timeDimChange.emit(evt);
}
测试代码如下:
describe('dimensionChange', () => {it(`should output the value`, () => {
theComp.timeDimChange.subscribe((evt) => expect(evt).toBe('output test'))
theComp.dimensionChange('output test');
})
})
8、使用Spy 确认函数被执行
(1)spyOn的基本用法
假如我们要为以下函数编写测试,在这个函数中我们对组件中某个变量的值做了修改
stopPropagation() {this.hasBeenCalled = true;
}
测试思路很简单,调用这个函数,然后检查变量的值是否被修改,就像下面这样
describe('stopPropagation', () => {it(`should change the value of hasBeenCalled`, () => {
theComp.stopPropagation();
expect(theComp.hasBeenCalled).toBe(true);
})
})
但是,如果我们是面临这样一个函数呢?函数中没有对变量进行修改,只是调用了入参的一个方法
stopPropagation(event) {event.stopPropagation();
}
先看答案,再来解释
describe('stopPropagation', () => {it(`should call event stopPropagation`, () => {
const event = {
stopPropagation() {}
}
spyOn(event, 'stopPropagation');
theComp.stopPropagation(event);
expect(event.stopPropagation).toHaveBeenCalled();
})
})
spyOn有两个参数,第一个参数是被监视对象,第二个参数是要监视的方法。
一旦执行了spyOn,那么当代码中有地方调用了被监视的方法时,实际上你代码里的这个方法并没有真正执行。在这种情况下,你可以使用expect(event.stopPropagation).toHaveBeenCalled(); 来验证方法调用行为是否符合预期。
那如果我想让我代码中的这个方法也执行,怎么办?这里有你想要的答案:https://scriptverse.academy/t...
(2)一个更接近业务场景的例子
再来一个业务场景中的真实案例,看完这个,你可能就更清楚spyOn的威力了。
假设有这样一个函数:
setAndChangeTimeRange() {if (this.hasTimeInUrl()) {
this.processTimeInUrl();
} else {
this.setValOfChosenTimeRange();
this.setTimeRange();
}
}
这个函数总共只有八行代码,但是这行代码中又调用了四个函数,如果把这四个函数一一展开,所涉及的代码量可能会超过一百行。那么,当我们在对这个函数进行单元测试的时候是测什么呢?要测试展开后的所有100行代码吗?
")
实际上,我们只需要测试这八行代码,也就是我的if-else 逻辑是否正确,至于每个函数的行为,我们会用该函数的单元测试代码保障。怎么写呢?就用我们刚刚提到的spyOn。那么,该函数的测试用例写出来就应该是下面这样:
describe('setAndChangeTimeRange', () => {it(`should exec processTimeInUrl if has time in url`, () => {
spyOn(theComp, 'hasTimeInUrl').and.returnValue(true);
spyOn(theComp, 'processTimeInUrl');
theComp.setAndChangeTimeRange();
expect(theComp.processTimeInUrl).toHaveBeenCalled();
});
it(`should set time range if does not have time in url`, () => {
spyOn(theComp, 'setValOfChosenTimeRange');
spyOn(theComp, 'setTimeRange');
spyOn(theComp, 'hasTimeInUrl').and.returnValue(false);
theComp.setAndChangeTimeRange();
expect(theComp.setValOfChosenTimeRange).toHaveBeenCalled();
expect(theComp.setTimeRange).toHaveBeenCalled();
});
})
写完这部分,停一会,再品一品“单元测试”这四个字,是不是觉得更有意境了?
9、用更少的用例完成更高的覆盖度
上述场景和案例都来自业务代码中一个532 行的公共组件,从0% 开始,到现在测试覆盖度达到90%+(离标题的100% 还差一点点哈哈,剩的大约10%就交给正在读文章的你了),目前测试代码量是597行(真的翻倍了,哈哈)
")
上面提到的内容已经是所有我认为值得一提的东西。场景写的差不多了,那就讨论一个相对本节内容稍微“题外”一点的话题。
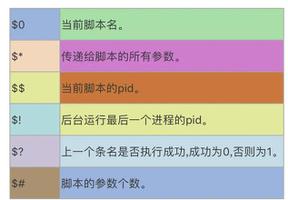
从下图中可以看到,为了对该函数做到较高的测试覆盖,很多代码被执行了4-5次。
所以如果你已经完成了对当前组件100%的单元测试覆盖,那么下一步或许就可以考虑,如何用更少的测试用例来完成更高的测试覆盖度。
")
10、还有更多
如果你觉得意犹未尽,或者说感觉文章里还存在没有讲清楚的情况,那么去这里寻找你想要的答案吧:https://angular.cn/guide/testing
想要系统地学习一样东西,文档和书籍永远是最好的选择。
总结
本文从测试覆盖度入手,讲解了各种覆盖度的计算方式,并给出一个简单的案例,你算对了吗?
接着,针对一个真实的业务组件,讨论多种场景下如何完成代码的测试覆盖,最终将该组件的测试覆盖度从0% 提升到90%+,希望你看了本篇有所收获。
加入我们
我们是DevUI团队,欢迎来这里和我们一起打造优雅高效的人机设计/研发体系。招聘邮箱:[email protected]。
文/DevUI 少东
往期文章推荐
《现在开始为你的Angular应用编写测试(一)》
《html2canvas实现浏览器截图的原理(包含源码分析的通用方法)》
《手把手教你搭建一个灰度发布环境》
参考链接汇总
- 白盒测试中的几种覆盖方法:https://www.jianshu.com/p/8814362ea125
- How to mock variable with Sinon/Mocha in node.js:https://stackoverflow.com/questions/47029151/how-to-mock-variable-with-sinon-mocha-in-node-js
- Injecting Window in an Angular Application:https://jasminexie.github.io/injecting-window-in-an-angular-application/
- 组件测试基础之By.css:https://angular.cn/guide/testing-components-basics#bycss
- jasmine-spyon:https://scriptverse.academy/tutorials/jasmine-spyon.html
- Angular 官方测试文档:https://angular.cn/guide/testing
- Angular8 多场景下单元测试实践指南:https://juejin.cn/post/6844903988324909069#heading-6
- JavaScript 测试驱动开发(图书):https://www.ituring.com.cn/book/1920
以上是 【JS】现在开始为你的Angular应用编写测试(二) 的全部内容, 来源链接: utcz.com/a/91026.html