【Python】django-rest-auth的使用
一、概述
在项目开发中很多开发者使用cookiecutter来构建Django项目的初始化模版,这样节省了大量的时间和精力,能更快速的开发。但是cookiecutter中设定的用户注册认证登陆模块django-allauth封装了整个模块,对前后端不分离项目更友好,但是如果前后端项目分离,很多的API无法使用,对开发造成很大的问题,为了解决这一问题,django-rest-auth应运而生,开放出部分API用于用户的管理
特点:
- 激活用户注册
- 登入和登出
- 获取或者更新某一个用户模型~~~~
- 密码修改
- 使用email重设密码
- 社交媒体认证
结构:
- rest_auth:具有登陆、登出、密码修改和密码重设的基本功能方法
- rest_auth_registruction:具备注册和社交媒体认证的相关逻辑
二、导入和配置
(一)、只使用django-rest-auth
- 导入: pipenv install django-rest-auth
- 把rest_auth注册到THIRD_INSTALLED_APPS或者INSTALLED_APPS中
- 在项目的一级路由中配置对应的路由
url(r'^rest-auth/', include('rest_auth.urls'))- 执行数据迁移:pipenv run python manage.py migrate
(二)、使用allauth中标准的注册功能
- 导入:pipenv install django-rest-auth[with_social]
- 注册django.contrib.sites, allauth, allauth.account, rest_auth和rest_auth.registration到INSTALLED_APPS或者THIRD_INSTALLED_APPS中
- 并在配置文件中base.py/settings.py中设置SITE_ID = 1
- 在项目一级路由中配置对应的路由
url(r'^rest-auth/', include('rest_auth.urls')),url(r'^rest-auth/registration/', include('rest_auth.registration.urls'))
- 执行数据迁移:pipenv run python manage.py migrate
(三)、注册账户
- url: rest_auth/registration/
parameter:
- username
- password1
- password2
- 设置EMAIL_BACKEND = 'django.core.mail.backends.console.EmailBackend'
- request
### RegistrationPOST http://127.0.0.1:8000/auth/registration/ HTTP/2.0
Content-Type: application/json
{
"username": "liquhua008",
"password1": "liqh930215",
"password2": "liqh930215",
"email": "[email protected]"
}
- Content-Type:application/json必须写上,否则程序会报415错误
HTTP/1.1 415 Unsupported Media TypeDate: Thu, 03 Dec 2020 02:23:15 GMT
Server: WSGIServer/0.2 CPython/3.7.0
Content-Type: application/json
Vary: Accept
Allow: POST, OPTIONS
X-Frame-Options: DENY
Content-Length: 62
X-Content-Type-Options: nosniff
Referrer-Policy: same-origin
{
"detail": "Unsupported media type \"text/plain\" in request."
}
报连接拒绝的错误或者CSRF错误
- 原因:没有设置Token权限
解决:设置权限
- 在INSTALLED APPS中添加'rest_framework.authtoken'
- 设置REST_FRAMEWORK
REST_FRAMEWORK = {'DEFAULT_AUTHENTICATION_CLASSES': [
'rest_framework.authentication.TokenAuthentication',
]
}
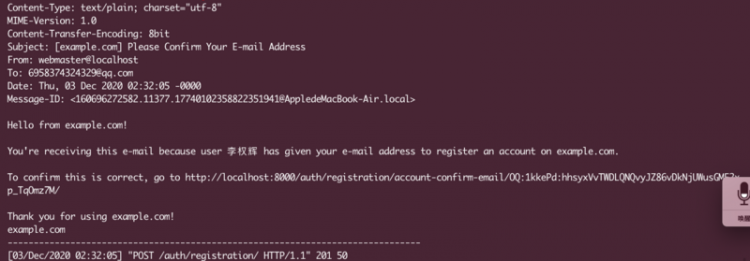
- 创建成功后在终端中打印出邮件内容并返回key

{"key": "06e7a7767b5da07257297941c29621ac842b0c9e"
}
(四)、登陆用户
- url: rest_auth/login/
parameter:
- username
- password
- Content-Type: application/json
- 登陆成功返回key
HTTP/1.1 200 OKDate: Thu, 03 Dec 2020 02:41:39 GMT
Server: WSGIServer/0.2 CPython/3.7.0
Content-Type: application/json
Vary: Accept, Cookie
Allow: POST, OPTIONS
X-Frame-Options: DENY
Content-Length: 50
X-Content-Type-Options: nosniff
Referrer-Policy: same-origin
Set-Cookie: csrftoken=vppzMvcQcFpab9kFeNenX3cUVvOzaK59Cfa0JNQIpqkNxw7yiQK8XXJnrQ4YI1cd; expires=Thu, 02 Dec 2021 02:41:39 GMT; Max-Age=31449600; Path=/; SameSite=Lax,sessionid=7ngs826bws34mdjkbb6f60xsuikzjmi1; expires=Thu, 17 Dec 2020 02:41:39 GMT; HttpOnly; Max-Age=1209600; Path=/; SameSite=Lax
{
"key": "1abc5ac07aab3395dfe4e832f7507250af4783a9"
}
(五)、已登陆用户操作
- 创建视图,视图设置权限为IsAuthenticated
from rest_framework.views import APIViewfrom rest_framework.response import Response
from rest_framework.permissions import IsAuthenticated
class UserDetailView(APIView):
permission_classes = [IsAuthenticated, ]
def get(self, request, *args, **kwargs):
return Response({"email": request.user.email}, status=200)
user_detail_view = UserDetailView.as_view()
- 添加路由
from django.contrib import adminfrom django.urls import path, include, re_path
from .views import (
user_detail_view
)
urlpatterns = [
path('admin/', admin.site.urls),
re_path(r'^auth/', include('rest_auth.urls')),
re_path(r'^auth/registration/', include('rest_auth.registration.urls')),
path('me/', user_detail_view) # 获取登陆用户的邮箱
]
- 发送请求
### MeGET http://127.0.0.1:8000/me/ HTTP/2.0
Content-Type: application/json
Authorization: Token 1abc5ac07aab3395dfe4e832f7507250af4783a9
- http请求中必须包含Authorization,内容为 Token 登陆后返回的key,如果不写token key
HTTP/1.1 401 UnauthorizedDate: Thu, 03 Dec 2020 02:50:18 GMT
Server: WSGIServer/0.2 CPython/3.7.0
Content-Type: application/json
WWW-Authenticate: Token
Vary: Accept
Allow: GET, HEAD, OPTIONS
X-Frame-Options: DENY
Content-Length: 58
X-Content-Type-Options: nosniff
Referrer-Policy: same-origin
{
"detail": "Authentication credentials were not provided."
}
- 成功返回需要获取的内容
相关介绍视频:JustDjango的dajngo-rest-auth
以上是 【Python】django-rest-auth的使用 的全部内容, 来源链接: utcz.com/a/73373.html


