vue源码分析——从实例化到渲染流程
本文vue 版本为 2.5.17, 分析的是 Runtime + Compiler 构建出来的 Vue.js。 在 Vue.js 2.0 中,最终都是通过 render 函数渲染,如果含有 template 属性,则需要将 template 编译成 render 函数,那么这个编译过程会发⽣运⾏时,所以需要带有Compiler编译器的版本。本文为vue源码介绍系列的第一篇,主要归纳整合vue实例化,将render函数转为vnode到生成挂载真实dom主要流程,具体细节请查看源码。第二篇将介绍组件化过程。
vue源码相对比较复杂,需要耐心反复理解及调试,不懂就多调试问百度,罗马不是一日建成的,相信坚持就会有收获哈~
具体调试可以下载vue.js,然后具体做断点debugger调试。
<script></script><div id="app"></div>
<script>
var vm = new Vue({
el: '#app',
render(h) {
return h(
'div', { attr: { class: 'classname' } },
[
'first item',
h('h2', { style: {color: 'orange' } }, 'second item')
]
)
},
data: {
message: 'Hello',
}
})
</script>
先上图分析流程
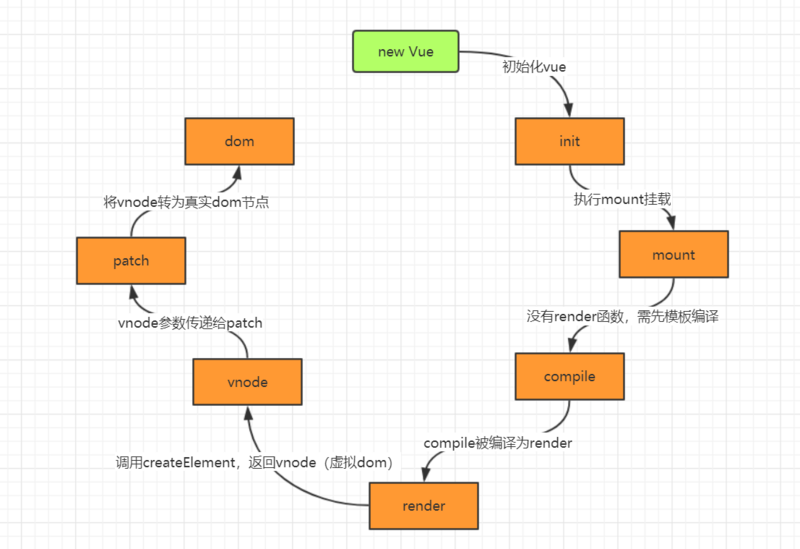
1. 定义Vue
function Vue (options) {if ("development" !== 'production' &&
!(this instanceof Vue)
) {
warn('Vue is a constructor and should be called with the `new` keyword');
}
this._init(options);
}
initMixin(Vue); // 定义 _init
stateMixin(Vue); // 定义 $set $get $delete $watch 等
eventsMixin(Vue); // 定义事件 $on $once $off $emit
lifecycleMixin(Vue); // 定义 _update $forceUpdate $destroy
renderMixin(Vue); // 定义 _render 返回虚拟dom
2. initMixin
实例化Vue时,执行 _init, _init 定义在 initMixin 中
Vue.prototype._init = function (options) {// 合并 options
if (options && options._isComponent) {
initInternalComponent(vm, options); // 组件合并
} else {
// 非组件合并
vm.$options = mergeOptions(
resolveConstructorOptions(vm.constructor),
options || {},
vm
);
}
initLifecycle(vm); // 定义 vm.$parent vm.$root vm.$children vm.$refs 等
initEvents(vm); // 定义 vm._events vm._hasHookEvent 等
initRender(vm); // 定义 $createElement $c
callHook(vm, 'beforeCreate'); // 挂载 beforeCreate 钩子函数
initInjections(vm); // resolve injections before data/props
initState(vm); // 初始化 props methods data computed watch 等方法
initProvide(vm); // resolve provide after data/props
callHook(vm, 'created'); // 挂载 created 钩子函数
if (vm.$options.el) {
vm.$mount(vm.$options.el); // 实例挂载渲染dom
}
};
3. $mount
vue最终都是通过render函数将dom编译为虚拟dom
// 构建render函数if (!options.render) {
// 如果没有render属性,那么将template模版编译转为render
}
// 最后调用 mount
return mount.call(this, el, hydrating)
// mount 调用 mountComponent
return mountComponent(this, el, hydrating)
4. mountComponent
通过 new Watcher 调用执行 updateComponent, vm._render获取虚拟dom, vm._update将虚拟dom转为真实的dom并挂载到页面
// hydrating 代表服务端渲染 hydrating => falseupdateComponent = function () {
vm._update(vm._render(), hydrating); // 关键点
};
5. _render
_render执行render函数 返回vnoe
Vue.prototype._render = function () {// 此处的 vm._renderProxy 等价于 vm
vnode = render.call(vm._renderProxy, vm.$createElement);
}
$createElement 主要是参数重载,整合为统一格式后调用 _createElement函数
function createElement ( context, tag, data, children, normalizationType, alwaysNormalize) {// 参数重载
if (Array.isArray(data) || isPrimitive(data)) {
normalizationType = children;
children = data;
data = undefined;
}
if (isTrue(alwaysNormalize)) {
normalizationType = ALWAYS_NORMALIZE;
}
return _createElement(context, tag, data, children, normalizationType)
}
_createElement 主要是根据 tag 标签判断是组件还是普通node标签,返回对应的vnode虚拟dom
function _createElement ( context, tag, data, children, normalizationType) {if (typeof tag === 'string') {
// platform built-in elements
vnode = new VNode(
config.parsePlatformTagName(tag), data, children,
undefined, undefined, context
);
}else{
// direct component options / constructor
vnode = createComponent(tag, data, context, children);
}
}
6. _update
_update 主要实现 vnode 转化为实际的dom, 注入到页面的同时并销毁页面模版。
定义 _update
// _update => __patch__Vue.prototype._update = function (vnode, hydrating) {
if (!prevVnode) {
// 初始化时
vm.$el = vm.__patch__(vm.$el, vnode, hydrating, false /* removeOnly */);
} else {
// 更新时
vm.$el = vm.__patch__(prevVnode, vnode);
}
}
定义 __patch__
// __patch__ => patchVue.prototype.__patch__ = inBrowser ? patch : noop;
定义 patch,
// 利用函数柯里化,将服务端和浏览器的差异集成到modules, nodeOps为dom元素操作方法集合var modules = platformModules.concat(baseModules);
var patch = createPatchFunction({ nodeOps: nodeOps, modules: modules });
定义 createPatchFunction
function createPatchFunction (backend) {return function patch (oldVnode, vnode, hydrating, removeOnly) {
// 创建新节点
createElm(
vnode,
insertedVnodeQueue,
oldElm._leaveCb ? null : parentElm,
nodeOps.nextSibling(oldElm)
);
// 销毁节点
if (isDef(parentElm)) {
removeVnodes(parentElm, [oldVnode], 0, 0);
} else if (isDef(oldVnode.tag)) {
invokeDestroyHook(oldVnode);
}
}
}
定义 createElm, 根据vnode创建真实dom
function createElm (vnode, insertedVnodeQueue, parentElm, refElm, nested, ownerArray, index) {// createChildren函数由子到父,深序递归调用createElm
createChildren(vnode, children, insertedVnodeQueue);
if (isDef(data)) {
invokeCreateHooks(vnode, insertedVnodeQueue);
}
// 子节点插入到父节点
insert(parentElm, vnode.elm, refElm);
}
以上就是vue从实例化,到调用render函数生成vnode,vnode通过patch转为真实dom节点,并挂载到页面的流程情况。接下来将第二篇将接扫vue组件化和生命周期过程。
以上是 vue源码分析——从实例化到渲染流程 的全部内容, 来源链接: utcz.com/a/38971.html

