Vue技术点整理VueRouter

路由 Vue Router
对于单页面应用来说,如果涉及到多个页面的话,就必须要使用到路由,一般使用官方支持的 router" title="vue-router">vue-router 库一,Vue Router 在项目中的安装引用
1,在页面中使用<script>快速使用Vue Router开发
<!doctype html><html>
<head>
<meta charset="utf-8">
<title>使用script直接引入Vue Router</title>
</head>
<body>
<script src="https://unpkg.com/vue/dist/vue.js"></script>
<script src="https://unpkg.com/vue-router/dist/vue-router.js"></script>
<div id="app">
<h1>页面共同header</h1>
<p>
<router-link to="/first">页面1</router-link>
<router-link to="/second">页面2</router-link>
</p>
<router-view></router-view>
</div>
<script>
//template也可以使用import从外部引入进来
const first = { template: '<div>I am first</div>' }
const second = { template: '<div>I am second</div>' }
const routes = [
{ path: '/first', component: first },
{ path: '/second', component: second }
]
const router = new VueRouter({
routes
})
const app = new Vue({
router
}).$mount('#app')
</script>
</body>
</html>
View Code
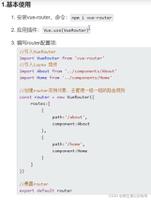
2,在vue cli框架使用路由
app.js
<template> <div id="app">
<router-view></router-view>
</div>
</template>
View Code
main.js
import Vue from "vue";import App from
"./App.vue";import router from
"./router.js";Vue.config.productionTip
= false;new Vue({ router,
render: h
=> h(App)}).$mount(
"#app");View Code
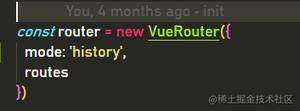
router.js
import Vue from 'vue'import Router from
'vue-router'Vue.use(Router)
const routes
= [ {
path:
'/index', name:
'index', component: ()
=> import("@/views/index.vue"), },
{
path:
'/login', name:
'login', component: ()
=> import("@/views/login.vue"), },
{
path:
'/fansNumber', name:
'fansNumber', component: ()
=> import("@/views/fansNumber.vue"), }
];
routes.forEach(route
=> { route.path
= route.path || '/' + (route.name || '');});
const router
= new Router({ routes });router.beforeEach((to, from, next)
=> {//路由执行之前,处理一些逻辑 next();
})
export default router;
View Code
二,Vue Router 基础功能用法
1,router-路径式传参
//路由定义 router.jsconst router = new VueRouter({
routes: [
// 动态路径参数 以冒号开头
{ path: '/user/:id', component: User }
]
})
//第一种编程式跳转指定路由 test.vue
const userId = '123'
this.$router.push({
path: '/user/' + userId
})
//第二种编程式跳转指定路由 test.vue
this.$router.push({
name: 'user',
params: userId
})
//声明式跳转指定路由 test.vue
<router-link to="/user/{{userId}}">
<span>跳转</span>
</router-link>
//在user的js里面接收参数
created() {
console.info(this.$route.params.userId)
}
注:你可以在一个路由中设置多段『路径参数』,对应的值都会设置到 $route.params 中。例如:
模式
匹配路径
$route.params
/user/:username
/user/jack
{ username:'jack' }
/user/:username/pwd:password
/user/jack/pwd/123
{ username:'jack',pwd:123
2,router-get方式传参
//路由定义 router.jsconst router = new VueRouter({
routes: [
{ path: '/user', component: User }
]
})
//编程式跳转到指定路由 test.vue
this.$router.push({
name: "user",
query: {
userName: 'jack'
pwd: '123'
}
});
//在user的js里面接收参数
created() {
console.info(this.$router.query.userName)
console.info(this.$router.query.pwd)
}
3,编程式导航
- router.replace() 和 router.push() 一样的用法,区别为:
- router.push() 每次调用,都会往history里面添加一条新纪录,可以返回历史页面
- router.replace() 每次调用,不会往history里面添加记录,而是会替换掉当前的history记录,没有历史记录
- router.go(1) //浏览器中,向前进一步,等同于history.foward()
- router.go(-1) //浏览器中,向后一步,等同于history.back()
4,基于路由的动态过渡效果
<template> <div id="app">
<transition name="fade">
<router-view></router-view>
</transition>
</div>
</template>
<style lang="scss">
.fade-enter-active{
transition: opacity .6s;
}
.fade-enter{
opacity: .5;
}</style>
5,导航守卫,过滤器
const router = new VueRouter({ routes: [
{
path:
"/home", name:
"Home", component: Home,
meta: {
type:
'1', title:
'首页' }
}
]
});
//路由执行前router.beforeEach((to, from, next) => {
//校验token是否过期
if(to.token && Util.checkToken(to.token)){
return next({path: to.path});
}else{
return next({path: '/login'});
}
//使用路由自定义meta,统一处理title
const title = to.meta && to.meta.title;
if (title) {
document.title = title;
}
})
//路由执行后
router.afterEach((to) => {
//恢复页面滚动位置
window.scrollTo(0, 0);
});
export default router;
6,使用scrollBehavior中的异步滚动
const router = new Router({ scrollBehavior(to, from, savedPosition) {
// keep-alive 返回缓存页面后记录浏览位置if (savedPosition && to.meta.keepAlive) {
return savedPosition;
}
// 异步滚动操作
returnnew Promise((resolve) => {
setTimeout(() => {
resolve({ x: 0, y: 1 });
}, 0);
});
},
});
更多功能,请参考router官网
原文出处:https://www.cnblogs.com/front-web/p/11153024.html
以上是 Vue技术点整理VueRouter 的全部内容, 来源链接: utcz.com/z/508736.html