React Native 与 iOS OC 之间的交互

前置准备
首先最好了解一点关于 oc 的语法知识,不然很多都是看不懂的
- 创建声明文件
nativeModule.h#import <Foundation/Foundation.h>#import <React/RCTBridgeModule.h>
@interface nativeModule : NSObject <RCTBridgeModule>
@end
- 创建文件
nativeModule.m#import <Foundation/Foundation.h>#import "nativeModule.h"
@interface nativeModule ()
@end
@implementation nativeModule
@end
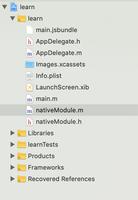
这是添加完文件后的结构目录
关于 interface 的区别:
.h里面的@interface,它是供其它Class调用的。它的@property和functions,都能够被其它Class“看到”(public)
而.m里面的@interface,在OC里叫作Class Extension,是.h文件中@interface的补充。但是.m文件里的@interface,对外是不开放的,只在.m文件里可见(private)
因此,我们将对外开放的方法、变量放到.h文件中,而将不想要对外开放的变量放到.m文件中(.m文件的方法可以不声明,直接用)。
RN 传值给 iOS
方法 1 正常传值给原生
在 .m 文件中添加方法:
// 省略上面的代码@implementation nativeModule
// 这句代码是必须的 用来导出 module, 这样才能在 RN 中访问 nativeModule这个 module
RCT_EXPORT_MODULE();
// 接收字符串
RCT_EXPORT_METHOD(addHelloWord:(NSString *)name location:(NSString *)location)
{
NSLog(@"%@,%@", name, location);
}
@end
RN 代码:
import { Button, NativeModules } from 'react-native'const { nativeModule } = NativeModules
<Button title={'传 2 个参数给 native'} onPress={() => {
nativeModule.addHelloWord('你的名字', '位置:浙江')
}}/>
点击此按钮的作用,就是将 '你的名字', '位置:浙江' 这 2 个字符串传递到了原生端
方法 2 传递回调函数
在 .m 文件中添加:
// 只接受一个参数——传递给 JavaScript 回调函数的参数数组。RCT_EXPORT_METHOD(checkIsRoot:(RCTResponseSenderBlock)callback) {
NSArray *array = @[@"string", @"number"];
callback(array);
}
在 RN 中添加代码:
<Button title={'js 传一个回调给 native,回调中收到一个数组'} onPress={() => { nativeModule.checkIsRoot((str: string, num: string) => {
console.log(str, num)
})
}}/>
这是在 RN 中 给原生端传递了一个回调函数,用来解决,部分操作完成后的回调, ** 如果 callback 多次调用 RN 会报错 **
方法 3 获取 promise 回调
在 .m 文件中添加代码:
@interface nativeModule ()@property (nonatomic) RCTPromiseResolveBlock normalResolve;
@property (nonatomic) RCTPromiseRejectBlock normalReject;
@property (nonatomic) NSInteger num;
@end
// 这是一个计时器
-(void)startTime: (NSArray*) data{
NSTimer *timer = [NSTimer scheduledTimerWithTimeInterval:2 repeats:YES block:^(NSTimer * _Nonnull timer) {
NSArray *events =@[@"Promise ",@"test ",@" array"];
if (events) {
self.normalResolve(events);
[timer invalidate];
} else {
[timer invalidate];
NSError *error=[NSError errorWithDomain:@"我是回调错误信息..." code:101 userInfo:nil];
self.normalReject(@"no_events", @"There were no events", error);
}
}];
[[NSRunLoop mainRunLoop] addTimer:timer forMode:NSDefaultRunLoopMode];
}
// 回调给RN的参数,回调的错误信息
RCT_EXPORT_METHOD(getHBDeviceUniqueID: (RCTPromiseResolveBlock)resolve
rejecter:(RCTPromiseRejectBlock)reject) {
// 要执行的任务
self.normalResolve = resolve;
self.normalReject = reject;
[self performSelectorOnMainThread:@selector(startTime:) withObject: [NSArray arrayWithObjects: @"1", @"2", nil] waitUntilDone:YES];
}
在 RN 中添加代码:
<Button title={'native传一个 promise 给 JS'} onPress={() => { nativeModule.getHBDeviceUniqueID().then((arr: string[]) => {
console.log('resolve', arr)
}).catch((err: string) => {
console.error(err)
})
}}/>
nativeModule.getHBDeviceUniqueID 的执行他是一个 promise,可以获取原生端的回调, 其实和方法 2 差不多
方法 3 获取 promise 的同步方式
在 .m 文件中添加:
// 这是一个计时器2-(void)startTime2: (NSArray*) data{
NSLog(@"data%@",data);
NSTimer *timer = [NSTimer scheduledTimerWithTimeInterval:1 repeats:YES block:^(NSTimer * _Nonnull timer) {
NSLog(@"%d", (int)self.num);
self.num = self.num + 1;
NSLog(@"%d", (int)self.num);
if (self.num > 4) {
[timer invalidate];
NSLog(@"end");
self.normalResolve(data);
}
}];
[[NSRunLoop mainRunLoop] addTimer:timer forMode:NSDefaultRunLoopMode];
}
// RCT_REMAP_METHOD 与RCT_EXPORT_METHOD相同,但是该方法是在JS线程上从JS同步调用的,可能会返回结果。
// 同步可能会有性能问题 建议除了 promise 以外都别使用
RCT_REMAP_METHOD(findEvents,
findEventsWithResolver:(RCTPromiseResolveBlock)resolve
rejecter:(RCTPromiseRejectBlock)reject)
{
self.normalResolve = resolve;
self.normalReject = reject;
self.num = 0;
[self performSelectorOnMainThread:@selector(startTime2:) withObject: [NSArray arrayWithObjects: @"1", @"2", nil] waitUntilDone:YES];
}
在 RN 端添加代码:
<Button title={'native传一个 promise 给 JS2'} onPress={() => { nativeModule.findEvents().then((arr: string[]) => {
console.log('resolve', arr)
}).catch((err: string) => {
console.error(err)
})
}}/>
方法 4 和方法 3 大体一致,但是有一点不同,就是 RCT_REMAP_METHOD 使用此方法会将代码变成同步状态
iOS 传值给 RN 端
初始的数据提供
在 appDelegate.m 文件中添加代码:
NSArray *imageList = @[@"http://foo.com/bar1.png", @"http://foo.com/bar2.png"];
NSDictionary *props = @{@"images" : imageList};
RCTRootView *rootView = [[RCTRootView alloc] initWithBridge:bridge moduleName:@"learn" initialProperties:props];
// 这一行代码原本就有,不同点在于 initialProperties:props
在 RN 端写入:
// 重写 APP , images就是 iOS 提供的数据,这里我们通过 context 来传递数据export default class App extends React.Component<{ images: string[] }> {
render() {
return <NativeProps.Provider value={this.props.images}>
<AppContainer/>
</NativeProps.Provider>
}
}
// 在 hooks 里简单的使用
const images = useContext(NativeProps);
<Text>这是从 native 端传来的初始数据{JSON.stringify(images)}</Text>
添加监听事件
在 .m 文件中添加代码:
// 可供监听的事件名称- (NSArray<NSString *> *)supportedEvents
{
return @[@"EventReminder"];
}
RCT_EXPORT_METHOD(postNotificationEvent:(NSString *)name)
{
NSLog(@"calendarEventReminderReceived");
[self sendEventWithName:@"EventReminder" body:@{@"name": name}];;
}
- (void)calendarEventReminderReceived:(NSNotification *)notification
{
// 这是官网的例子
NSLog(@"calendarEventReminderReceived");
NSString *eventName = notification.userInfo[@"name"];
[self sendEventWithName:@"EventReminder" body:@{@"name": eventName}];
}
RCT_EXPORT_METHOD(Send){
NSDictionary *dict = @{@"name" : @"veuimyzi"};
NSNotification *notification = [[NSNotification alloc] initWithName:@"EventReminder" object:nil userInfo:dict] ;
[self calendarEventReminderReceived:notification];
}
在 RN 中添加代码:
const ManagerEmitter = new NativeEventEmitter(nativeModule)const [msg, setMsg] = useState([])
// hooks 中的使用,类似于 componentDidMount 生命周期
useEffect(() => {
const subscription = ManagerEmitter.addListener(
'EventReminder',
(reminder) => {
setMsg(prevState => {
return prevState.concat(reminder.name)
})
console.log('这是监听的EventReminder事件回复', reminder.name)
}
)
return () => {
subscription.remove()
}
}, [])
<Button title={'js 监听事件,让 native 给 js 发通知'} onPress={() => {
nativeModule.postNotificationEvent('test')
}}/>
<Button title={'js 监听事件,让 native 给 js 发通知 send'} onPress={() => {
nativeModule.Send()
}}/>
{
msg.map((item, index) => {
return <Text key={item + index}>item:{item}</Text>
})
}
关于 postNotificationEvent 方法是属于最简单的使用, 在原生端调用 sendEventWithName 就可以传递数据给 RN 的监听
而另一个方法 Send 和 calendarEventReminderReceived ,一个是来自于官网的实例 讲的是从 NSNotification获取数据, Send 是传递数据给 calendarEventReminderReceived
关于监听的优化, 这个官网上也有,有空可以看下,就是在 .m 文件中添加下列代码:
@implementation nativeModule{
bool hasListeners;
// 一个局部变量
}
-(void)startObserving {
hasListeners = YES;
}
-(void)stopObserving {
hasListeners = NO;
}
// 在发送监听的添加判断,如果有监听才发送,有效减少桥接代码的调用
if (hasListeners) {
[self sendEventWithName:@"EventReminder" body:@{@"name": name}];;
}
总结
上述代码的库: https://github.com/Grewer/learn-rn
关于原生端和 RN 端的交互基本就是这些了,当然原生端还有更多,更复杂的操作,比如进程什么的,如果想写桥接方法,这个也会碰到很多,不过掌握了上面这些,对于一些三方 SDK 的调用是够用了
以上是 React Native 与 iOS OC 之间的交互 的全部内容, 来源链接: utcz.com/z/382752.html


