「进阶篇」Vue Router 核心原理解析

此篇为进阶篇,着重把原理讲清楚,不会大篇幅手撕源码。
前言
此篇为进阶篇,希望读者有 Vue.js,Vue Router 的使用经验,并对 Vue.js 核心原理有简单了解;
不会大篇幅手撕源码,会贴最核心的源码,对应的官方仓库源码地址会放到超上,可以配合着看;
对应的源码版本是 3.5.3,也就是 Vue.js 2.x 对应的 Vue Router 最新版本;
Vue Router 是标准写法,为了简单,下面会简称 router。
本文将用以下问题为线索展开讲 router 的原理:
- $router 和 $route 哪来的
- router 怎样知道要渲染哪个组件
- this.$router.push 调用了什么原生 API
- router-view 渲染的视图是怎样被更新的
- router 怎样知道要切换视图的
文末有总结大图
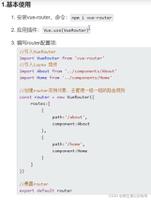
以下是本文使用的简单例子:
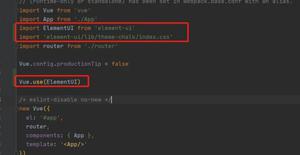
// main.jsimport Vue from 'vue'
import App from './App'
import router from './router'
new Vue({
el: '#app',
// 挂载 Vue Router 实例
router,
components: { App },
template: '<App/>'
})
// router/index.js
import Vue from 'vue'
import Router from 'vue-router'
import Home from '@/components/Home'
import About from '@/components/About'
import Home1 from '@/components/Home1'
// 使用 Vue Router 插件
Vue.use(Router)
// 创建 Vue Router 实例
export default new Router({
routes: [
{
path: '/',
redirect: '/home'
},
{
path: '/home',
name: 'Home',
component: Home,
children: [
{
path: 'home1',
name: 'Home1',
component: Home1
}
]
},
{
path: '/about',
name: 'About',
component: About
}
]
})
// App.vue
<template>
<div id="app">
<router-link to="/home">Go to Home</router-link>
<router-link to="/about">Go to About</router-link>
<router-link to="/home/home1">Go to Home1</router-link>
<router-view/>
</div>
</template>
<script>
export default {
name: 'App'
}
</script>
页面表现举例:
$router 和 $route 哪来的
我们在组件里使用 this.$router 去跳转路由、使用 this.$route 获取当前路由信息或监听路由变化,那它们是从哪里来的?答案是路由注册
路由注册
路由注册发生在 Vue.use 时,而 use 的就是 router 在 index.js 暴露的 VueRouter 类:
// demo代码:import Router from 'vue-router'
// 使用 Vue Router 插件
Vue.use(Router)
// router 的 index.jsimport { install } from './install'
// VueRouter 类
export default class VueRouter {
}
VueRouter.install = install
// install.js
export function install (Vue) {
// 全局混入钩子函数
Vue.mixin({
beforeCreate () {
// 有router配置项,代表是根组件,设置根router
if (isDef(this.$options.router)) {
this._routerRoot = this
this._router = this.$options.router
} else {
// 非根组件,通过其父组件访问,一层层直到根组件
this._routerRoot = (this.$parent && this.$parent._routerRoot) || this
}
},
})
// Vue 原型上增加 $router 和 $route
Object.defineProperty(Vue.prototype, '$router', {
get () { return this._routerRoot._router }
})
Object.defineProperty(Vue.prototype, '$route', {
get () { return this._routerRoot._route }
})
// 全局注册了 router-view 组件和 router-link 组件
Vue.component('RouterView', View)
Vue.component('RouterLink', Link)
}
所以 this.$router,this.$route 就是在注册路由时混入了全局的 beforeCreate 钩子,钩子里进行了 Vue 原型的拓展。
同时也清楚了 router-view 和 router-link 的来源。
VueRouter 类
我们先看最核心部分
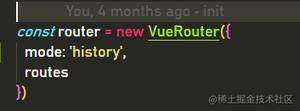
export default class VueRouter { constructor (options) {
// 确定路由模式,浏览器环境默认是 hash,Node.js环境默认是abstract
let mode = options.mode || 'hash'
this.fallback =
mode === 'history' && !supportsPushState && options.fallback !== false
if (this.fallback) {
mode = 'hash'
}
if (!inBrowser) {
mode = 'abstract'
}
this.mode = mode
// 根据模式实例化不同的 history 来管理路由
switch (mode) {
case 'history':
this.history = new HTML5History(this, options.base)
break
case 'hash':
this.history = new HashHistory(this, options.base, this.fallback)
break
case 'abstract':
this.history = new AbstractHistory(this, options.base)
break
default:
if (process.env.NODE_ENV !== 'production') {
assert(false, `invalid mode: ${mode}`)
}
}
}
}
constructor 里重要的两个事情:1. 确定路由模式,2. 根据模式创建 History 实例。
如上,history 类有 base 基类,不同模式有对应的 abstract 类、hash 类、html5 类,继承于 base 类,history 实例处理路由切换、路由跳转等等事情。
init
VueRouter 的 init 发生在刚才说的 beforeCreate 钩子里
// beforeCreate 钩子里调用了 initthis._router.init(this)
// VueRouter类的 init 实例方法
init(app) {
// 保存 router 实例
this.app = app
const history = this.history
if (history instanceof HTML5History || history instanceof HashHistory) {
const setupListeners = routeOrError => {
// 待揭秘
history.setupListeners()
}
// 路由切换
history.transitionTo(
history.getCurrentLocation(),
setupListeners,
setupListeners
)
}
}
init 里最主要处理了 history.transitionTo,transitionTo 有调用了 setupListeners,先有个印象即可。
router 怎样知道要渲染哪个组件
用户传入路由配置后,router 是怎样知道要渲染哪个组件的,答案是 Matcher
Matcher
Matcher 是匹配器,处理路由匹配,创建 matcher 发生在 VueRouter 类的构造函数里
this.matcher = createMatcher(options.routes || [], this)// create-matcher.js
export function createMatcher(routes, router){
// 创建映射表
const { pathList, pathMap, nameMap } = createRouteMap(routes)
// 根据我们要跳转的路由匹配到组件,比如 this.$router.push('/about')
function match() {
}
}
createRouteMap
createRouteMap 负责创建路由映射表
export function createRouteMap(routes, oldPathList, oldPathMap, oldNameMap){ const pathList: Array<string> = oldPathList || []
const pathMap: Dictionary<RouteRecord> = oldPathMap || Object.create(null)
const nameMap: Dictionary<RouteRecord> = oldNameMap || Object.create(null)
...
return {
pathList,
pathMap,
nameMap
}
}
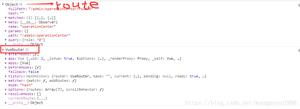
其中的处理细节先不用关注,打印一下例子里的路由映射表就很清楚有什么内容了:
pathList【path 列表】、pathMap【path 到 RouteRecord 的映射】、nameMap【name 到RouteRecord 的映射】,有了路由映射表之后想定位到 RouteRecord 就很容易了
其中 router 一些数据结构如下:源码
match 方法
match 方法就是从刚才生成的路由映射表里面取出 RouterRecord
// create-matcher.jsfunction match(raw, currentRoute, redirectedFrom){
const location = normalizeLocation(raw, currentRoute, false, router)
const { name } = location
if (name) {
// name 的情况
...
} else if (location.path) {
// path 的情况
...
}
}
this.$router.push 调用了什么原生 API
this.$router.push 用于跳转路由,内部调用的是 transitionTo 做路由切换,
在 hash 模式的源码,在 history 模式的源码
以 hash 模式为例
// history/hash.js// push 方法
push (location, onComplete, onAbort) {
// transitionTo 做路由切换,在里面调用了刚才的 matcher 的 match 方法匹配路由
// transitionTo 第2个和第3个参数是回调函数
this.transitionTo(
location,
route => {
pushHash(route.fullPath)
onComplete && onComplete(route)
},
onAbort
)
}
// 更新 url,如果支持 h5 的 pushState api,就使用 pushState 的方式,
// 否则设置 window.location.hash
function pushHash (path) {
if (supportsPushState) {
pushState(getUrl(path))
} else {
window.location.hash = path
}
}
function getUrl (path) {
const href = window.location.href
const i = href.indexOf('#')
const base = i >= 0 ? href.slice(0, i) : href
return `${base}#${path}`
}
history 模式就是调用 pushState 方法
pushState 方法
源码
export function pushState (url, replace) { // 获取 window.history
const history = window.history
try {
if (replace) {
const stateCopy = extend({}, history.state)
stateCopy.key = getStateKey()
// 调用 replaceState
history.replaceState(stateCopy, '', url)
} else {
// 调用 pushState
history.pushState({ key: setStateKey(genStateKey()) }, '', url)
}
} catch (e) {
...
}
}
router-view 渲染的视图是怎样被更新的
router-view 用于渲染传入路由配置对应的组件
export default { name: 'RouterView',
functional: true,
render(_, { props, children, parent, data }) {
...
// 标识
data.routerView = true
// 通过 depth 由 router-view 组件向上遍历直到根组件,
// 遇到其他的 router-view 组件则路由深度+1
// 用 depth 帮助找到对应的 RouterRecord
let depth = 0
while (parent && parent._routerRoot !== parent) {
const vnodeData = parent.$vnode ? parent.$vnode.data : {}
if (vnodeData.routerView) {
depth++
}
parent = parent.$parent
}
data.routerViewDepth = depth
// 获取匹配的组件
const route = parent.$route
const matched = route.matched[depth]
const component = matched && matched.components[name]
...
// 渲染对应的组件
const h = parent.$createElement
return h(component, data, children)
}
}
比如例子中的二级路由 home1
因为是二级路由,所以深度 depth 是 1,找到如下图的 home1 组件
更新
那么每次路由切换之后,怎样触发了渲染新视图呢?
每次 transitionTo 完成后会执行添加的回调函数,回调函数里更新了当前路由信息
在 VueRouter 的 init 方法里注册了回调:
history.listen(route => { this.apps.forEach(app => {
// 更新当前路由信息 _route
app._route = route
})
})
而在组件的 beforeCreate 钩子里把 _route 变成了响应式的,在 router-view 的 render 函数里访问到了 parent.$route,也就是访问到了 _route,
所以一旦 _route 改变了,就触发了 router-view 组件的重新渲染
// 把 _route 变成响应式的Vue.util.defineReactive(this, '_route', this._router.history.current)
router 怎样知道要切换视图的
到现在我们已经清楚了 router 是怎样切换视图的,那当我们点击浏览器的后退按钮、前进按钮的时候是怎样触发视图切换的呢?
答案是 VueRouter 在 init 的时候做了事件监听 setupListeners
setupListeners
popstate 事件:在做出浏览器动作时,才会触发该事件,调用 window.history.pushState 或 replaceState 不会触发,文档
hashchange 事件:hash 变化时触发
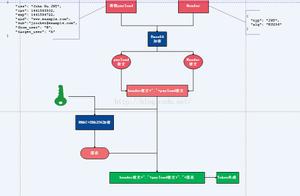
核心原理总结
本文从5个问题出发,解析了 Vue Router 的核心原理,而其它分支比如导航守卫是如何实现的等等可以自己去了解,先了解了核心原理再看其他部分也是水到渠成。
本身前端路由的实现并不复杂,Vue Router 更多的是考虑怎样和 Vue.js 的核心能力结合起来,应用到 Vue.js 生态中去。
对 Vue Router 的原理有哪一部分想和我聊聊的,可以在评论区留言。
以上是 「进阶篇」Vue Router 核心原理解析 的全部内容, 来源链接: utcz.com/z/381040.html