vue的MVVM原理

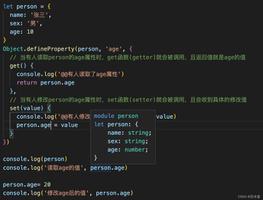
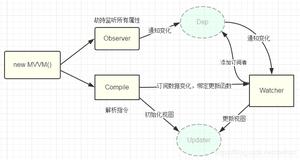
参考vue的MVVM,模拟了数据劫持、数据代理、数据编译、发布订阅、数据更新视图、双向数据绑定、computed(计算属性) 、mounted(钩子函数)等功能。
页面调用:
<!DOCTYPE html><html lang="en">
<head>
<meta charset="UTF-8" />
<meta http-equiv="X-UA-Compatible" content="IE=edge" />
<meta name="viewport" content="width=device-width, initial-scale=1.0" />
<title>Document</title>
</head>
<body>
<div id="app">
<h1>{{song}}</h1>
<p>排名:{{count}}</p>
<p>总计:{{sum}}</p>
<p>《{{album.name}}》是{{singer}}2005年11月发行的专辑</p>
<p>主打歌为{{album.theme}}</p>
<p>作词人为{{singer}}等人。</p>
为你弹奏肖邦的{{album.theme}}
<br />
<input type="text" v-model="model" />
<p>{{model}}</p>
<button onclick="modfiy()">增加</button>
</div>
<script src="./MVVM原理.js"></script>
<script>
let mvvm = new Mvvm({
el: "#app",
data: {
song: "发如雪",
album: {
name: "十一月的萧邦",
theme: "夜曲",
},
singer: "周杰伦",
count: 1,
num: 100,
model: "双向绑定",
},
computed: {
sum() {
// console.log(this);
return this.count + this.num;
},
noop() {},
},
mounted() {
// console.log(this);
},
});
function modfiy() {
mvvm.count++;
// console.log(mvvm);
}
</script>
</body>
</html>
MVVM.js
// 创建一个Mvvm构造函数// 这里用es6方法将options赋一个初始值,防止没传,等同于options || {}
function Mvvm(options = {}) {
// vm.$options Vue上是将所有属性挂载到上面,所以我们也同样实现,将所有属性挂载到了$options
this.$options = options;
// this.$data 这里也和Vue一样
this.$data = this.$options.data;
// 数据劫持
observe(this.$data);
// 数据代理
for (let key in this.$data) {
Object.defineProperty(this, key, {
configurable: true,
get() {
return this.$data[key]; // 如this.a = {b: 1}
},
set(newVal) {
this.$data[key] = newVal;
},
});
}
// 初始化computed,将this指向实例
initComputed.call(this);
// 编译
new Compile(options.el, this);
// 所有事情处理好后执行mounted钩子函数
options.mounted.call(this);
}
// 创建一个Observe构造函数
// 写数据劫持的主要逻辑
function Observe(data) {
// 所谓数据劫持就是给对象增加get,set
// 先遍历一遍对象再说
for (let key in data) {
// 每个属性单独定义依赖
let dep = new Dep();
// 把data属性通过defineProperty的方式定义属性
let val = data[key];
observe(val); // 递归继续向下找,实现深度的数据劫持
Object.defineProperty(data, key, {
configurable: true,
get() {
// console.log("depend:", `${key}: ${val}`);
dep.depend(); // 将watcher添加到订阅事件中 [watcher]
return val;
},
set(newVal) {
// 更改值的时候
if (val === newVal) {
// 设置的值和以前值一样就不理它
return;
}
val = newVal; // 如果以后再获取值(get)的时候,将刚才设置的值再返回去
observe(newVal); // 当设置为新值后,也需要把新值再去定义成属性
dep.notify(); // 让所有watcher的update方法执行即可
},
});
}
}
// 外面再写一个函数
// 不用每次调用都写个new
// 也方便递归调用
function observe(data) {
// 如果不是对象的话就直接return掉
// 防止递归溢出
if (!data || typeof data !== "object") return;
return new Observe(data);
}
function initComputed() {
let vm = this;
let computed = this.$options.computed; // 从options上拿到computed属性 {sum: ƒ, noop: ƒ}
// 得到的都是对象的key可以通过Object.keys转化为数组
Object.keys(computed).forEach((key) => {
// key就是sum,noop
// 直接将computed里面的函数绑定到vm上方便后面通过vm[key]直接调用
Object.defineProperty(vm, key, {
configurable: true,
// 这里判断是computed里的key是对象还是函数,如果是函数直接就会调get方法,如果是对象的话,手动调一下get方法即可
// 如: sum() {return this.a + this.b;},他们获取a和b的值就会调用get方法
// 所以不需要new Watcher去监听变化了
get() {
// console.log("computedGet");
return typeof computed[key] === "function"
? computed[key].call(vm)
: computed[key].get.call(vm);
},
set(newVal) {
// console.log("set");
computed[key] = newVal;
},
});
});
}
// 创建Compile构造函数
function Compile(el, vm) {
// 将el挂载到实例上方便调用
vm.$el = document.querySelector(el);
// 在el范围里将内容都拿到,当然不能一个一个的拿
// 可以选择移到内存中去然后放入文档碎片中,节省开销
let fragment = document.createDocumentFragment();
while ((child = vm.$el.firstChild)) {
fragment.appendChild(child); // 此时将el中的内容放入内存中
}
// 对el里面的内容进行替换
let replace = function (frag) {
// console.log(frag.childNodes);
Array.from(frag.childNodes).forEach((node) => {
if (node.nodeType === 1) {
// 元素节点
let nodeAttr = node.attributes; // 获取dom上的所有属性,是个类数组
Array.from(nodeAttr).forEach((attr) => {
let name = attr.name; // v-model type
let exp = attr.value; // model text
if (name.includes("v-")) {
// 监听变化
new Watcher(() => {
node.value = vm[exp]; // 当watcher触发时会自动将内容放进输入框中
});
node.addEventListener("input", (e) => {
let newVal = e.target.value;
// 相当于给this.model赋了一个新值
// 而值的改变会调用set,set中又会调用notify,notify中调用watcher的update方法实现了更新
vm[exp] = newVal;
});
}
});
}
let txt = node.textContent;
let reg = /\{\{(.*?)\}\}/g; // 正则匹配{{}}
if (node.nodeType === 3 && reg.test(txt)) {
// 即是文本节点又有大括号的情况{{}}
// 用trim方法去除一下首尾空格
new Watcher(() => {
node.textContent = txt
.replace(reg, (...arguments) => {
// 这里的arguments是所有相匹配的结果,类似:
// ["{{count}}", "count", 3, "排名:{{count}}"]
// console.log(node);
// console.log(arguments);
let arr = arguments[1].split(".");
// console.log(arr);
return arr.reduce((prev, next) => {
// console.log("prev: ", prev);
// console.log("next: ", next);
// console.log("prev[next]: ", prev[next]);
return prev[next];
}, vm);
})
.trim();
});
}
// 如果还有子节点,继续递归replace
if (node.childNodes && node.childNodes.length) {
replace(node);
}
});
};
replace(fragment); // 替换内容
vm.$el.appendChild(fragment); // 再将文档碎片放入el中
}
// 发布订阅模式 订阅和发布 如[fn1, fn2, fn3]
function Dep() {
// 存放所有的监听watcher
this.subs = [];
}
Dep.prototype = {
//添加一个观察者对象
addDep(watcher) {
this.subs.push(watcher);
// console.log(this.subs);
// console.log(this.subs.length);
},
//依赖收集
depend() {
//Dep.target 作用只有需要的才会收集依赖
if (Dep.target) {
this.addDep(Dep.target);
}
},
// 调用依赖收集的Watcher更新
notify() {
// console.log(this);
// 绑定的方法,都有一个update方法
this.subs.forEach((watcher) => watcher.update());
},
};
// 监听函数
// 通过Watcher这个类创建的实例,都拥有update方法
function Watcher(fn) {
// console.log("Watcher");
this.fn = fn; // 将fn放到实例上
// 添加一个事件
// 这里我们先定义一个属性
Dep.target = this;
this.fn();
Dep.target = null;
}
Watcher.prototype.update = function () {
// notify的时候值已经更改了
// console.log(this);
this.fn();
};
参考链接:https://juejin.cn/post/6844903586103558158#heading-11
以上是 vue的MVVM原理 的全部内容, 来源链接: utcz.com/z/377970.html


