vue拖拽添加的简单实现
本文主要介绍了vue拖拽添加的简单实现,具体如下:
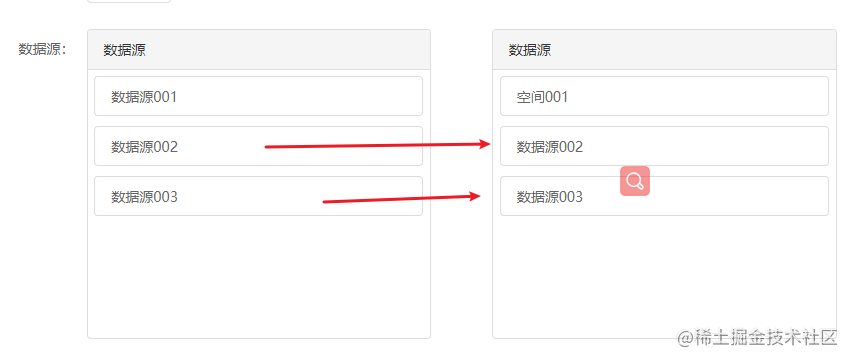
效果图
并没有判断是否重复,没有删除旧数据
数据体
<MyShuttle :dataOrigin='[
{
Name:"数据001",
Id:"数001",
},
{
Name:"数据002",
Id:"数001",
},
{
Name:"数据003",
Id:"数001",
}]'
:space='[{
Name:"右001",
Id:"右001",
}]' />
代码
draggable开启可拖动
@dragenter.prevent @dragover.prevent
// 阻止浏览器默认行为,不然会显示一个叉叉,不好看
阻止默认行为
@dragleave.stop=“dragleave($event, ‘main')”
进入离开当前元素都会触发
@dragend.stop=“dragEnd($event, item)”
放下拖拽内容触发
拖拽事件和属性
标记 这个很重要!!! 这个决定了拖拽事件的行为。当点击开始拖拽之后,鼠标点击所在的位置就是标记。
dragstart:当单击下鼠标,并移动之后执行。
drag:在dragstart执行之后,鼠标在移动时连续触发。
dragend:当拖拽行为结束,也就是松开鼠标的时候触发。
dragenter:当正在拖拽的元素的标记进入某个Dom元素时触发,自身首先会触发。被进入的Dom元素会触发这个事件。
dragover:当拖拽的元素的标记在进入的Dom元素上移动时触发,在自身移动时也会触发。
dragleave:当拖拽的元素在离开进入的Dom时触发。
H5拖拽属性 draggable
draggable:当需要某个元素可以拖拽时,需设置为true,默认为false。选中的文本、图片、链接默认可以拖拽。
DataTransfer对象:该属性用于保存拖放的数据和交互信息,该组件没有使用到,暂忽略。
当鼠标移动到目标div盒子才会追加,简单的才最能说明问题
<template>
<div class="MyShuttle">
<div class="MyShuttleLeft">
<div class="title">数据源</div>
<div class="dataBox" @dragleave.stop="dragleave($event, 'main')">
<div v-for="(item, i) in dataOrigin" :key="i" class="dataList" draggable @dragenter.prevent
@dragover.prevent @dragstart.stop="dragstart($event, item)"
@dragend.stop="dragEnd($event, item)">
{{ item.Name}}
</div>
</div>
</div>
<div class="MyShuttleCenter"></div>
<div class="MyShuttleRight">
<div class="title">数据源</div>
<div ref="MyShuttleRight" class="dataBox">
<div v-for="(item, i) in spaceList" :key="i" class="dataList" draggable @dragenter.prevent
@dragover.prevent>
{{ item.Name}}
</div>
</div>
</div>
</div>
</template>
<script>
export default {
name: '',
components: {},
props: {
dataOrigin: {
type: Array
},
space: {
type: Array
}
},
data() {
return {
spaceList: this.space,
isDragStatus: false
}
},
computed: {},
watch: {},
created() { },
mounted() { },
methods: {
dragleave(e, item) {
// console.log(e, item)
if (item === 'main') {
this.isDragStatus = true
} else {
this.isDragStatus = false
}
// console.log(this.isDragStatus)
},
dragstart(e, item) {
// console.log(e, item)
},
dragEnd(e, item) {
const top = this.$refs.MyShuttleRight.getBoundingClientRect().top
const right = this.$refs.MyShuttleRight.getBoundingClientRect().right
const bottom = this.$refs.MyShuttleRight.getBoundingClientRect().bottom
const left = this.$refs.MyShuttleRight.getBoundingClientRect().left
console.log(top, right, bottom, left)
console.log(e.clientX, e.clientY, item)
if (this.isDragStatus && e.clientY > top && e.clientY < bottom && e.clientX > left && e.clientX < right) {
this.spaceList.push(item)
console.log(this.spaceList.indexOf(item))
}
}
}
}
</script>
<style scoped lang="scss">
.MyShuttle {
width: 100%;
height: 308px;
display: flex;
justify-content: space-between;
// 左右盒子公共样式
.MyShuttleLeft,
.MyShuttleRight {
border: 1px solid #dddddd;
border-collapse: collapse;
.title {
box-sizing: border-box;
width: 100%;
height: 40px;
background: #f5f5f5;
border-radius: 4px 4px 0px 0px;
border-bottom: 1px solid #dddddd;
padding: 10px 16px;
font-size: 14px;
font-family: PingFangSC-Regular, PingFang SC;
font-weight: 400;
color: #333333;
line-height: 20px;
}
.dataBox {
width: 100%;
height: 228px;
overflow: auto;
padding: 6px 0;
.dataList {
width: 96%;
height: 40px;
box-sizing: border-box;
font-size: 14px;
font-family: PingFangSC-Regular, PingFang SC;
font-weight: 400;
color: #666;
line-height: 20px;
margin: 0 2% 10px;
padding: 10px 16px;
border: 1px solid #ddd;
border-radius: 4px;
user-select: none;
cursor: pointer;
&:hover {
color: #01bc77;
background: rgba(1, 188, 119, 0.1);
}
}
}
}
.MyShuttleLeft {
width: 362px;
height: 100%;
background: #ffffff;
border-radius: 4px;
}
.MyShuttleCenter {
width: 64px;
height: 100%;
}
.MyShuttleRight {
width: 362px;
height: 100%;
background: #ffffff;
border-radius: 4px;
}
}
</style>
到此这篇关于vue拖拽添加的简单实现的文章就介绍到这了,更多相关vue拖拽添加内容请搜索以前的文章或继续浏览下面的相关文章希望大家以后多多支持!
以上是 vue拖拽添加的简单实现 的全部内容, 来源链接: utcz.com/p/240364.html