拼搏30天VUE.js之props(Part10)

今天跟著大漠老師學習組件通訊的用法:原文:https://www.w3cplus.com/vue/component-communication.html
* 父组件向子组件通讯
要在Vue中将数据从父组件传到子组件,我们可以通过 props来实现。
* 父组件使用属性绑定
为了将数据从父组件传到子组件,在父组件中设置一个属性,该属性绑定和子组件的prop相同的名称一个属性值。
栗子一:
<!-- ParentCard.vue --><template>
<div class="card">
<div class="card-header">
<h5 v-text="theCardTitle">
</h5>
<button @click="sendMessage" class="btn">给子组件发送一个消息</button>
</div>
<div class="card-body">
<child-card :parentMessage="parentMessage">
</child-card>
</div>
</div>
</template>
<script> import ChildCard from './ChildCard';
export default {
name: 'ParentCard',
data: () => ({
theCardTitle: '父组件',
parentMessage: ''
}),
components: {
ChildCard
},
methods: {
sendMessage() {
this.parentMessage = `<b>消息来自父组件:</b> (^_^)!!!`
}
}
}
</script>
子頁面:
<!-- ChildCard.vue --> <template>
<div class="message">
<div class="message-header">
<h5 v-text="theCardTitle"></h5>
</div>
<div class="message-body">
<p class="message-text" v-html="theCardBody"></p>
<div v-if="parentMessage" class="alert" v-html="parentMessage"></div>
</div>
</div>
</template>
<script> export default {
name: 'ChildCard',
props: ['parentMessage'],
data: () => ({
theCardTitle: '子组件',
theCardBody: '我是一个子组件!(^_^) !!!'
})
}
</script>
最终效果如下:
上面的两小节中,分别创建了ParentCard和ChildCard两个组件,而且子组件ChildCard嵌套在父组件ParentCard中。在子组件中,使用了v-if指令有条件地显示来自父组件ParentCard的消息,并且显示在div.alert中。如果没有消息,则不会显示.alert。因此,当页面首次渲染时,parentMessage的初始值是一个空字符串(在ParentCard组件的data中设置了parentMessage为空字符串)。所以我们一开始渲染页面的时候,并看不到(ChildCard子组件不显示.alert)。当用户点击了ParentCard组件中的“发送消息”的按钮时,则会触发ParentCard组件中定义的sendMessage()方法。这个时候,parentMessage的值就变成了<b>消息来自父组件:</b> (^_^)!!!。由于此变量使用:parentMessage="parentMessage"绑定到<child-card>标签上,并且子组件ChildCard通过props:['parentMessage']接受该值,如此一来,子组件将使用来自父组件的parentMessage的值。
当你点击示例中右上角的按钮,就可以看到父组件向子组件发送的消息,这样就完成了父组件向子组件的数据通讯:
简单的总结一下:
在Vue中,父组件向子组件传递数据(通讯),可以借助
props属性完成。
栗子二:
父组件:
<!-- ParentCard.vue --><template>
<div class="card">
<div class="card-header">
<h5 v-text="theCardTitle"></h5>
</div>
<div class="card-body">
<child-card :Child ="ChildCard ">
</child-card>
</div>
</div>
</template>
<script> import ChildCard from './ChildCard';
export default {
name: 'ParentCard',
data: () => ({
theCardTitle: '父组件',
ChildCard :[
{
name:"susan1",age:11
},
{
name:"susan2",age:12
},
{
name:"susan3",age:13
}
]
})
}
</script>
子组件:
<!-- ChildCard.vue --> <template>
<div class="message">
<div class="message-header">
<h5 v-text="theCardTitle"></h5>
</div>
<div class="message-body">
<p class="message-text" v-for="user in ChildCard">{{user.name}}</p>
</div>
</div>
</template>
<script> export default {
name: 'ChildCard',
props:{
Child:{
type:Array,
required:true
}
},
data: () => ({
theCardTitle: '子组件'
})
}
</script>
在父组件存放数组,通过 <child-card :Child ="ChildCard ">传入到子组件中,然后子组件tong通过props接收,然后在页面中循环出来即可。这个Child 可以自己定义,props接收的也是这个Child 参数。
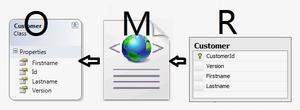
用一张类似下面这样的图来描述父组件向子组件通讯的关系:
* 子组件发出自定义事件
首先在子组件ChildCard的<template>中添加一个新的标签button。在这个button添加一个click事件:
<!-- ChildCard.vue --> <template>
<div class="message">
<div class="message-header">
<h5 v-text="theCardTitle"></h5>
</div>
<div class="message-body">
<p class="message-text" v-html="theCardBody"></p>
<div v-if="parentMessage" class="alert" v-html="parentMessage"></div>
<button v-if="parentMessage" @click="ok" class="btn">OK</button>
</div>
</div>
</template>
当我们点击“OK”按钮时,想运行名为ok()的方法。让我们设置该方法,以便在触发事件时发出($emit)自定义的事件。我们将一个finished字符串传递给$emit函数。当然我们可以选择自己喜欢的名字,但在这个案例中我们选择了finished这个名,这样更具语义化。我们希望子组件的信息发送到父组件。
<!-- ChildCard.vue --><script>
export default {
name: 'ChildCard',
props: ['parentMessage'],
data: () => ({
theCardTitle: '子组件',
theCardBody: '我是一个子组件!(^_^) !!!'
}),
methods: {
ok() {
this.$emit('finished')
}
}
}
</script>
* 父组件侦听自定义事件
现在我们可以回到父组件ParentCard中,在父组件中使用自定义标签调用子组件ChildCard,在这个标签中我们可以使用@finished="finished"侦听子组件中自定义的事件。这意味着我们需要在父组件中定义一个finished()方法。父组件中定制了自定义属性的侦听器和触发它的方法。
<!-- ParentCard.vue --> <template> <div class="card">
<div class="card-header">
<h5 v-text="theCardTitle"></h5> <button @click="sendMessage" class="btn">给子组件发送一个消息</button>
</div>
<div class="card-body">
<child-card :parentMessage="parentMessage" @finished="finished"></child-card>
</div>
</div>
</template>
<script>
import ChildCard from "./ChildCard";
export default {
name: "ParentCard",
data: () => ({
theCardTitle: "父组件",
parentMessage: ""
}),
components: {
ChildCard
},
methods: {
sendMessage() {
this.parentMessage = `<b>消息来自父组件:</b> (^_^)!!!`;
},
finished() {
this.parentMessage = ''
}
}
};
</script>
在这个示例中,用户首先点击“发送消息”按钮,它将消息向下发送到子组件,这个时候消息和一个新按钮会一起在子组件中渲染。
现在我们可点击“OK”按钮,它会向父组件发出自定义的finished事件。在父组件中,我们正在侦听该自定义事件,当侦听到finished自定义事件时,就会触发finished()方法,将parentMessage重置为空字符串。现在这个示例,我们实现了父组件向子组件和子组件向父组件传递数据(数据通讯)。
同样的,我们可以用张图来描述:
* 通过回调函数实现子组件向父组件通讯
上面的示例是通过自定义事件完成子组件向父组件进行数据通讯。如果你不想发出自定义事件,还可以通过另一种方式将消息从子组件发送到父组件。和上一个示例不同之处是,我们不需要在子组件中定义ok()方法,而是在父组件中定义该方法。一旦我们在父组件上定义了该方法,就可以通过props把信息从父组件传递给子组件。所以在ParentCard组件中定义ok()方法,并且在<child-card>上绑定已定义该方法和props。
<!-- ParentCard.vue --> <template> <div class="card">
<div class="card-header">
<h5 v-text="theCardTitle"></h5>
<button @click="sendMessage" class="btn">给子组件发送一个消息</button>
</div>
<div class="card-body">
<child-card :parentMessage="parentMessage" @finished="finished" :ok="ok"></child-card>
</div>
</div>
</template>
<script>
import ChildCard from "./ChildCard";
export default {
name: "ParentCard",
data: () => ({
theCardTitle: "父组件",
parentMessage: ""
}),
components: {
ChildCard
},
methods: {
sendMessage() {
this.parentMessage = `<b>消息来自父组件:</b> (^_^)!!!`;
},
finished() {
this.parentMessage = ''
},
ok() {
this.finished()
}
}
};
</script>
现在我们要做的是更新子组件上的props。这样做的目的是通过props将回调函数从父组件中传递到子组件。我们可以像下面这样做:
<!-- ChildCard.vue --> <template>
<div class="message">
<div class="message-header">
<h5 v-text="theCardTitle"></h5>
</div>
<div class="message-body">
<p class="message-text" v-html="theCardBody"></p>
<div v-if="parentMessage" class="alert" v-html="parentMessage"></div>
<button v-if="parentMessage" @click="ok" class="btn">OK</button>
</div>
</div>
</template>
<script>
export default {
name: 'ChildCard',
props: ['parentMessage', 'ok'],
data: () => ({
theCardTitle: '子组件',
theCardBody: '我是一个子组件!(^_^) !!!'
})
}
</script>
結果為:
https://codesandbox.io/s/zw836j69pp
现在我们知道如何通过props实现父组件向子组件之间的通讯以及如何通过自定义事件完成子组件向父组件之间的通讯。除了这两种之外,还有另外一种情形,那就是兄弟之间的组件如何进行数据通讯。那么接下来,咱们就来学习这方面的知识。
* 兄弟组件通讯
在Vue中实现兄弟组件的通讯也有几种方法,其中一种方法是让父组件允当两个子组件之间的中间件(中继);另一种就是使用EventBus(事件总线),它允许两个子组件之间直接通讯,而不需要涉及父组件。
* 通过父组件进行兄弟组件之间通讯
先来看第一个方法,就是让兄弟组件通过一个共同的父组件彼此通讯。
我们还是通过示例来学习。接下来的这个示例包含父组件和两个子组件,这两个子组件是兄弟组件。单击兄弟组件上的按钮,可以看到他们之间可以相互通讯。
首先创建ParentCard组件:
<!-- ParentCard.vue --> <template> <div class="card">
<div class="card-header">
<h5 v-text="theCardTitle"></h5> <button @click="momSaidChill" v-if="stopFighting()" class="btn">停止通讯</button>
</div>
<div class="card-body">
<brother-card :messageSon="messageson" @brotherSaid="messageDaughter($event)"></brother-card>
<sister-card :messageDaughter="messagedaughter" @sisterSaid="messageSon($event)"></sister-card>
</div>
</div>
</template>
<script>
import BrotherCard from './BrotherCard';
import SisterCard from './SisterCard'
export default {
name: 'ParentCard',
data: () => ({
theCardTitle: '父组件',
messagedaughter: '',
messageson: ''
}),
components: {
BrotherCard,
SisterCard
},
methods: {
messageDaughter(message) {
this.messagedaughter = message;
},
messageSon(message) {
this.messageson = message;
},
stopFighting() {
if (this.messagedaughter && this.messageson) {
return true
}
return false
},
momSaidChill() {
this.messagedaughter = '', this.messageson = ''
}
}
};
</script>
创建SisterCard组件:
<!-- SisterCard.vue --> <template>
<div class="message">
<div class="message-header">
<h5 v-text="theCardTitle"></h5>
</div>
<div class="message-body">
<p class="message-text">我是Sister组件</p>
<button @click="messageBrother" class="btn">给哥哥发消息</button>
<div v-if="messageDaughter" class="alert" v-html="messageDaughter"></div>
</div>
</div>
</template>
<script>
export default {
name: 'SisterCard',
props: ['messageDaughter'],
data: () => ({
theCardTitle: '子组件2'
}),
methods: {
messageBrother() {
this.$emit('sisterSaid', '妈妈说,该做作业了!(^_^)!!!')
}
}
} </script>
接着创建BrotherCard组件:
<!-- BrotherCard.vue --><template>
<div class="message">
<div class="message-header">
<h5 v-text="theCardTitle"></h5>
</div>
<div class="message-body">
<p class="message-text">我是Brother组件</p> <button @click="messageSister" class="btn">给妹妹发消息</button>
<div v-if="messageSon" class="alert" v-html="messageSon"></div>
</div>
</div>
</template>
<script>
export default {
name: 'BrotherCard',
props: ['messageSon'],
data: () => ({
theCardTitle: '子组件1'
}),
methods: {
messageSister() {
this.$emit('brotherSaid', '妈妈说,该做作业了!(^_^)!!!')
}
}
}
</script>
最終效果:https://mo4m1m3zy.codesandbox.io/
SisterCard通过ParentCard与BrotherCard通讯
首先来看SisterCard是如何与BrotherCard通讯的。从示例中可以看出,他们两之间的通讯是通过其父组件ParentCard作为中间媒介来进行通讯的。
我们在SisterCard组件的<template>中为messageBrother()方法设置了一个@click事件来监听该事件。
<button @click="messageBrother" class="btn">给哥哥发消息</button>当用户点击SisterCard中的“给哥哥发消息”将会触发messageBrother()方法。在这个方法中,将发出一个sisterSaid事件,并且把妈妈说,该做作业了!(^_^)!!!信息发送出去。
methods: { messageBrother() {
this.$emit("sisterSaid", "妈妈说,该做作业了!(^_^)!!!");
}
}
在ParentCard的<template>中定制了一个@sisterSaid事件侦听器,它触发了messageSon()方法。所以父组件在这两个兄弟组件之间起到了传递的作用。
<sister-card :messageDaughter="messagedaughter" @sisterSaid="messageSon($event)"></sister-card>
另外在ParentCard组件中声明了messageSon()方法,该方法接受上面发送的自定义事件,并将其设置为messageson属性。
messageSon(message) { this.messageson = message; },这样一来,ParentCard组件中messageson就由空字符串变成了妈妈说,该做作业了!(^_^)!!!。
接着在ParentCard组件自定义标签<brother-card>通过:messageSon="messageson"的方式将messageson属性绑定到<brother-card>。
<brother-card :messageSon="messageson" @brotherSaid="messageDaughter($event)"></brother-card>这个时候在BrotherCard组件中设置props的属性值为messageSon。这样就可以访问源自于SisterCard组件的数据,并且该数据在BrotherCard中显示。
props: ["messageSon"],最后在BrotherCard组件就可以使用该数据。我们可以通过v-if指令来查看messageSon是否有任何有用的数据,如果有,那么就在div.alert中显示该消息:
<div v-if="messageSon" class="alert" v-html="messageSon"></div>上面的描述过程也适用于BrotherCard通过ParentCard与SisterCard进行数据通讯。
* 通过EventBus进行兄弟间组件通讯
随着应用程序越来越庞大,通过父组件来传递所有内容会把事情变得越来越棘手。不过我们还有另一种选择,那就是使用EventBus架起兄弟之间通讯的桥梁。接下来看看我们是如何利用这一点一完成兄弟组件之间的数据通讯。
我们同样基于上面的示例来做修改。接下来的示例中,ParentCard组件包含了SisterCard和BrotherCard两个子组件,而且这两个子组件是兄弟组件。
首先在main.js文件中定义一个新的eventBus对象,其实他是一个全新的Vue实例:
// main.jsimport Vue from 'vue'
import App from './App'
export const eventBus = new Vue()
new Vue({
el: '#app',
render: h => h(App)
})
接着在新创建的BrotherCard组件导入main.js:
<!-- BrotherCard.vue --> <script> import { eventBus } from '../main' </script>
eventBus实例现在将成为BrotherCard组件中发出事件的实例。现在我们可以使用eventBus.$emit来替代上例中的this.$emit。eventBus是一个Vue实例,而且eventBus有这个$emit方法,这就是我们能够这么用的原因。这样做同样会触发相同的自定义事件名称和消息。
methods: { messageSister() {
eventBus.$emit('brotherSaid', '妈妈说,该做作业了!(^_^)!!!')
}
}
同样可以在SisterCard组件中引入eventBus:
<script> import { eventBus } from '../main' </script>将created()生命周期钩子添加到SisterCard组件。在created()钩子中添加eventBus启动自定义事件的侦听器。当使用SisterCard组件时,该侦听器将开始运行并且会保持运行。下面的代码只是侦听brotherSaid自定义事件,然后触发回调,将作为自定义事件有效负载传递的消息分配给fromBrother。
created() { eventBus.$on('brotherSaid', (message) => {
this.fromBrother = message
})
}
这样就可以有条件地显示来自BrotherCard的信息:
<div v-if="fromBrother" class="alert" v-html="fromBrother"></div>上面看到的是如何通过eventBus实现SisterCard向BrotherCard传递数据的方式,反之,BrotherCard向SisterCard`传递数据也可以使用类似的方式。
最终代码如下:
<!-- SisterCard.vue --> <template> <div class="message">
<div class="message-header">
<h5 v-text="theCardTitle"></h5>
</div>
<div class="message-body">
<p class="message-text">我是Sister组件</p> <button @click="messageBrother" class="btn">给哥哥发消息</button>
<div v-if="fromBrother" class="alert" v-html="fromBrother"></div>
</div>
</div>
</template>
<script> import { eventBus } from "../main"; export default { name: "SisterCard", data: () => ({ theCardTitle: "Sister Card", fromBrother: "" }), methods: { messageBrother() { eventBus.$emit("sisterSaid", "妈妈说,该做作业了!(^_^)!!!"); } }, created() { eventBus.$on("brotherSaid", message => { this.fromBrother = message; }); } }; </script>
<!-- BrotherCard.vue --> <template>
<div class="message">
<div class="message-header">
<h5 v-text="theCardTitle"></h5>
</div>
<div class="message-body">
<p class="message-text">我是Brother组件</p> <button @click="messageSister" class="btn">给妹妹发消息</button>
<div v-if="fromSister" class="alert" v-html="fromSister"></div>
</div>
</div>
</template>
<script>
import { eventBus } from "../main.js";
export default {
name: "BrotherCard",
data: () => ({
theCardTitle: "Brother Card",
fromSister: ""
}),
methods: {
messageSister() {
eventBus.$emit("brotherSaid", "妈妈说,该做作业了!(^_^)!!!");
}
},
created() {
eventBus.$on("sisterSaid", message => {
this.fromSister = message;
});
}
};
</script>
最后创建的ParentCard组件,我们可以像下面这样编码:
<!-- ParentCard --> <template> <div class="card">
<div class="card-header">
<h5 v-text="theCardTitle"></h5>
</div>
<div class="card-body">
<brother-card></brother-card>
<sister-card></sister-card>
</div>
</div>
</template>
<script>
import BrotherCard from "./BrotherCard";
import SisterCard from "./SisterCard";
export default {
name: "ParentCard",
data: () => ({
theCardTitle: "Parent Card"
}),
components: {
BrotherCard, SisterCard
}
};
</script>
最终看到的效果如下:https://50jkx4n5z4.codesandbox.io/
总结
在本教程中,我们学习了在Vue中如何实现组件之间的通讯。通过实例看到了如何实现父组件向子组件,子组件向父组件以及兄弟组件间的数据通讯。简单的根据为:
- 通过
props可以实现父组件向子组件发送数据 - 通过自定义事件可以实现子组件向父组件发送数据
- 兄弟组件数据通讯除了借助共同的父组件做为通讯桥梁之外,还可以通过
eventBus来让兄弟之间组件进行数据通讯
最后用一张图来简单的描述一下:
以上是 拼搏30天VUE.js之props(Part10) 的全部内容, 来源链接: utcz.com/z/377553.html