vue.js中Vue-router 2.0基础实践教程
前言
Vue.js的一大特色就是构建单页面应用十分方便,既然要方便构建单页面应用那么自然少不了路由,router" title="vue-router">vue-router就是vue官方提供的一个路由框架。本文主要介绍了Vue-router 2.0的相关内容,分享出来供大家参考学习,下面来看看详细的介绍:
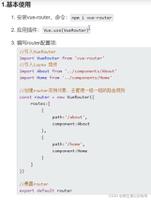
一、基础用法:
<div id="app">
<h1>Hello App!</h1>
<p>
<!-- 使用 router-link 组件来导航. -->
<!-- 通过传入 `to` 属性指定链接. -->
<!-- <router-link> 默认会被渲染成一个 `<a>` 标签 -->
<router-link to="/foo">Go to Foo</router-link>
<router-link to="/bar">Go to Bar</router-link>
</p>
<!-- 路由出口 -->
<!-- 路由匹配到的组件将渲染在这里 -->
<router-view></router-view>
</div>
<template id='foo'>
<p>this is foo!</p>
</template>
<template id='bar'>
<p>this is bar!</p>
</template>
// 1. 定义(路由)组件。
// 可以从其他文件 import 进来
const Foo = { template:'#foo' };
const Bar = { template:'#bar' };
// 2. 定义路由
// 每个路由应该映射一个组件。 其中"component" 可以是
// 通过 Vue.extend() 创建的组件构造器,
// 或者,只是一个组件配置对象。
const routes = [
{ path: '/foo', component: Foo },
{ path: '/bar', component: Bar }
];
// 3. 创建 router 实例,然后传 `routes` 配置
// 你还可以传别的配置参数, 不过先这么简单着吧。
const router = new VueRouter({ routes:routes });
// 4. 创建和挂载根实例。
// 记得要通过 router 配置参数注入路由,
// 从而让整个应用都有路由功能
const app = new Vue({ router:router }).$mount('#app');
二、动态路由匹配:
<div id="app">
<h1>Hello App!</h1>
<p>
<router-link to="/user/foo/post/123">Go to Foo</router-link>
<router-link to="/user/bar/post/456">Go to Bar</router-link>
</p>
<router-view></router-view>
</div>
<template id='user'>
<p>User:{{ $route.params.id }},Post:{{$route.params.post_id}}</p>
</template>
// 1. 定义组件。
const User = {
template:'#user',
watch:{
'$route'(to,from){
console.log('从'+from.params.id+'到'+to.params.id);
}
}
};
// 2. 创建路由实例 (可设置多段路径参数)
const router = new VueRouter({
routes:[
{ path:'/user/:id/post/:post_id',component:User }
]
});
//3. 创建和挂载根实例
const app = new Vue({ router:router }).$mount('#app');
三、嵌套路由:
<div id="app">
<h1>Hello App!</h1>
<p>
<router-link to="/user/foo">Go to Foo</router-link>
<router-link to="/user/foo/profile">Go to profile</router-link>
<router-link to="/user/foo/posts">Go to posts</router-link>
</p>
<router-view></router-view>
</div>
<template id='user'>
<div>
<h2>User:{{ $route.params.id }}</h2>
<router-view></router-view>
</div>
</template>
<template id="userHome">
<p>主页</p>
</template>
<template id="userProfile">
<p>概况</p>
</template>
<template id="userPosts">
<p>登录信息</p>
</template>
// 1. 定义组件。
const User = {
template:'#user'
};
const UserHome = {
template:'#userHome'
};
const UserProfile = {
template:'#userProfile'
};
const UserPosts = {
template:'#userPosts'
};
// 2. 创建路由实例
const router = new VueRouter({
routes:[
{ path:'/user/:id', component:User,
children:[
// 当 /user/:id 匹配成功,
// UserHome 会被渲染在 User 的 <router-view> 中
{ path: '', component: UserHome},
// 当 /user/:id/profile 匹配成功,
// UserProfile 会被渲染在 User 的 <router-view> 中
{ path:'profile', component:UserProfile },
// 当 /user/:id/posts 匹配成功
// UserPosts 会被渲染在 User 的 <router-view> 中
{ path: 'posts', component: UserPosts }
]
}
]
});
//3. 创建和挂载根实例
const app = new Vue({ router:router }).$mount('#app');
四、编程式路由:
<div id="app">
<h1>Hello App!</h1>
<p>
<router-link to="/user/foo">Go to Foo</router-link>
</p>
<router-view></router-view>
</div>
<template id='user'>
<h2>User:{{ $route.params.id }}</h2>
</template>
<template id="register">
<p>注册</p>
</template>
// 1. 定义组件。
const User = {
template:'#user'
};
const Register = {
template:'#register'
};
// 2. 创建路由实例
const router = new VueRouter({
routes:[
{ path:'/user/:id', component:User },
{ path:'/register', component:Register }
]
});
//3. 创建和挂载根实例
const app = new Vue({ router:router }).$mount('#app');
//4.router.push(location)
router.push({ path: 'register', query: { plan: 'private' }});
五、命名路由:
<div id="app">
<h1>Named Routes</h1>
<p>Current route name: {{ $route.name }}</p>
<ul>
<li><router-link :to="{ name: 'home' }">home</router-link></li>
<li><router-link :to="{ name: 'foo' }">foo</router-link></li>
<li><router-link :to="{ name: 'bar', params: { id: 123 }}">bar</router-link></li>
</ul>
<router-view class="view"></router-view>
</div>
<template id='home'>
<div>This is Home</div>
</template>
<template id='foo'>
<div>This is Foo</div>
</template>
<template id='bar'>
<div>This is Bar {{ $route.params.id }}</div>
</template>
const Home = { template: '#home' };
const Foo = { template: '#foo' };
const Bar = { template: '#bar' };
const router = new VueRouter({
routes: [
{ path: '/', name: 'home', component: Home },
{ path: '/foo', name: 'foo', component: Foo },
{ path: '/bar/:id', name: 'bar', component: Bar }
]
});
new Vue({ router:router }).$mount('#app');
六、命名视图:
<div id="app">
<router-link to="/">Go to Foo</router-link>
<router-view class="view one"></router-view>
<router-view class="view two" name="a"></router-view>
<router-view class="view three" name="b"></router-view>
</div>
<template id='foo'>
<div>This is Foo</div>
</template>
<template id='bar'>
<div>This is Bar {{ $route.params.id }}</div>
</template>
<template id='baz'>
<div>This is baz</div>
</template>
const Foo = { template: '#foo' };
const Bar = { template: '#bar' };
const Baz = { template: '#baz' };
const router = new VueRouter({
routes: [
{
path: '/',
components: {
default:Foo,
a:Bar,
b:Baz
}
}
]
});
new Vue({ router:router }).$mount('#app');
总结
以上是 vue.js中Vue-router 2.0基础实践教程 的全部内容, 来源链接: utcz.com/z/329518.html


