详解Nuxt内导航栏的两种实现方式
方式一 | 通过嵌套路由实现
在pages页面根据nuxt的路由规则,建立页面
1. 创建文件目录及文件
根据规则,如果要创建子路由,子路由的文件夹名字,必须和父路由名字相同
所以,我们的文件夹也为index,index文件夹需要一个默认的页面不然nuxt的路由规则就不能正确匹配页面
一级路由是根路由
二级路由是index,user,默认进入index路由
下面是router页面自动生成的路由
{
path: "/",
component: _93624e48,
children: [{
path: "",
component: _7ba30c26,
name: "index"
}, {
path: "user",
component: _6934afa7,
name: "index-user"
}]
}
2. html页面增加nutx-child配合子路由跳转
<template>
<div class="container">
<div>
<logo />
<h1 class="title">
nuxt-demo
</h1>
// 直接访问路由
<!-- <nuxt-link to="/users">用户列表</nuxt-link> -->
// 通过push的方式直接访问路由路径
<!-- <el-button @click="$router.push('/users')">用户列表</el-button> -->
// 通过push的方式,同时用对象的方式访问路由
<el-button @click="$router.push({name: 'index'})">首页</el-button>
<el-button @click="$router.push({name: 'index-user'})">用户详情</el-button>
</div>
// nuxt规定的子路由插槽
<nuxt-child></nuxt-child>
</div>
</template>
这里就拿官方demo改了一下,可以看到,切换路由的时候,只有子路由页面是变换的,父路由部分是没有变换的
方式二 | 创建公共组件实现
这个方法是需要用到vuex的,当然了,如果嫌麻烦,用storage也行
在components内创建公共组件
1.在pages文件夹创建页面,一个主页,一个用户页面,一个活动页面
创建页面的过程就不一一细说了,具体就是文件夹下面一个index.vue,router就会读这个index为路由指定的页面
我们看下.nuxt文件夹下面的router.js页面
这就是建立好的路由
2. 创建公共组件
这里偷个懒,用的element的导航栏组件
<template>
<div id="nav-wrapper">
<el-menu :default-active="activeIndex" class="el-menu-demo" mode="horizontal" @select="handleSelect">
<el-menu-item index="1" @click="$router.push({name: 'index'})">首页</el-menu-item>
<el-menu-item index="3" @click="$router.push({name: 'users'})">用户页面</el-menu-item>
<el-menu-item index="4" @click="$router.push({name: 'active'})">活动页面</el-menu-item>
</el-menu>
</div>
</template>
3. 在所有路由页面导入创建的公共组件
<template>
<div class="container">
<div>
<logo />
<h1 class="title">
nuxt-demo
</h1>
<navBar />
</div>
</div>
</template>
<script>
import Logo from '~/components/Logo.vue'
import navBar from '~/components/nav.vue'
export default {
components: {
Logo,
navBar
}
}
</script>
<style>
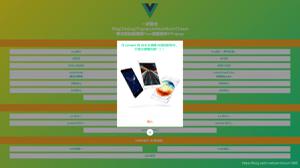
这样就完成了第一步,我们看下预览
问题出现了,虽然我们的路由变换了,但是导航栏的状态确没有同步,因为路由跳转的时候,组件状态会刷新,所以这个时候,需要共享状态,所以,我这里用的是vuex
4. 使用vuex同步导航栏状态
直接在store文件夹内进行添加就行,nuxt里推荐的两种vuex使用方法
第一种是普通创建
第二种是模块化创建
这里我选的是第二种方式,我也建议使用这种,因为方便维护,各种状态一目了然
我们看下目录结构,这里和在vue使用的vuex目录是一样的
这里就不一一详细说明每个文件内容了,本次重点是使用vuex来同步状态
我们把状态同步到vuex中,这样每次页面进来的时候,直接读取vuex中的数据,就可以同步导航栏状态栏了
4.1 vuex使用报错
store/index.js should export a method that returns a Vuex
instance.vuex在nuxt中是需要导出一个store实例
我们这里需要改动一下store文件下的index页面
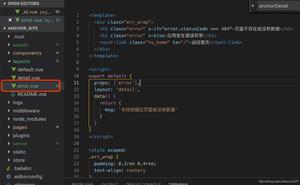
我们继续回到导航栏组件内
<template>
<div id="nav-wrapper">
<el-menu :default-active="activeIndex" class="el-menu-demo" mode="horizontal" @select="handleSelect">
<el-menu-item index="1" @click="$router.push({name: 'index'})">首页</el-menu-item>
<el-menu-item index="3" @click="$router.push({name: 'users'})">用户页面</el-menu-item>
<el-menu-item index="4" @click="$router.push({name: 'active'})">活动页面</el-menu-item>
</el-menu>
</div>
</template>
<script>
import {mapGetters, mapMutations} from 'vuex'
export default{
data() {
return {
activeIndex: '1',
activeIndex2: '1'
};
},
computed: {
...mapGetters([
'barIndex'
])
},
methods: {
...mapMutations({
'change_index': 'CHANGE_INDEX'
}),
handleSelect(key, keyPath) {
console.log(key, keyPath);
this.activeIndex = key
// 每次切换导航栏,会把当前状态同步到vuex中
this.change_index(this.activeIndex)
}
},
created() {
if (this.barIndex) { // 判断vuex内是否有上一次存储的数据,有就同步到当前状态
this.activeIndex = this.barIndex
}
console.log('vuex', this.activeIndex)
}
}
</script>
这样,我们就已经可以同步导航栏状态了
到此这篇关于详解Nuxt内导航栏的两种实现方式的文章就介绍到这了,更多相关Nuxt内导航栏内容请搜索以前的文章或继续浏览下面的相关文章希望大家以后多多支持!
以上是 详解Nuxt内导航栏的两种实现方式 的全部内容, 来源链接: utcz.com/z/318001.html