Windows下用Nginx配置https服务器及反向代理的问题
请求逻辑
前端 --> https方式请求nginx
nginx --> 通过http请求后端服务
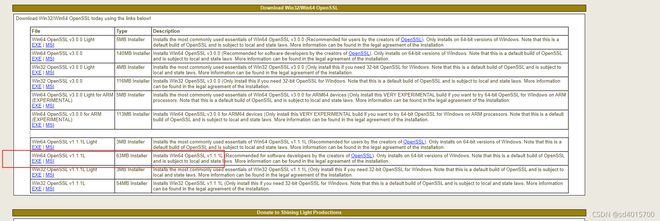
安装OpenSSL
下载地址
然后配置环境变量。在系统环境变量中添加环境变量:
变量名:OPENSSL_HOME
变量值:F:\OpenSSL-Win64\bin;
(变量值为OPENSSL安装位置下的bin目录)
生成证书
用命令行随便打开一个目录, 使用如下命令生成证书
# 创建私钥
# test文件名是自己随便起即可, 这个命令会让你设置两次rsa的密码, 请务必记住该密码, 后续需要使用, 命令执行完毕, 会在当前目录生成 test.key 的文件
openssl genrsa -des3 -out test.key 1024
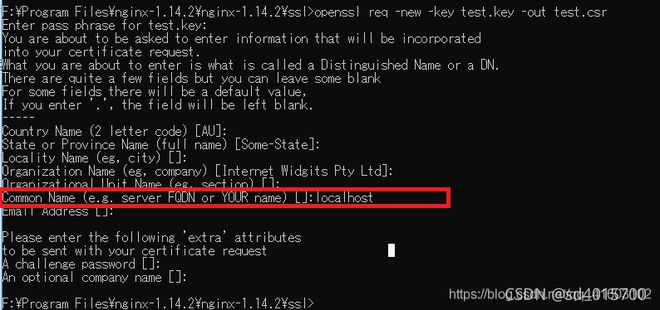
# 创建csr证书, 这里用到的 test.key 是上一个命令生成的那个. 执行这个命令后,需要输入一系列的信息。输入的信息中最重要的为Common Name,这里输入的域名即为我们要使用https访问的域名 ,比如我输入的是localhost。其它的内容随便填即可。以上步骤完成后,ssl文件夹内出现两个文件:test.csr 和 test.key
openssl req -new -key test.key -out test.csr
# 去除密码
# 在加载SSL支持的Nginx并使用上述私钥时除去必须的口令,否则会在启动nginx的时候需要输入密码。
# 复制test.key并重命名为test.copy.key
# 在命令行中执行如下命令以去除口令(此时需要输入密码,这个密码就是上文中在创建私钥的时候输入的密码。)
openssl rsa -in test.copy.key -out test.key
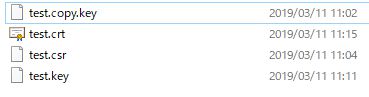
# 生成crt证书. 证书生成完毕。我们发现,ssl文件夹中一共生成了4个文件。下面,配置https服务器的时候,我们需要用到的是其中的test.crt和test.key这两个文件。
openssl x509 -req -days 365 -in test.csr -signkey test.key -out test.crt

下载安装nginx, 修改nginx配置
将生成的test.key 和 test.crt 移动到 $NGINX_ROOT/conf目录
#user nobody;
worker_processes 1;
#error_log logs/error.log;
#error_log logs/error.log notice;
#error_log logs/error.log info;
#pid logs/nginx.pid;
events {
worker_connections 1024;
}
http {
include mime.types;
default_type application/octet-stream;
#log_format main '$remote_addr - $remote_user [$time_local] "$request" '
# '$status $body_bytes_sent "$http_referer" '
# '"$http_user_agent" "$http_x_forwarded_for"';
#access_log logs/access.log main;
sendfile on;
#tcp_nopush on;
#keepalive_timeout 0;
keepalive_timeout 65;
#gzip on;
server {
listen 80;
server_name localhost;
#charset koi8-r;
#access_log logs/host.access.log main;
location / {
root D:/local-site;
index index.html index.htm;
}
#error_page 404 /404.html;
# redirect server error pages to the static page /50x.html
#
error_page 500 502 503 504 /50x.html;
location = /50x.html {
root html;
}
# proxy the PHP scripts to Apache listening on 127.0.0.1:80
#
#location ~ \.php$ {
# proxy_pass http://127.0.0.1;
#}
# pass the PHP scripts to FastCGI server listening on 127.0.0.1:9000
#
#location ~ \.php$ {
# root html;
# fastcgi_pass 127.0.0.1:9000;
# fastcgi_index index.php;
# fastcgi_param SCRIPT_FILENAME /scripts$fastcgi_script_name;
# include fastcgi_params;
#}
# deny access to .htaccess files, if Apache's document root
# concurs with nginx's one
#
#location ~ /\.ht {
# deny all;
#}
}
server {
listen 8086;
listen localhost:8086;
server_name localhost;
gzip on;
gzip_buffers 4 16k;
gzip_comp_level 6;
gzip_vary on;
gzip_types text/plain text/css application/json application/x-javascript application/javascript text/xml application/xml application/xml+rss text/javascript;
location / {
root D:/local-site/good-test;
index index.html index.htm;
}
location ^~/api/ {
rewrite ^~/api/(.*)$ /$1 break;
proxy_pass http://localhost:8080/; #代理IP:端口
}
}
# HTTPS server 配置, 这里使用了反向代理和跨域支持, 注意nginx和后端服务, 只需要在nginx设置跨域即可, 后端服务的跨域不要开启, 如果两边都开启了跨域, 会出问题
#
server {
listen 443 ssl;
server_name localhost;
ssl_certificate test.crt;
ssl_certificate_key test.key;
ssl_session_cache shared:SSL:1m;
ssl_session_timeout 5m;
ssl_ciphers HIGH:!aNULL:!MD5;
ssl_prefer_server_ciphers on;
# location / {
# root html;
# index index.html index.htm;
# }
location / {
# rewrite ^~/api/(.*)$ /$1 break;
# add_header Access-Control-Allow-Origin *;
# 允许客户端的请求方法
add_header 'Access-Control-Allow-Methods' 'GET, POST, OPTIONS, DELETE, PUT';
# 允许客户端提交的的请求头
add_header 'Access-Control-Allow-Headers' 'Origin, x-requested-with, Content-Type, Accept, Authorization';
# 允许客户端提交Cookie
add_header 'Access-Control-Allow-Credentials' 'true';
# 允许客户端访问的响应头
add_header 'Access-Control-Expose-Headers' 'Cache-Control, Content-Language, Content-Type, Expires, Last-Modified, Pragma';
proxy_pass http://10.114.119.61:8080;
proxy_set_header X-Forwarded-For $proxy_add_x_forwarded_for;
proxy_set_header X-Forwarded-Proto $scheme;
proxy_set_header X-Forwarded-Port $server_port;
proxy_set_header Host $host;
proxy_set_header X-Real-IP $remote_addr;
}
}
server {
listen 8443 ssl;
server_name localhost;
ssl_certificate test.crt;
ssl_certificate_key test.key;
ssl_session_cache shared:SSL:1m;
ssl_session_timeout 5m;
ssl_ciphers HIGH:!aNULL:!MD5;
ssl_prefer_server_ciphers on;
# location / {
# root html;
# index index.html index.htm;
# }
location / {
# rewrite ^~/api/(.*)$ /$1 break;
# add_header Access-Control-Allow-Origin $http_origin;
# 允许客户端的请求方法
add_header 'Access-Control-Allow-Methods' 'GET, POST, OPTIONS, DELETE, PUT';
# 允许客户端提交的的请求头
add_header 'Access-Control-Allow-Headers' 'Origin, x-requested-with, Content-Type, Accept, Authorization';
# 允许客户端提交Cookie
add_header 'Access-Control-Allow-Credentials' 'true';
# 允许客户端访问的响应头
add_header 'Access-Control-Expose-Headers' 'Cache-Control, Content-Language, Content-Type, Expires, Last-Modified, Pragma';
# 这是是配置需要代理的服务
proxy_pass http://10.114.119.61:7001;
# proxy_pass https://172.16.46.38:8443;
# proxy_pass http://10.114.119.61:8866;
proxy_set_header X-Forwarded-For $proxy_add_x_forwarded_for;
proxy_set_header X-Forwarded-Proto $scheme;
proxy_set_header X-Forwarded-Port $server_port;
proxy_set_header Host $host;
proxy_set_header X-Real-IP $remote_addr;
}
}
}
本地域名配置
打开C:\Windows\System32\drivers\etc\hosts文件
加入配置:
10.114.119.61 pan.test.com
10.114.119.61 pan.uat.com
到此这篇关于Windows下用Nginx配置https服务器及反向代理的文章就介绍到这了,更多相关Nginx配置https服务器内容请搜索以前的文章或继续浏览下面的相关文章希望大家以后多多支持!
以上是 Windows下用Nginx配置https服务器及反向代理的问题 的全部内容, 来源链接: utcz.com/p/253356.html