Java使用HttpClient详细示例
HTTP 协议可能是现在 Internet 上使用得最多、最重要的协议了,越来越多的 Java 应用程序需要直接通过 HTTP 协议来访问网络资源。虽然在 JDK 的 java net包中已经提供了访问 HTTP 协议的基本功能,但是对于大部分应用程序来说,JDK 库本身提供的功能还不够丰富和灵活。HttpClient 是 Apache Jakarta Common 下的子项目,用来提供高效的、最新的、功能丰富的支持 HTTP 协议的客户端编程工具包,并且它支持 HTTP 协议最新的版本和建议。
HTTP和浏览器有点像,但却不是浏览器。很多人觉得既然HttpClient是一个HTTP客户端编程工具,很多人把他当做浏览器来理解,但是其实HttpClient不是浏览器,它是一个HTTP通信库,因此它只提供一个通用浏览器应用程序所期望的功能子集,最根本的区别是HttpClient中没有用户界面,浏览器需要一个渲染引擎来显示页面,并解释用户输入,例如鼠标点击显示页面上的某处,有一个布局引擎,计算如何显示HTML页面,包括级联样式表和图像。javascript解释器运行嵌入HTML页面或从HTML页面引用的javascript代码。来自用户界面的事件被传递到javascript解释器进行处理。除此之外,还有用于插件的接口,可以处理Applet,嵌入式媒体对象(如pdf文件,Quicktime电影和Flash动画)或ActiveX控件(可以执行任何操作)。HttpClient只能以编程的方式通过其API用于传输和接受HTTP消息。
HttpClient的主要功能:
- 实现了所有 HTTP 的方法(GET、POST、PUT、HEAD、DELETE、HEAD、OPTIONS 等)
- 支持 HTTPS 协议
- 支持代理服务器(Nginx等)等
- 支持自动(跳转)转向
- ……
进入正题
环境说明:JDK1.8、SpringBoot
准备环节
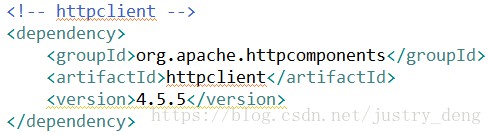
第一步:在pom.xml中引入HttpClient的依赖
第二步:引入fastjson依赖

- 注:本人引入此依赖的目的是,在后续示例中,会用到“将对象转化为json字符串的功能”,也可以引其他有此功能的依赖。
- 注:SpringBoot的基本依赖配置,这里就不再多说了。
详细使用示例
声明:此示例中,以JAVA发送HttpClient(在test里面单元测试发送的);也是以JAVA接收的(在controller里面接收的)。
声明:下面的代码,本人亲测有效。
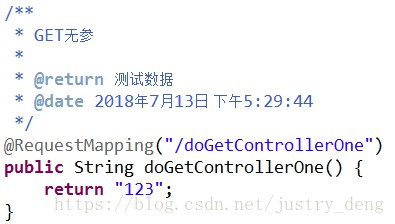
GET无参:
HttpClient发送示例:
/**
* GET---无参测试
*
* @date 2018年7月13日 下午4:18:50
*/
@Test
public void doGetTestOne() {
// 获得Http客户端(可以理解为:你得先有一个浏览器;注意:实际上HttpClient与浏览器是不一样的)
CloseableHttpClient httpClient = HttpClientBuilder.create().build();
// 创建Get请求
HttpGet httpGet = new HttpGet("http://localhost:12345/doGetControllerOne");
// 响应模型
CloseableHttpResponse response = null;
try {
// 由客户端执行(发送)Get请求
response = httpClient.execute(httpGet);
// 从响应模型中获取响应实体
HttpEntity responseEntity = response.getEntity();
System.out.println("响应状态为:" + response.getStatusLine());
if (responseEntity != null) {
System.out.println("响应内容长度为:" + responseEntity.getContentLength());
System.out.println("响应内容为:" + EntityUtils.toString(responseEntity));
}
} catch (ClientProtocolException e) {
e.printStackTrace();
} catch (ParseException e) {
e.printStackTrace();
} catch (IOException e) {
e.printStackTrace();
} finally {
try {
// 释放资源
if (httpClient != null) {
httpClient.close();
}
if (response != null) {
response.close();
}
} catch (IOException e) {
e.printStackTrace();
}
}
}
对应接收示例:
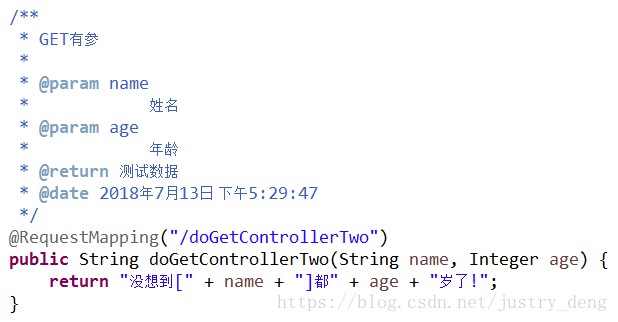
GET有参(方式一:直接拼接URL):
HttpClient发送示例:
/**
* GET---有参测试 (方式一:手动在url后面加上参数)
*
* @date 2018年7月13日 下午4:19:23
*/
@Test
public void doGetTestWayOne() {
// 获得Http客户端(可以理解为:你得先有一个浏览器;注意:实际上HttpClient与浏览器是不一样的)
CloseableHttpClient httpClient = HttpClientBuilder.create().build();
// 参数
StringBuffer params = new StringBuffer();
try {
// 字符数据最好encoding以下;这样一来,某些特殊字符才能传过去(如:某人的名字就是“&”,不encoding的话,传不过去)
params.append("name=" + URLEncoder.encode("&", "utf-8"));
params.append("&");
params.append("age=24");
} catch (UnsupportedEncodingException e1) {
e1.printStackTrace();
}
// 创建Get请求
HttpGet httpGet = new HttpGet("http://localhost:12345/doGetControllerTwo" + "?" + params);
// 响应模型
CloseableHttpResponse response = null;
try {
// 配置信息
RequestConfig requestConfig = RequestConfig.custom()
// 设置连接超时时间(单位毫秒)
.setConnectTimeout(5000)
// 设置请求超时时间(单位毫秒)
.setConnectionRequestTimeout(5000)
// socket读写超时时间(单位毫秒)
.setSocketTimeout(5000)
// 设置是否允许重定向(默认为true)
.setRedirectsEnabled(true).build();
// 将上面的配置信息 运用到这个Get请求里
httpGet.setConfig(requestConfig);
// 由客户端执行(发送)Get请求
response = httpClient.execute(httpGet);
// 从响应模型中获取响应实体
HttpEntity responseEntity = response.getEntity();
System.out.println("响应状态为:" + response.getStatusLine());
if (responseEntity != null) {
System.out.println("响应内容长度为:" + responseEntity.getContentLength());
System.out.println("响应内容为:" + EntityUtils.toString(responseEntity));
}
} catch (ClientProtocolException e) {
e.printStackTrace();
} catch (ParseException e) {
e.printStackTrace();
} catch (IOException e) {
e.printStackTrace();
} finally {
try {
// 释放资源
if (httpClient != null) {
httpClient.close();
}
if (response != null) {
response.close();
}
} catch (IOException e) {
e.printStackTrace();
}
}
}
对应接收示例:

GET有参(方式二:使用URI获得HttpGet):
HttpClient发送示例:
/**
* GET---有参测试 (方式二:将参数放入键值对类中,再放入URI中,从而通过URI得到HttpGet实例)
*
* @date 2018年7月13日 下午4:19:23
*/
@Test
public void doGetTestWayTwo() {
// 获得Http客户端(可以理解为:你得先有一个浏览器;注意:实际上HttpClient与浏览器是不一样的)
CloseableHttpClient httpClient = HttpClientBuilder.create().build();
// 参数
URI uri = null;
try {
// 将参数放入键值对类NameValuePair中,再放入集合中
List<NameValuePair> params = new ArrayList<>();
params.add(new BasicNameValuePair("name", "&"));
params.add(new BasicNameValuePair("age", "18"));
// 设置uri信息,并将参数集合放入uri;
// 注:这里也支持一个键值对一个键值对地往里面放setParameter(String key, String value)
uri = new URIBuilder().setScheme("http").setHost("localhost")
.setPort(12345).setPath("/doGetControllerTwo")
.setParameters(params).build();
} catch (URISyntaxException e1) {
e1.printStackTrace();
}
// 创建Get请求
HttpGet httpGet = new HttpGet(uri);
// 响应模型
CloseableHttpResponse response = null;
try {
// 配置信息
RequestConfig requestConfig = RequestConfig.custom()
// 设置连接超时时间(单位毫秒)
.setConnectTimeout(5000)
// 设置请求超时时间(单位毫秒)
.setConnectionRequestTimeout(5000)
// socket读写超时时间(单位毫秒)
.setSocketTimeout(5000)
// 设置是否允许重定向(默认为true)
.setRedirectsEnabled(true).build();
// 将上面的配置信息 运用到这个Get请求里
httpGet.setConfig(requestConfig);
// 由客户端执行(发送)Get请求
response = httpClient.execute(httpGet);
// 从响应模型中获取响应实体
HttpEntity responseEntity = response.getEntity();
System.out.println("响应状态为:" + response.getStatusLine());
if (responseEntity != null) {
System.out.println("响应内容长度为:" + responseEntity.getContentLength());
System.out.println("响应内容为:" + EntityUtils.toString(responseEntity));
}
} catch (ClientProtocolException e) {
e.printStackTrace();
} catch (ParseException e) {
e.printStackTrace();
} catch (IOException e) {
e.printStackTrace();
} finally {
try {
// 释放资源
if (httpClient != null) {
httpClient.close();
}
if (response != null) {
response.close();
}
} catch (IOException e) {
e.printStackTrace();
}
}
}
对应接收示例:
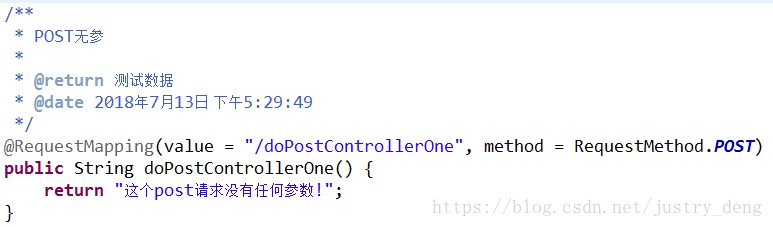
POST无参:
HttpClient发送示例:
/**
* POST---无参测试
*
* @date 2018年7月13日 下午4:18:50
*/
@Test
public void doPostTestOne() {
// 获得Http客户端(可以理解为:你得先有一个浏览器;注意:实际上HttpClient与浏览器是不一样的)
CloseableHttpClient httpClient = HttpClientBuilder.create().build();
// 创建Post请求
HttpPost httpPost = new HttpPost("http://localhost:12345/doPostControllerOne");
// 响应模型
CloseableHttpResponse response = null;
try {
// 由客户端执行(发送)Post请求
response = httpClient.execute(httpPost);
// 从响应模型中获取响应实体
HttpEntity responseEntity = response.getEntity();
System.out.println("响应状态为:" + response.getStatusLine());
if (responseEntity != null) {
System.out.println("响应内容长度为:" + responseEntity.getContentLength());
System.out.println("响应内容为:" + EntityUtils.toString(responseEntity));
}
} catch (ClientProtocolException e) {
e.printStackTrace();
} catch (ParseException e) {
e.printStackTrace();
} catch (IOException e) {
e.printStackTrace();
} finally {
try {
// 释放资源
if (httpClient != null) {
httpClient.close();
}
if (response != null) {
response.close();
}
} catch (IOException e) {
e.printStackTrace();
}
}
}
对应接收示例:
POST有参(普通参数):
注:POST传递普通参数时,方式与GET一样即可,这里以直接在url后缀上参数的方式示例。
HttpClient发送示例:
/**
* POST---有参测试(普通参数)
*
* @date 2018年7月13日 下午4:18:50
*/
@Test
public void doPostTestFour() {
// 获得Http客户端(可以理解为:你得先有一个浏览器;注意:实际上HttpClient与浏览器是不一样的)
CloseableHttpClient httpClient = HttpClientBuilder.create().build();
// 参数
StringBuffer params = new StringBuffer();
try {
// 字符数据最好encoding以下;这样一来,某些特殊字符才能传过去(如:某人的名字就是“&”,不encoding的话,传不过去)
params.append("name=" + URLEncoder.encode("&", "utf-8"));
params.append("&");
params.append("age=24");
} catch (UnsupportedEncodingException e1) {
e1.printStackTrace();
}
// 创建Post请求
HttpPost httpPost = new HttpPost("http://localhost:12345/doPostControllerFour" + "?" + params);
// 设置ContentType(注:如果只是传普通参数的话,ContentType不一定非要用application/json)
httpPost.setHeader("Content-Type", "application/json;charset=utf8");
// 响应模型
CloseableHttpResponse response = null;
try {
// 由客户端执行(发送)Post请求
response = httpClient.execute(httpPost);
// 从响应模型中获取响应实体
HttpEntity responseEntity = response.getEntity();
System.out.println("响应状态为:" + response.getStatusLine());
if (responseEntity != null) {
System.out.println("响应内容长度为:" + responseEntity.getContentLength());
System.out.println("响应内容为:" + EntityUtils.toString(responseEntity));
}
} catch (ClientProtocolException e) {
e.printStackTrace();
} catch (ParseException e) {
e.printStackTrace();
} catch (IOException e) {
e.printStackTrace();
} finally {
try {
// 释放资源
if (httpClient != null) {
httpClient.close();
}
if (response != null) {
response.close();
}
} catch (IOException e) {
e.printStackTrace();
}
}
}
对应接收示例:

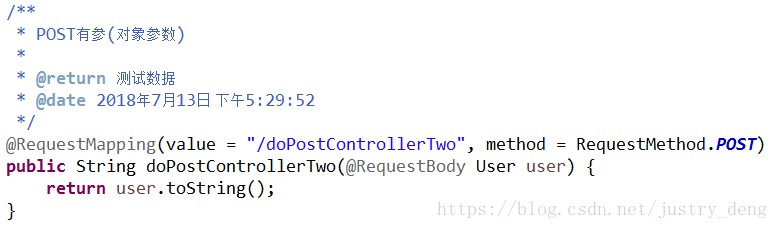
POST有参(对象参数):
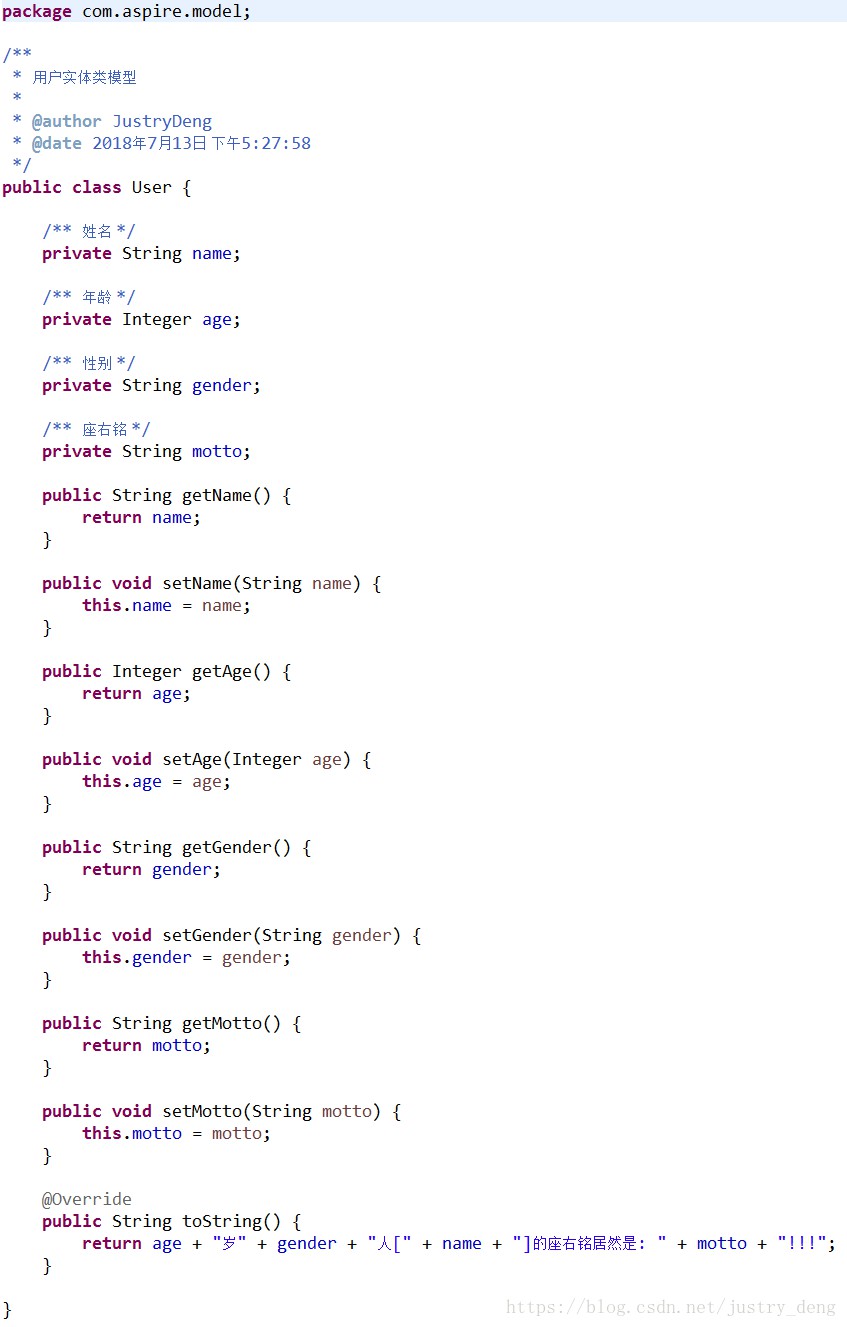
先给出User类

HttpClient发送示例:
/**
* POST---有参测试(对象参数)
*
* @date 2018年7月13日 下午4:18:50
*/
@Test
public void doPostTestTwo() {
// 获得Http客户端(可以理解为:你得先有一个浏览器;注意:实际上HttpClient与浏览器是不一样的)
CloseableHttpClient httpClient = HttpClientBuilder.create().build();
// 创建Post请求
HttpPost httpPost = new HttpPost("http://localhost:12345/doPostControllerTwo");
User user = new User();
user.setName("潘晓婷");
user.setAge(18);
user.setGender("女");
user.setMotto("姿势要优雅~");
// 我这里利用阿里的fastjson,将Object转换为json字符串;
// (需要导入com.alibaba.fastjson.JSON包)
String jsonString = JSON.toJSONString(user);
StringEntity entity = new StringEntity(jsonString, "UTF-8");
// post请求是将参数放在请求体里面传过去的;这里将entity放入post请求体中
httpPost.setEntity(entity);
httpPost.setHeader("Content-Type", "application/json;charset=utf8");
// 响应模型
CloseableHttpResponse response = null;
try {
// 由客户端执行(发送)Post请求
response = httpClient.execute(httpPost);
// 从响应模型中获取响应实体
HttpEntity responseEntity = response.getEntity();
System.out.println("响应状态为:" + response.getStatusLine());
if (responseEntity != null) {
System.out.println("响应内容长度为:" + responseEntity.getContentLength());
System.out.println("响应内容为:" + EntityUtils.toString(responseEntity));
}
} catch (ClientProtocolException e) {
e.printStackTrace();
} catch (ParseException e) {
e.printStackTrace();
} catch (IOException e) {
e.printStackTrace();
} finally {
try {
// 释放资源
if (httpClient != null) {
httpClient.close();
}
if (response != null) {
response.close();
}
} catch (IOException e) {
e.printStackTrace();
}
}
}
对应接收示例:
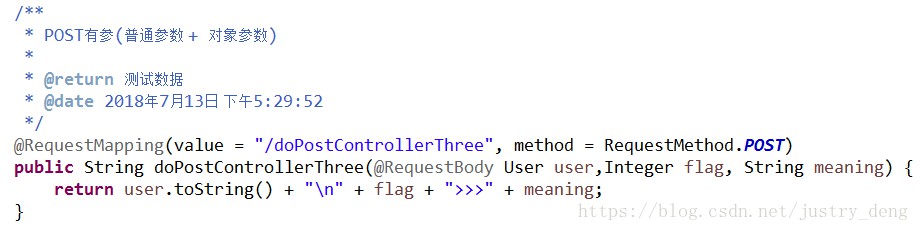
POST有参(普通参数 + 对象参数):
注:POST传递普通参数时,方式与GET一样即可,这里以通过URI获得HttpPost的方式为例。
先给出User类:
HttpClient发送示例:
/**
* POST---有参测试(普通参数 + 对象参数)
*
* @date 2018年7月13日 下午4:18:50
*/
@Test
public void doPostTestThree() {
// 获得Http客户端(可以理解为:你得先有一个浏览器;注意:实际上HttpClient与浏览器是不一样的)
CloseableHttpClient httpClient = HttpClientBuilder.create().build();
// 创建Post请求
// 参数
URI uri = null;
try {
// 将参数放入键值对类NameValuePair中,再放入集合中
List<NameValuePair> params = new ArrayList<>();
params.add(new BasicNameValuePair("flag", "4"));
params.add(new BasicNameValuePair("meaning", "这是什么鬼?"));
// 设置uri信息,并将参数集合放入uri;
// 注:这里也支持一个键值对一个键值对地往里面放setParameter(String key, String value)
uri = new URIBuilder().setScheme("http").setHost("localhost").setPort(12345)
.setPath("/doPostControllerThree").setParameters(params).build();
} catch (URISyntaxException e1) {
e1.printStackTrace();
}
HttpPost httpPost = new HttpPost(uri);
// HttpPost httpPost = new
// HttpPost("http://localhost:12345/doPostControllerThree1");
// 创建user参数
User user = new User();
user.setName("潘晓婷");
user.setAge(18);
user.setGender("女");
user.setMotto("姿势要优雅~");
// 将user对象转换为json字符串,并放入entity中
StringEntity entity = new StringEntity(JSON.toJSONString(user), "UTF-8");
// post请求是将参数放在请求体里面传过去的;这里将entity放入post请求体中
httpPost.setEntity(entity);
httpPost.setHeader("Content-Type", "application/json;charset=utf8");
// 响应模型
CloseableHttpResponse response = null;
try {
// 由客户端执行(发送)Post请求
response = httpClient.execute(httpPost);
// 从响应模型中获取响应实体
HttpEntity responseEntity = response.getEntity();
System.out.println("响应状态为:" + response.getStatusLine());
if (responseEntity != null) {
System.out.println("响应内容长度为:" + responseEntity.getContentLength());
System.out.println("响应内容为:" + EntityUtils.toString(responseEntity));
}
} catch (ClientProtocolException e) {
e.printStackTrace();
} catch (ParseException e) {
e.printStackTrace();
} catch (IOException e) {
e.printStackTrace();
} finally {
try {
// 释放资源
if (httpClient != null) {
httpClient.close();
}
if (response != null) {
response.close();
}
} catch (IOException e) {
e.printStackTrace();
}
}
}
对应接收示例:
对评论区关注度较高的问题进行相关补充:
提示:如果想要知道完整的具体的代码及测试细节,可去下面给的项目代码托管链接,将项目clone下来进行观察。如果需要运行测试,可以先启动该SpringBoot项目,然后再运行相关test方法,进行测试。
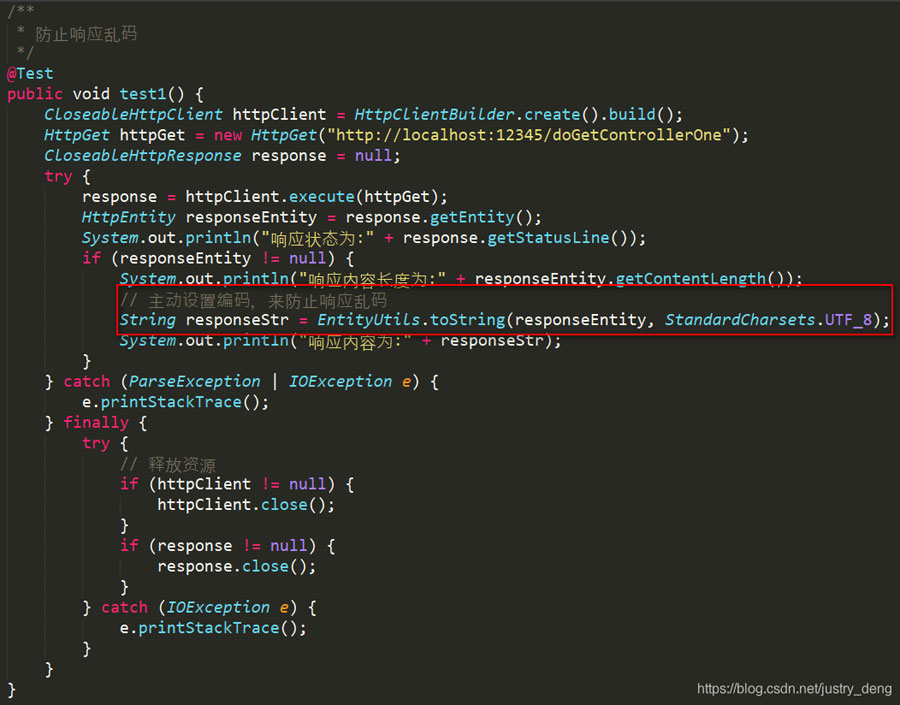
解决响应乱码问题(示例):
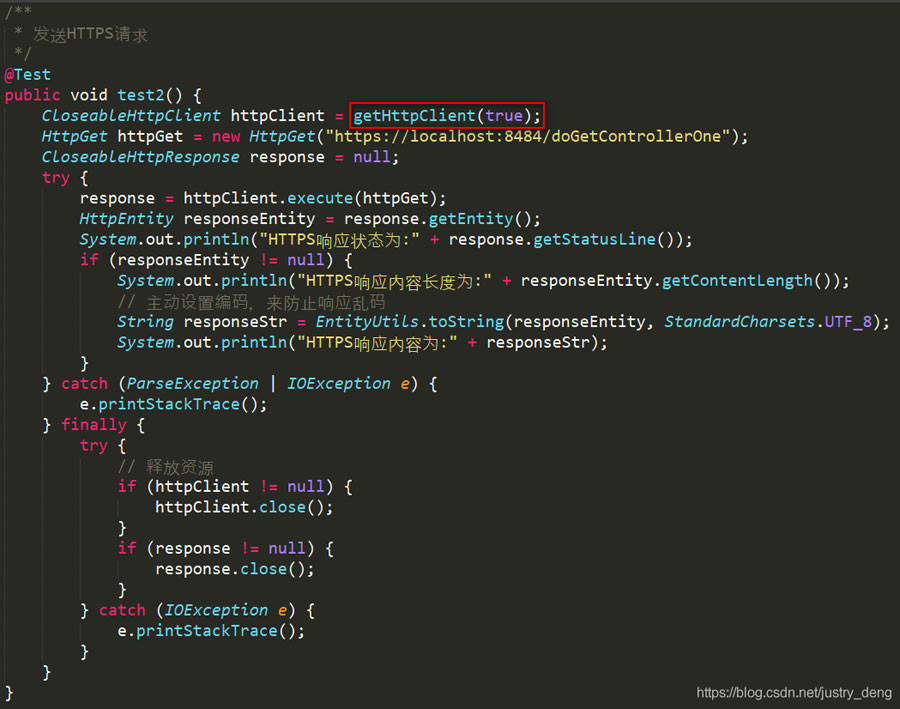
进行HTTPS请求并进行(或不进行)证书校验(示例):
使用示例:
相关方法详情(非完美封装):
/**
* 根据是否是https请求,获取HttpClient客户端
*
* TODO 本人这里没有进行完美封装。对于 校不校验校验证书的选择,本人这里是写死
* 在代码里面的,你们在使用时,可以灵活二次封装。
*
* 提示: 此工具类的封装、相关客户端、服务端证书的生成,可参考我的这篇博客:
* <linked>https://blog.csdn.net/justry_deng/article/details/91569132</linked>
*
*
* @param isHttps 是否是HTTPS请求
*
* @return HttpClient实例
* @date 2019/9/18 17:57
*/
private CloseableHttpClient getHttpClient(boolean isHttps) {
CloseableHttpClient httpClient;
if (isHttps) {
SSLConnectionSocketFactory sslSocketFactory;
try {
/// 如果不作证书校验的话
sslSocketFactory = getSocketFactory(false, null, null);
/// 如果需要证书检验的话
// 证书
//InputStream ca = this.getClass().getClassLoader().getResourceAsStream("client/ds.crt");
// 证书的别名,即:key。 注:cAalias只需要保证唯一即可,不过推荐使用生成keystore时使用的别名。
// String cAalias = System.currentTimeMillis() + "" + new SecureRandom().nextInt(1000);
//sslSocketFactory = getSocketFactory(true, ca, cAalias);
} catch (Exception e) {
throw new RuntimeException(e);
}
httpClient = HttpClientBuilder.create().setSSLSocketFactory(sslSocketFactory).build();
return httpClient;
}
httpClient = HttpClientBuilder.create().build();
return httpClient;
}
/**
* HTTPS辅助方法, 为HTTPS请求 创建SSLSocketFactory实例、TrustManager实例
*
* @param needVerifyCa
* 是否需要检验CA证书(即:是否需要检验服务器的身份)
* @param caInputStream
* CA证书。(若不需要检验证书,那么此处传null即可)
* @param cAalias
* 别名。(若不需要检验证书,那么此处传null即可)
* 注意:别名应该是唯一的, 别名不要和其他的别名一样,否者会覆盖之前的相同别名的证书信息。别名即key-value中的key。
*
* @return SSLConnectionSocketFactory实例
* @throws NoSuchAlgorithmException
* 异常信息
* @throws CertificateException
* 异常信息
* @throws KeyStoreException
* 异常信息
* @throws IOException
* 异常信息
* @throws KeyManagementException
* 异常信息
* @date 2019/6/11 19:52
*/
private static SSLConnectionSocketFactory getSocketFactory(boolean needVerifyCa, InputStream caInputStream, String cAalias)
throws CertificateException, NoSuchAlgorithmException, KeyStoreException,
IOException, KeyManagementException {
X509TrustManager x509TrustManager;
// https请求,需要校验证书
if (needVerifyCa) {
KeyStore keyStore = getKeyStore(caInputStream, cAalias);
TrustManagerFactory trustManagerFactory = TrustManagerFactory.getInstance(TrustManagerFactory.getDefaultAlgorithm());
trustManagerFactory.init(keyStore);
TrustManager[] trustManagers = trustManagerFactory.getTrustManagers();
if (trustManagers.length != 1 || !(trustManagers[0] instanceof X509TrustManager)) {
throw new IllegalStateException("Unexpected default trust managers:" + Arrays.toString(trustManagers));
}
x509TrustManager = (X509TrustManager) trustManagers[0];
// 这里传TLS或SSL其实都可以的
SSLContext sslContext = SSLContext.getInstance("TLS");
sslContext.init(null, new TrustManager[]{x509TrustManager}, new SecureRandom());
return new SSLConnectionSocketFactory(sslContext);
}
// https请求,不作证书校验
x509TrustManager = new X509TrustManager() {
@Override
public void checkClientTrusted(X509Certificate[] arg0, String arg1) {
}
@Override
public void checkServerTrusted(X509Certificate[] arg0, String arg1) {
// 不验证
}
@Override
public X509Certificate[] getAcceptedIssuers() {
return new X509Certificate[0];
}
};
SSLContext sslContext = SSLContext.getInstance("TLS");
sslContext.init(null, new TrustManager[]{x509TrustManager}, new SecureRandom());
return new SSLConnectionSocketFactory(sslContext);
}
/**
* 获取(密钥及证书)仓库
* 注:该仓库用于存放 密钥以及证书
*
* @param caInputStream
* CA证书(此证书应由要访问的服务端提供)
* @param cAalias
* 别名
* 注意:别名应该是唯一的, 别名不要和其他的别名一样,否者会覆盖之前的相同别名的证书信息。别名即key-value中的key。
* @return 密钥、证书 仓库
* @throws KeyStoreException 异常信息
* @throws CertificateException 异常信息
* @throws IOException 异常信息
* @throws NoSuchAlgorithmException 异常信息
* @date 2019/6/11 18:48
*/
private static KeyStore getKeyStore(InputStream caInputStream, String cAalias)
throws KeyStoreException, CertificateException, IOException, NoSuchAlgorithmException {
// 证书工厂
CertificateFactory certificateFactory = CertificateFactory.getInstance("X.509");
// 秘钥仓库
KeyStore keyStore = KeyStore.getInstance(KeyStore.getDefaultType());
keyStore.load(null);
keyStore.setCertificateEntry(cAalias, certificateFactory.generateCertificate(caInputStream));
return keyStore;
}
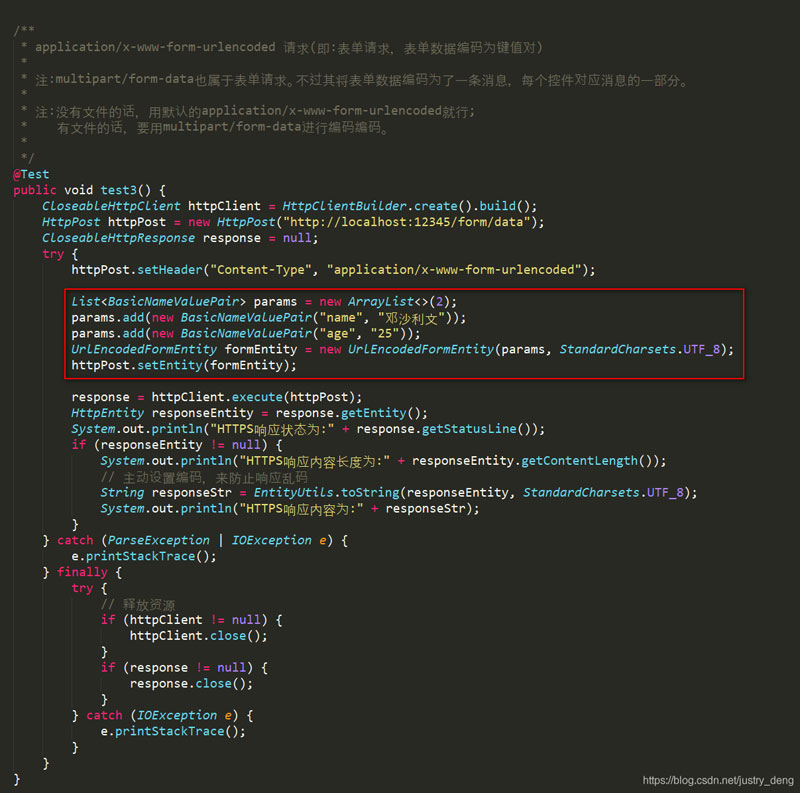
application/x-www-form-urlencoded表单请求(示例):
发送文件(示例):
准备工作:
如果想要灵活方便的传输文件的话,除了引入org.apache.httpcomponents基本的httpclient依赖外再额外引入org.apache.httpcomponents的httpmime依赖。
P.S.:即便不引入httpmime依赖,也是能传输文件的,不过功能不够强大。
在pom.xml中额外引入:
<!--
如果需要灵活的传输文件,引入此依赖后会更加方便
-->
<dependency>
<groupId>org.apache.httpcomponents</groupId>
<artifactId>httpmime</artifactId>
<version>4.5.5</version>
</dependency>
发送端是这样的:
/**
*
* 发送文件
*
* multipart/form-data传递文件(及相关信息)
*
* 注:如果想要灵活方便的传输文件的话,
* 除了引入org.apache.httpcomponents基本的httpclient依赖外
* 再额外引入org.apache.httpcomponents的httpmime依赖。
* 追注:即便不引入httpmime依赖,也是能传输文件的,不过功能不够强大。
*
*/
@Test
public void test4() {
CloseableHttpClient httpClient = HttpClientBuilder.create().build();
HttpPost httpPost = new HttpPost("http://localhost:12345/file");
CloseableHttpResponse response = null;
try {
MultipartEntityBuilder multipartEntityBuilder = MultipartEntityBuilder.create();
// 第一个文件
String filesKey = "files";
File file1 = new File("C:\\Users\\JustryDeng\\Desktop\\back.jpg");
multipartEntityBuilder.addBinaryBody(filesKey, file1);
// 第二个文件(多个文件的话,使用同一个key就行,后端用数组或集合进行接收即可)
File file2 = new File("C:\\Users\\JustryDeng\\Desktop\\头像.jpg");
// 防止服务端收到的文件名乱码。 我们这里可以先将文件名URLEncode,然后服务端拿到文件名时在URLDecode。就能避免乱码问题。
// 文件名其实是放在请求头的Content-Disposition里面进行传输的,如其值为form-data; name="files"; filename="头像.jpg"
multipartEntityBuilder.addBinaryBody(filesKey, file2, ContentType.DEFAULT_BINARY, URLEncoder.encode(file2.getName(), "utf-8"));
// 其它参数(注:自定义contentType,设置UTF-8是为了防止服务端拿到的参数出现乱码)
ContentType contentType = ContentType.create("text/plain", Charset.forName("UTF-8"));
multipartEntityBuilder.addTextBody("name", "邓沙利文", contentType);
multipartEntityBuilder.addTextBody("age", "25", contentType);
HttpEntity httpEntity = multipartEntityBuilder.build();
httpPost.setEntity(httpEntity);
response = httpClient.execute(httpPost);
HttpEntity responseEntity = response.getEntity();
System.out.println("HTTPS响应状态为:" + response.getStatusLine());
if (responseEntity != null) {
System.out.println("HTTPS响应内容长度为:" + responseEntity.getContentLength());
// 主动设置编码,来防止响应乱码
String responseStr = EntityUtils.toString(responseEntity, StandardCharsets.UTF_8);
System.out.println("HTTPS响应内容为:" + responseStr);
}
} catch (ParseException | IOException e) {
e.printStackTrace();
} finally {
try {
// 释放资源
if (httpClient != null) {
httpClient.close();
}
if (response != null) {
response.close();
}
} catch (IOException e) {
e.printStackTrace();
}
}
}
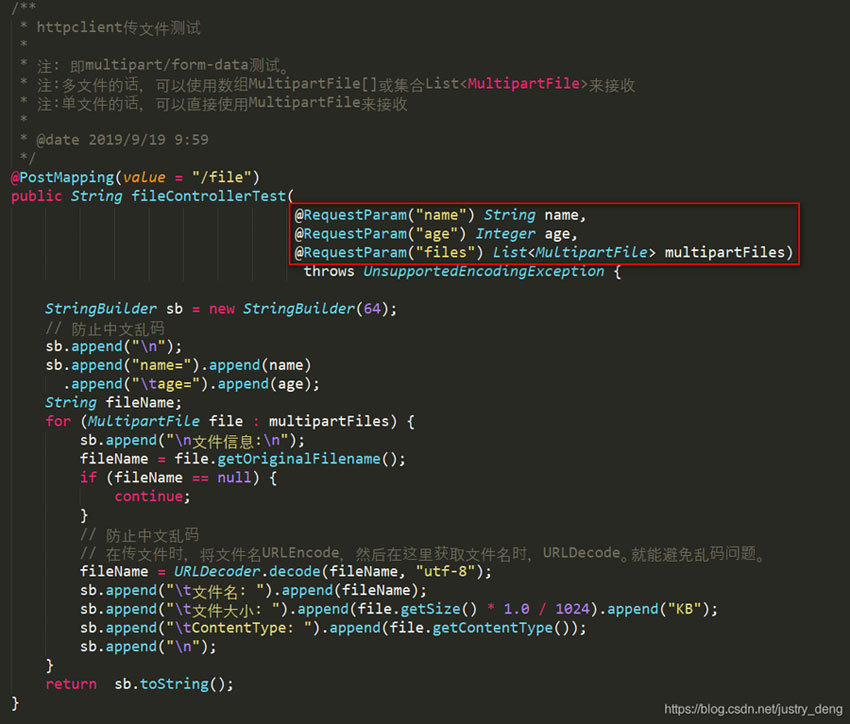
接收端是这样的:
发送流(示例):
发送端是这样的:
/**
*
* 发送流
*
*/
@Test
public void test5() {
CloseableHttpClient httpClient = HttpClientBuilder.create().build();
HttpPost httpPost = new HttpPost("http://localhost:12345/is?name=邓沙利文");
CloseableHttpResponse response = null;
try {
InputStream is = new ByteArrayInputStream("流啊流~".getBytes());
InputStreamEntity ise = new InputStreamEntity(is);
httpPost.setEntity(ise);
response = httpClient.execute(httpPost);
HttpEntity responseEntity = response.getEntity();
System.out.println("HTTPS响应状态为:" + response.getStatusLine());
if (responseEntity != null) {
System.out.println("HTTPS响应内容长度为:" + responseEntity.getContentLength());
// 主动设置编码,来防止响应乱码
String responseStr = EntityUtils.toString(responseEntity, StandardCharsets.UTF_8);
System.out.println("HTTPS响应内容为:" + responseStr);
}
} catch (ParseException | IOException e) {
e.printStackTrace();
} finally {
try {
// 释放资源
if (httpClient != null) {
httpClient.close();
}
if (response != null) {
response.close();
}
} catch (IOException e) {
e.printStackTrace();
}
}
}
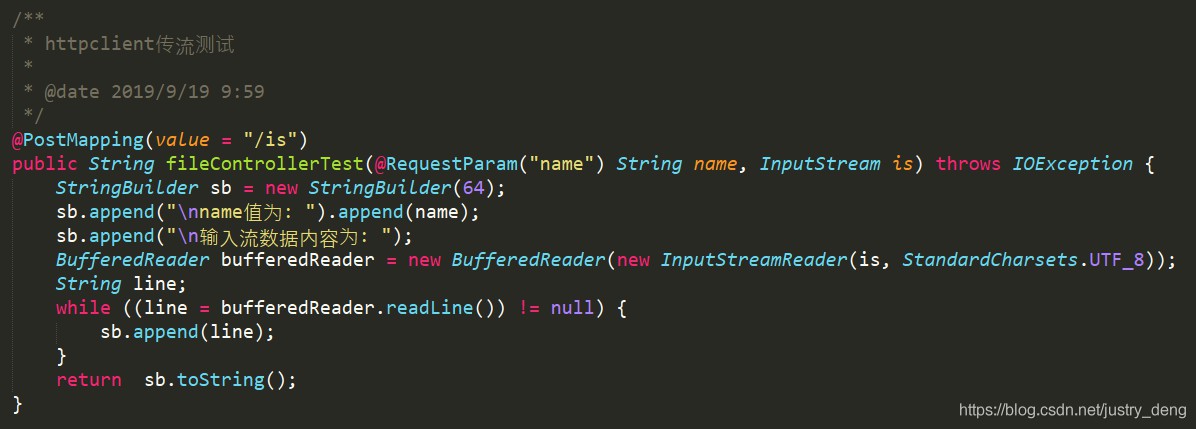
接收端是这样的:
再次提示:如果想要自己进行测试,可去下面给的项目代码托管链接,将项目clone下来,然后先启动该SpringBoot项目,然后再运行相关test方法,进行测试。
工具类提示:使用HttpClient时,可以视情况将其写为工具类。如:Github上Star非常多的一个HttpClient的工具类是httpclientutil。本人在这里也推荐使用该工具类,因为该工具类的编写者封装了很多功能在里面,如果不是有什么特殊的需求的话,完全可以不用造轮子,可以直接使用该工具类。使用方式很简单,可详见https://github.com/Arronlong/httpclientutil。
以上所述是小编给大家介绍的Java使用HttpClient详细示例,希望对大家有所帮助。在此也非常感谢大家对网站的支持!
以上是 Java使用HttpClient详细示例 的全部内容, 来源链接: utcz.com/p/251895.html