springboot整合多数据源配置方式
简介
主要介绍两种整合方式,分别是 springboot+mybatis 使用分包方式整合,和 springboot+druid+mybatisplus 使用注解方式整合。
一、表结构
在本地新建两个数据库,名称分别为db1和db2,新建一张user表,表结构如下:

SQL代码:
CREATE TABLE `user` (
`id` int(11) NOT NULL AUTO_INCREMENT COMMENT '主键',
`name` varchar(25) NOT NULL COMMENT '姓名',
`age` int(2) DEFAULT NULL COMMENT '年龄',
`sex` tinyint(1) NOT NULL DEFAULT '0' COMMENT '性别:0-男,1-女',
`addr` varchar(100) DEFAULT NULL COMMENT '地址',
PRIMARY KEY (`id`)
) ENGINE=InnoDB AUTO_INCREMENT=2 DEFAULT CHARSET=utf8
二、多数据源整合
1. springboot+mybatis使用分包方式整合
1.1 主要依赖包
- spring-boot-starter-web
- mybatis-spring-boot-starter
- mysql-connector-java
- lombok
pom.xml 文件如下:
<?xml version="1.0" encoding="UTF-8"?>
<project xmlns="http://maven.apache.org/POM/4.0.0" xmlns:xsi="http://www.w3.org/2001/XMLSchema-instance"
xsi:schemaLocation="http://maven.apache.org/POM/4.0.0 https://maven.apache.org/xsd/maven-4.0.0.xsd">
<modelVersion>4.0.0</modelVersion>
<parent>
<groupId>org.springframework.boot</groupId>
<artifactId>spring-boot-starter-parent</artifactId>
<version>2.1.9.RELEASE</version>
<relativePath/> <!-- lookup parent from repository -->
</parent>
<groupId>com.example</groupId>
<artifactId>multipledatasource</artifactId>
<version>0.0.1-SNAPSHOT</version>
<name>multipledatasource</name>
<description>Demo project for Spring Boot</description>
<properties>
<java.version>1.8</java.version>
</properties>
<dependencies>
<!-- spring 依赖 -->
<groupId>org.springframework.boot</groupId>
<artifactId>spring-boot-starter-web</artifactId>
</dependency>
<!-- mysql 依赖 -->
<dependency>
<groupId>org.mybatis.spring.boot</groupId>
<artifactId>mybatis-spring-boot-starter</artifactId>
<version>2.1.0</version>
</dependency>
<dependency>
<groupId>mysql</groupId>
<artifactId>mysql-connector-java</artifactId>
<scope>runtime</scope>
</dependency>
<dependency>
<groupId>org.projectlombok</groupId>
<artifactId>lombok</artifactId>
<optional>true</optional>
</dependency>
<dependency>
<groupId>org.springframework.boot</groupId>
<artifactId>spring-boot-starter-test</artifactId>
<scope>test</scope>
</dependency>
</dependencies>
<build>
<plugins>
<plugin>
<groupId>org.springframework.boot</groupId>
<artifactId>spring-boot-maven-plugin</artifactId>
</plugin>
</plugins>
</build>
</project>
1.2 application.yml 配置文件
server:
port: 8080 # 启动端口
spring:
datasource:
db1: # 数据源1
jdbc-url: jdbc:mysql://localhost:3306/db1?characterEncoding=utf8&useUnicode=true&useSSL=false&serverTimezone=GMT%2B8
username: root
password: root
driver-class-name: com.mysql.cj.jdbc.Driver
db2: # 数据源2
jdbc-url: jdbc:mysql://localhost:3306/db2?characterEncoding=utf8&useUnicode=true&useSSL=false&serverTimezone=GMT%2B8
username: root
password: root
driver-class-name: com.mysql.cj.jdbc.Driver
注意事项
各个版本的 springboot 配置 datasource 时参数有所变化,例如低版本配置数据库 url 时使用 url 属性,高版本使用 jdbc-url 属性,请注意区分。
1.3 建立连接数据源的配置文件
第一个配置文件
@Configuration
@MapperScan(basePackages = "com.example.multipledatasource.mapper.db1", sqlSessionFactoryRef = "db1SqlSessionFactory")
public class DataSourceConfig1 {
@Primary // 表示这个数据源是默认数据源, 这个注解必须要加,因为不加的话spring将分不清楚那个为主数据源(默认数据源)
@Bean("db1DataSource")
@ConfigurationProperties(prefix = "spring.datasource.db1") //读取application.yml中的配置参数映射成为一个对象
public DataSource getDb1DataSource(){
return DataSourceBuilder.create().build();
}
@Primary
@Bean("db1SqlSessionFactory")
public SqlSessionFactory db1SqlSessionFactory(@Qualifier("db1DataSource") DataSource dataSource) throws Exception {
SqlSessionFactoryBean bean = new SqlSessionFactoryBean();
bean.setDataSource(dataSource);
// mapper的xml形式文件位置必须要配置,不然将报错:no statement (这种错误也可能是mapper的xml中,namespace与项目的路径不一致导致)
bean.setMapperLocations(new PathMatchingResourcePatternResolver().getResources("classpath*:mapping/db1/*.xml"));
return bean.getObject();
}
@Primary
@Bean("db1SqlSessionTemplate")
public SqlSessionTemplate db1SqlSessionTemplate(@Qualifier("db1SqlSessionFactory") SqlSessionFactory sqlSessionFactory){
return new SqlSessionTemplate(sqlSessionFactory);
}
}
第二个配置文件
@Configuration
@MapperScan(basePackages = "com.example.multipledatasource.mapper.db2", sqlSessionFactoryRef = "db2SqlSessionFactory")
public class DataSourceConfig2 {
@Bean("db2DataSource")
@ConfigurationProperties(prefix = "spring.datasource.db2")
public DataSource getDb1DataSource(){
return DataSourceBuilder.create().build();
}
@Bean("db2SqlSessionFactory")
public SqlSessionFactory db1SqlSessionFactory(@Qualifier("db2DataSource") DataSource dataSource) throws Exception {
SqlSessionFactoryBean bean = new SqlSessionFactoryBean();
bean.setDataSource(dataSource);
bean.setMapperLocations(new PathMatchingResourcePatternResolver().getResources("classpath*:mapping/db2/*.xml"));
return bean.getObject();
}
@Bean("db2SqlSessionTemplate")
public SqlSessionTemplate db1SqlSessionTemplate(@Qualifier("db2SqlSessionFactory") SqlSessionFactory sqlSessionFactory){
return new SqlSessionTemplate(sqlSessionFactory);
}
}
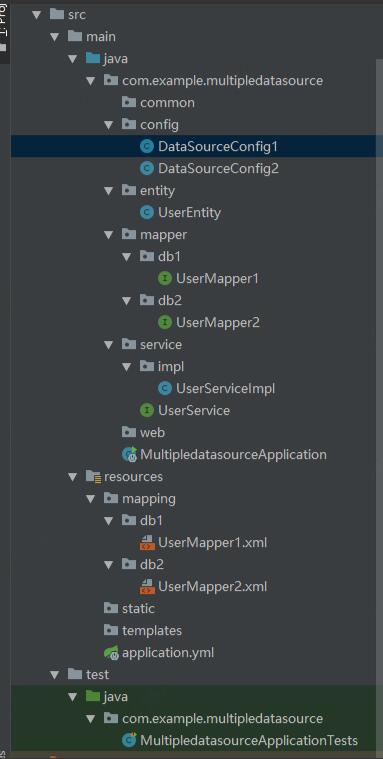
1.4 具体实现
项目结构如下:
注意事项
- 在 service 层中根据不同的业务注入不同的 dao 层
- 如果是主从复制- -读写分离:比如 db1 中负责增删改,db2 中负责查询。但是需要注意的是负责增删改的数据库必须是主库(master)
2. springboot+druid+mybatisplus使用注解整合
2.1 主要依赖包
- spring-boot-starter-web
- mybatis-plus-boot-starter
- dynamic-datasource-spring-boot-starter # 配置动态数据源
- druid-spring-boot-starter # 阿里的数据库连接池
- mysql-connector-java
- lombok
pom.xml 文件如下:
<?xml version="1.0" encoding="UTF-8"?>
<project xmlns="http://maven.apache.org/POM/4.0.0" xmlns:xsi="http://www.w3.org/2001/XMLSchema-instance"
xsi:schemaLocation="http://maven.apache.org/POM/4.0.0 https://maven.apache.org/xsd/maven-4.0.0.xsd">
<modelVersion>4.0.0</modelVersion>
<parent>
<groupId>org.springframework.boot</groupId>
<artifactId>spring-boot-starter-parent</artifactId>
<version>2.1.9.RELEASE</version>
<relativePath/> <!-- lookup parent from repository -->
</parent>
<groupId>com.example</groupId>
<artifactId>mutipledatasource2</artifactId>
<version>0.0.1-SNAPSHOT</version>
<name>mutipledatasource2</name>
<description>Demo project for Spring Boot</description>
<properties>
<java.version>1.8</java.version>
</properties>
<dependencies>
<dependency>
<groupId>org.springframework.boot</groupId>
<artifactId>spring-boot-starter-web</artifactId>
</dependency>
<dependency>
<groupId>com.baomidou</groupId>
<artifactId>mybatis-plus-boot-starter</artifactId>
<version>3.2.0</version>
</dependency>
<dependency>
<groupId>com.baomidou</groupId>
<artifactId>dynamic-datasource-spring-boot-starter</artifactId>
<version>2.5.6</version>
</dependency>
<dependency>
<groupId>mysql</groupId>
<artifactId>mysql-connector-java</artifactId>
<scope>runtime</scope>
</dependency>
<dependency>
<groupId>com.alibaba</groupId>
<artifactId>druid-spring-boot-starter</artifactId>
<version>1.1.20</version>
</dependency>
<dependency>
<groupId>org.projectlombok</groupId>
<artifactId>lombok</artifactId>
<optional>true</optional>
</dependency>
<dependency>
<groupId>org.springframework.boot</groupId>
<artifactId>spring-boot-starter-test</artifactId>
<scope>test</scope>
</dependency>
</dependencies>
<build>
<plugins>
<plugin>
<groupId>org.springframework.boot</groupId>
<artifactId>spring-boot-maven-plugin</artifactId>
</plugin>
</plugins>
</build>
<profiles>
<profile>
<id>local1</id>
<properties>
<profileActive>local1</profileActive>
</properties>
<activation>
<activeByDefault>true</activeByDefault>
</activation>
</profile>
<profile>
<id>local2</id>
<properties>
<profileActive>local2</profileActive>
</properties>
</profile>
</profiles>
</project>
2.2 application.yml 配置文件
server:
port: 8080
spring:
datasource:
dynamic:
primary: db1 # 配置默认数据库
datasource:
db1: # 数据源1配置
url: jdbc:mysql://localhost:3306/db1?characterEncoding=utf8&useUnicode=true&useSSL=false&serverTimezone=GMT%2B8
username: root
password: root
driver-class-name: com.mysql.cj.jdbc.Driver
db2: # 数据源2配置
url: jdbc:mysql://localhost:3306/db2?characterEncoding=utf8&useUnicode=true&useSSL=false&serverTimezone=GMT%2B8
username: root
password: root
driver-class-name: com.mysql.cj.jdbc.Driver
durid:
initial-size: 1
max-active: 20
min-idle: 1
max-wait: 60000
autoconfigure:
exclude: com.alibaba.druid.spring.boot.autoconfigure.DruidDataSourceAutoConfigure # 去除druid配置
DruidDataSourceAutoConfigure会注入一个DataSourceWrapper,其会在原生的spring.datasource下找 url, username, password 等。动态数据源 URL 等配置是在 dynamic 下,因此需要排除,否则会报错。排除方式有两种,一种是上述配置文件排除,还有一种可以在项目启动类排除:
@SpringBootApplication(exclude = DruidDataSourceAutoConfigure.class)
public class Application {
public static void main(String[] args) {
SpringApplication.run(Application.class, args);
}
}
2.3 给使用非默认数据源添加注解@DS
@DS 可以注解在方法上和类上,同时存在方法注解优先于类上注解。
注解在 service 实现或 mapper 接口方法上,不要同时在 service 和 mapper 注解。
@DS("db2")
public interface UserMapper extends BaseMapper<User> {
}
@Service
@DS("db2")
public class ModelServiceImpl extends ServiceImpl<ModelMapper, Model> implements IModelService {}
@Select("SELECT * FROM user")
@DS("db2")
List<User> selectAll();
到此这篇关于springboot整合多数据源配置的文章就介绍到这了,更多相关springboot整合多数据源内容请搜索以前的文章或继续浏览下面的相关文章希望大家以后多多支持!
以上是 springboot整合多数据源配置方式 的全部内容, 来源链接: utcz.com/p/251893.html