Java开发之手把手教你搭建企业级工程SSM框架
关于Spring + Spring MVC + MyBatis的搭建
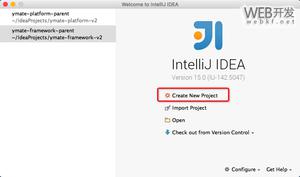
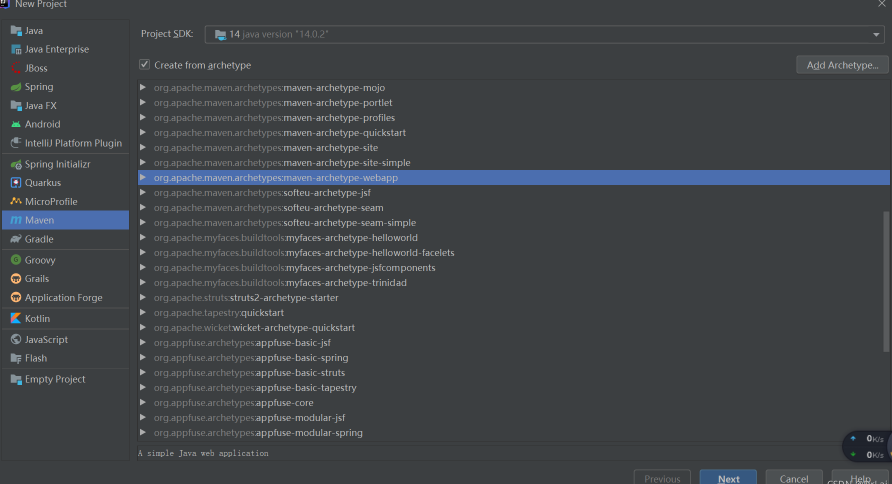
1.在IDEA界面中创建MavenWeb工程
选中下图maven-archetype-webapp
2.在pom.xml中添加如下相关依赖
<?xml version="1.0" encoding="UTF-8"?>
<project xmlns="http://maven.apache.org/POM/4.0.0" xmlns:xsi="http://www.w3.org/2001/XMLSchema-instance"
xsi:schemaLocation="http://maven.apache.org/POM/4.0.0 http://maven.apache.org/xsd/maven-4.0.0.xsd">
<modelVersion>4.0.0</modelVersion>
<groupId>org.example</groupId>
<artifactId>ssm</artifactId>
<version>1.0-SNAPSHOT</version>
<packaging>war</packaging>
<name>ssm Maven Webapp</name>
<!-- FIXME change it to the project's website -->
<url>http://www.example.com</url>
<properties>
<project.build.sourceEncoding>UTF-8</project.build.sourceEncoding>
<maven.compiler.source>1.8</maven.compiler.source>
<maven.compiler.target>1.8</maven.compiler.target>
</properties>
<dependencies>
<!--springmvc-->
<groupId>org.springframework</groupId>
<artifactId>spring-webmvc</artifactId>
<version>5.3.9</version>
</dependency>
<!--jdbc-->
<dependency>
<groupId>org.springframework</groupId>
<artifactId>spring-jdbc</artifactId>
<version>5.3.9</version>
</dependency>
<!--Spring aop-->
<dependency>
<groupId>org.springframework</groupId>
<artifactId>spring-aop</artifactId>
<version>5.3.9</version>
</dependency>
<dependency>
<groupId>org.springframework</groupId>
<artifactId>spring-aspects</artifactId>
<version>5.3.9</version>
</dependency>
<!--Mybatis-->
<dependency>
<groupId>org.mybatis</groupId>
<artifactId>mybatis-spring</artifactId>
<version>2.0.6</version>
</dependency>
<!--mysql驱动-->
<dependency>
<groupId>org.mybatis</groupId>
<artifactId>mybatis</artifactId>
<version>3.4.5</version>
</dependency>
<dependency>
<groupId>mysql</groupId>
<artifactId>mysql-connector-java</artifactId>
<version>8.0.11</version>
</dependency>
<!--c3p0-->
<dependency>
<groupId>c3p0</groupId>
<artifactId>c3p0</artifactId>
<version>0.9.1.2</version>
</dependency>
<!--lombok-->
<dependency>
<groupId>org.projectlombok</groupId>
<artifactId>lombok</artifactId>
<version>1.18.20</version>
</dependency>
<!--jstl-->
<dependency>
<groupId>jstl</groupId>
<artifactId>jstl</artifactId>
<version>1.2</version>
</dependency>
<!--ServletAPI-->
<dependency>
<groupId>javax.servlet</groupId>
<artifactId>javax.servlet-api</artifactId>
<version>4.0.1</version>
</dependency>
</dependencies>
<build>
<finalName>ssm</finalName>
<pluginManagement><!-- lock down plugins versions to avoid using Maven defaults (may be moved to parent pom) -->
<plugins>
<plugin>
<artifactId>maven-clean-plugin</artifactId>
<version>3.1.0</version>
</plugin>
<!-- see http://maven.apache.org/ref/current/maven-core/default-bindings.html#Plugin_bindings_for_war_packaging -->
<plugin>
<artifactId>maven-resources-plugin</artifactId>
<version>3.0.2</version>
</plugin>
<plugin>
<artifactId>maven-compiler-plugin</artifactId>
<version>3.8.0</version>
</plugin>
<plugin>
<artifactId>maven-surefire-plugin</artifactId>
<version>2.22.1</version>
</plugin>
<plugin>
<artifactId>maven-war-plugin</artifactId>
<version>3.2.2</version>
</plugin>
<plugin>
<artifactId>maven-install-plugin</artifactId>
<version>2.5.2</version>
</plugin>
<plugin>
<artifactId>maven-deploy-plugin</artifactId>
<version>2.8.2</version>
</plugin>
</plugins>
</pluginManagement>
<resources>
<resource>
<directory>src/main/java</directory>
<includes>
<include>**/*.xml</include>
</includes>
</resource>
</resources>
</build>
</project>
3.web.xml 配置 Spring MVC、Spring
设置字符编码过滤器、加载静态资源。
<!DOCTYPE web-app PUBLIC
"-//Sun Microsystems, Inc.//DTD Web Application 2.3//EN"
"http://java.sun.com/dtd/web-app_2_3.dtd" >
<web-app>
<display-name>Archetype Created Web Application</display-name>
<!--Spring监听-->
<context-param>
<param-name>contextConfigLocation</param-name>
<param-value>classpath:spring.xml</param-value>
</context-param>
<listener>
<listener-class>org.springframework.web.context.ContextLoaderListener</listener-class>
</listener>
<!--Spring MVC-->
<servlet>
<servlet-name>dispatcher</servlet-name>
<servlet-class>org.springframework.web.servlet.DispatcherServlet</servlet-class>
<init-param>
<param-name>contextConfigLocation</param-name>
<param-value>classpath:springmvc.xml</param-value>
</init-param>
</servlet>
<servlet-mapping>
<servlet-name>dispatcher</servlet-name>
<url-pattern>/</url-pattern>
</servlet-mapping>
<!--字符编码过滤器-->
<filter>
<filter-name>character</filter-name>
<filter-class>org.springframework.web.filter.CharacterEncodingFilter</filter-class>
<init-param>
<param-name>encoding</param-name>
<param-value>utf-8</param-value>
</init-param>
<init-param>
<param-name>forceRequestEncoding</param-name>
<param-value>true</param-value>
</init-param>
<init-param>
<param-name>forceResponseEncoding</param-name>
<param-value>true</param-value>
</init-param>
</filter>
<filter-mapping>
<filter-name>character</filter-name>
<url-pattern>/*</url-pattern>
</filter-mapping>
<!--加载静态资源-->
<servlet-mapping>
<servlet-name>default</servlet-name>
<url-pattern>*.js</url-pattern>
</servlet-mapping>
<servlet-mapping>
<servlet-name>default</servlet-name>
<url-pattern>*.png</url-pattern>
</servlet-mapping>
<servlet-mapping>
<servlet-name>default</servlet-name>
<url-pattern>*.css</url-pattern>
</servlet-mapping>
</web-app>
4.分别在main目录下创建resource包
并创建spring,springmvc,mybatis.xml文件

5.在spring.xml中连接数据库
将user和password改成自己的数据库用户名和密码,并将3306/后面改成连接数据库的包名,紧接着配置SqlSessionFactory,扫描Mapper接口,事务管理等。
<?xml version="1.0" encoding="UTF-8"?>
<beans xmlns="http://www.springframework.org/schema/beans"
xmlns:xsi="http://www.w3.org/2001/XMLSchema-instance"
xmlns:context="http://www.springframework.org/schema/context"
xmlns:aop="http://www.springframework.org/schema/aop"
xmlns:tx="http://www.springframework.org/schema/tx"
xsi:schemaLocation="http://www.springframework.org/schema/aop
http://www.springframework.org/schema/aop/spring-aop-4.3.xsd
http://www.springframework.org/schema/beans
http://www.springframework.org/schema/beans/spring-beans-3.2.xsd
http://www.springframework.org/schema/tx
http://www.springframework.org/schema/tx/spring-tx-4.3.xsd
http://www.springframework.org/schema/context
http://www.springframework.org/schema/context/spring-context-4.3.xsd">
<bean id="dataSource" class="com.mchange.v2.c3p0.ComboPooledDataSource">
<property name="user" value="root"/>
<property name="password" value="abcd1234"/>
<property name="driverClass" value="com.mysql.cj.jdbc.Driver"/>
<property name="jdbcUrl" value="jdbc:mysql://localhost:3306/bjpower?
useUnicode=true&characterEncoding=UTF-8"/>
</bean>
<!--SqlSessionFactory-->
<bean id="sqlSessionFactory" class="org.mybatis.spring.SqlSessionFactoryBean">
<property name="dataSource" ref="dataSource"></property>
<property name="mapperLocations" value="classpath:com/south/repository/*.xml"></property>
<property name="configLocation" value="classpath:mybatis.xml"></property>
</bean>
<!--扫描Mapper接口-->
<bean class="org.mybatis.spring.mapper.MapperScannerConfigurer">
<property name="basePackage" value="com.south.repository"></property>
</bean>
<!--事务管理-->
<bean id="transactionManager" class="org.springframework.jdbc.datasource.DataSourceTransactionManager">
<property name="dataSource" ref="dataSource"></property>
</bean>
<tx:advice id="txAdvice" transaction-manager="transactionManager">
<tx:attributes>
<tx:method name="*"/>
</tx:attributes>
</tx:advice>
<aop:config>
<aop:pointcut id="txPoint" expression="execution(* com.south.service.impl.*.*(..))"></aop:pointcut>
<aop:advisor advice-ref="txAdvice" pointcut-ref="txPoint"></aop:advisor>
</aop:config>
</beans>
6.springmvc.xml中配置驱动和前后缀表达式
<?xml version="1.0" encoding="UTF-8"?>
<beans xmlns="http://www.springframework.org/schema/beans"
xmlns:xsi="http://www.w3.org/2001/XMLSchema-instance"
xmlns:context="http://www.springframework.org/schema/context"
xmlns:mvc="http://www.springframework.org/schema/mvc"
xsi:schemaLocation="http://www.springframework.org/schema/beans
http://www.springframework.org/schema/beans/spring-beans-3.0.xsd
http://www.springframework.org/schema/context
http://www.springframework.org/schema/context/spring-context-3.0.xsd
http://www.springframework.org/schema/mvc
http://www.springframework.org/schema/mvc/spring-mvc-3.2.xsd">
<mvc:annotation-driven></mvc:annotation-driven>
<context:component-scan base-package="com.south"></context:component-scan>
<bean class="org.springframework.web.servlet.view.InternalResourceViewResolver">
<property name="prefix" value="/"></property>
<property name="suffix" value=".jsp"></property>
</bean>
</beans>
7.配置打印sql语句和指定实体类,让idea搜索需要的javaBean
<?xml version="1.0" encoding="UTF-8"?>
<!DOCTYPE configuration PUBLIC "-//mybatis.org//DTD Config 3.0//EN"
"http://mybatis.org/dtd/mybatis-3-config.dtd">
<configuration>
<settings>
<!-- 打印SQL-->
<setting name="logImpl" value="STDOUT_LOGGING" />
</settings>
<typeAliases>
<!-- 指定⼀个包名,MyBatis会在包名下搜索需要的JavaBean-->
<package name="com.south.entity"/>
</typeAliases>
</configuration>
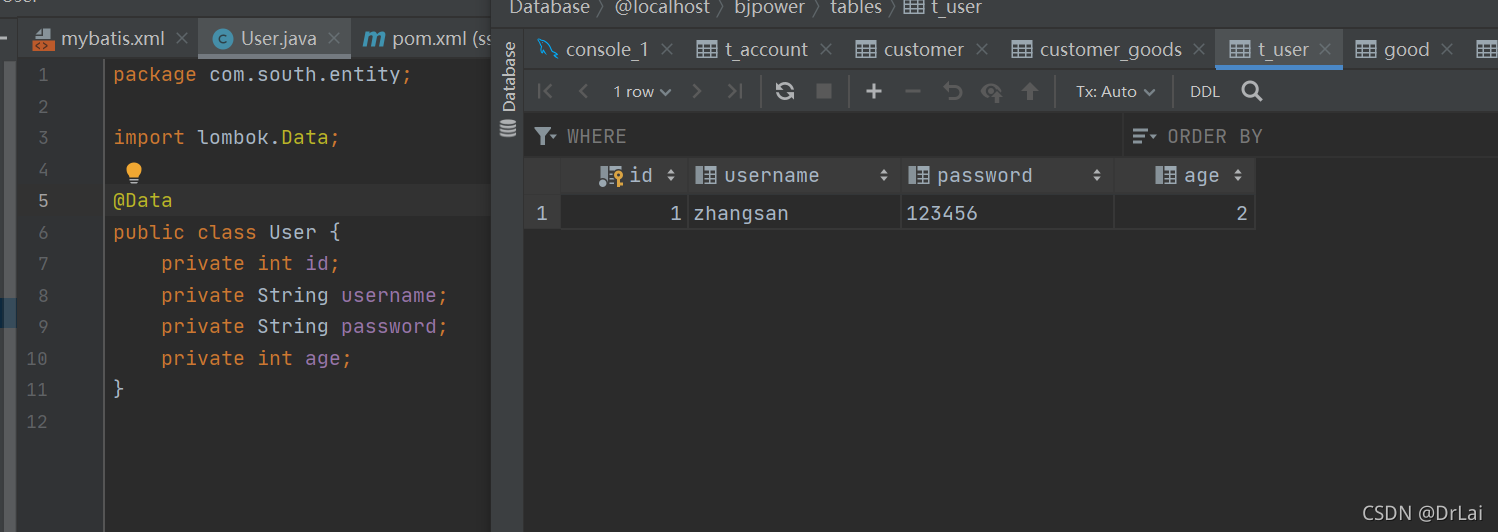
8.创建与数据库相对应的实体类
9.Handler
package com.south.controller;
import org.springframework.beans.factory.annotation.Autowired;
import org.springframework.stereotype.Controller;
import org.springframework.web.bind.annotation.GetMapping;
import org.springframework.web.bind.annotation.RequestMapping;
import org.springframework.web.servlet.ModelAndView;
import com.south.service.UserService;
@Controller
@RequestMapping("/user")
public class UserHandler {
@Autowired
private UserService userService;
@GetMapping("/index")
public ModelAndView index(){
ModelAndView modelAndView=new ModelAndView();
modelAndView.setViewName("index");
modelAndView.addObject("list",userService.findAll());
return modelAndView;
}
}
10.Service及其接口
package com.south.service.impl;
import com.south.entity.User;
import org.springframework.beans.factory.annotation.Autowired;
import org.springframework.stereotype.Service;
import com.south.repository.UserRepository;
import com.south.service.UserService;
import java.util.List;
@Service
public class UserServiceimpl implements UserService {
@Autowired
private UserRepository userRepository;
@Override
public List<User> findAll() {
return userRepository.findAll();
}
}
package com.south.service;
import com.south.entity.User;
import java.util.List;
public interface UserService {
public List<User> findAll();
}
11.Repository
<?xml version="1.0" encoding="UTF-8" ?>
<!DOCTYPE mapper PUBLIC "-//mybatis.org//DTD Mapper 3.0//EN"
"http://mybatis.org/dtd/mybatis-3-mapper.dtd">
<mapper namespace="com.south.repository.UserRepository">
<select id="findAll" resultType="User">
select * from t_user
</select>
</mapper>
12.测试所用的jsp
<%@page contentType="text/html;charset=UTF-8" %>
<%@page isELIgnored="false" %>
<%@taglib prefix="c" uri="http://java.sun.com/jsp/jstl/core" %>
<html>
<head>
</head>
<titie>Title</titie>
<body>
<c:forEach items="${list}" var="user">
${user.id}-${user.username}-${user.password}-${user.age}<br/>
</c:forEach>
</body>
</html>
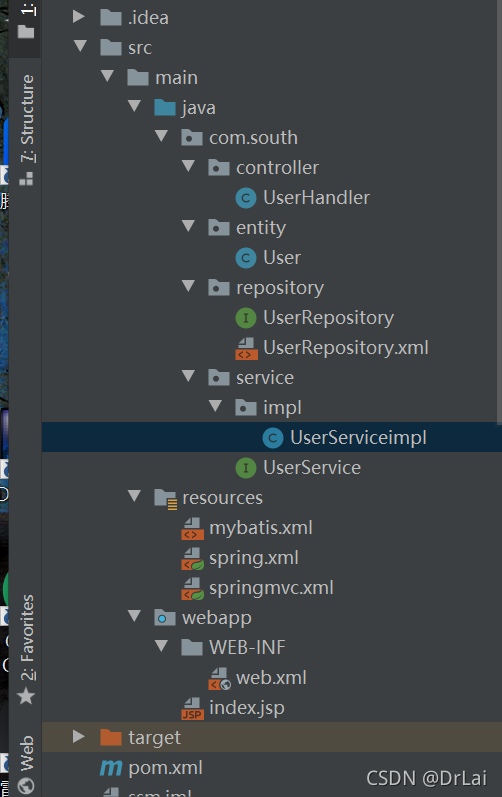
最后放出根目录的图片,方便大家学习参考
以上就是Java教程手把手教你搭建企业级工程SSM框架的详细内容,更多关于Java教程搭建企业级SSM框架的资料请关注其它相关文章!
以上是 Java开发之手把手教你搭建企业级工程SSM框架 的全部内容, 来源链接: utcz.com/p/248980.html