SpringBoot实战之高效使用枚举参数(原理篇)案例详解
找入口
对 Spring 有一定基础的同学一定知道,请求入口是DispatcherServlet,所有的请求最终都会落到doDispatch方法中的ha.handle(processedRequest, response, mappedHandler.getHandler())逻辑。我们从这里出发,一层一层向里扒。
跟着代码深入,我们会找到org.springframework.web.method.support.InvocableHandlerMethod#invokeForRequest的逻辑:
public Object invokeForRequest(NativeWebRequest request, @Nullable ModelAndViewContainer mavContainer,
Object... providedArgs) throws Exception {
Object[] args = getMethodArgumentValues(request, mavContainer, providedArgs);
if (logger.isTraceEnabled()) {
logger.trace("Arguments: " + Arrays.toString(args));
}
return doInvoke(args);
}
可以看出,这里面通过getMethodArgumentValues方法处理参数,然后调用doInvoke方法获取返回值。
继续深入,能够找到org.springframework.web.method.annotation.RequestParamMethodArgumentResolver#resolveArgument方法,这个方法就是解析参数的逻辑。
试想一下,如果是我们自己实现这段逻辑,会怎么做呢?
- 获取输入参数
- 找到目标参数
- 检查是否需要特殊转换逻辑
- 如果需要,进行转换
- 如果不需要,直接返回
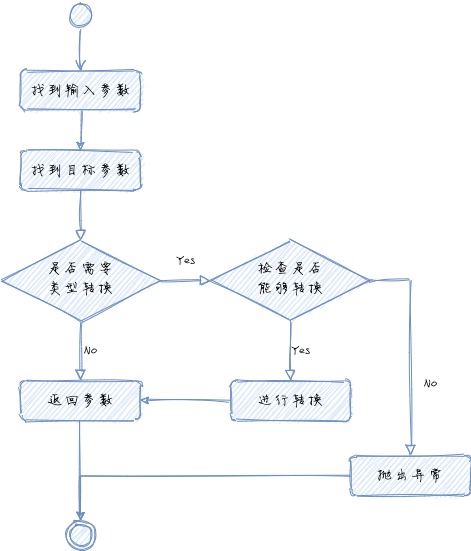
获取输入参数的逻辑在org.springframework.web.method.annotation.RequestParamMethodArgumentResolver#resolveName,单参数返回的是 String 类型,多参数返回 String 数组。核心代码如下:
String[] paramValues = request.getParameterValues(name);
if (paramValues != null) {
arg = (paramValues.length == 1 ? paramValues[0] : paramValues);
}
所以说,无论我们的目标参数是什么,输入参数都是 String 类型或 String 数组,然后 Spring 把它们转换为我们期望的类型。
找到目标参数的逻辑在DispatcherServlet中,根据 uri 找到对应的 Controller 处理方法,找到方法就找到了目标参数类型。
接下来就是检查是否需要转换逻辑,也就是org.springframework.validation.DataBinder#convertIfNecessary,顾名思义,如果需要就转换,将字符串类型转换为目标类型。在我们的例子中,就是将 String 转换为枚举值。
查找转换器
继续深扒,会在org.springframework.beans.TypeConverterDelegate#convertIfNecessary方法中找到这么一段逻辑:
if (conversionService.canConvert(sourceTypeDesc, typeDescriptor)) {
try {
return (T) conversionService.convert(newValue, sourceTypeDesc, typeDescriptor);
}
catch (ConversionFailedException ex) {
// fallback to default conversion logic below
conversionAttemptEx = ex;
}
}
这段逻辑中,调用了org.springframework.core.convert.support.GenericConversionService#canConvert方法,检查是否可转换,如果可以转换,将会执行类型转换逻辑。
检查是否可转换的本质就是检查是否能够找到对应的转换器。如果能找到,就用找到的转换器开始转换逻辑,如果找不到,那就是不能转换,走其他逻辑。
我们可以看看查找转换器的代码org.springframework.core.convert.support.GenericConversionService#getConverter,可以对我们自己写代码有一些启发:
private final Map<ConverterCacheKey, GenericConverter> converterCache = new ConcurrentReferenceHashMap<>(64);
protected GenericConverter getConverter(TypeDescriptor sourceType, TypeDescriptor targetType) {
ConverterCacheKey key = new ConverterCacheKey(sourceType, targetType);
GenericConverter converter = this.converterCache.get(key);
if (converter != null) {
return (converter != NO_MATCH ? converter : null);
}
converter = this.converters.find(sourceType, targetType);
if (converter == null) {
converter = getDefaultConverter(sourceType, targetType);
}
if (converter != null) {
this.converterCache.put(key, converter);
return converter;
}
this.converterCache.put(key, NO_MATCH);
return null;
}
转换为伪代码就是:
- 根据参数类型和目标类型,构造缓存 key
- 根据缓存 key,从缓存中查询转换器
- 如果能找到且不是 NO_MATCH,返回转换器;如果是 NO_MATCH,返回 null;如果未找到,继续
- 通过
org.springframework.core.convert.support.GenericConversionService.Converters#find查询转换器 - 如果未找到,检查源类型和目标类型是否可以强转,也就是类型一致。如果是,返回 NoOpConverter,如果否,返回 null。
- 检查找到的转换器是否为 null,如果不是,将转换器加入到缓存中,返回该转换器
- 如果否,在缓存中添加 NO_MATCH 标识,返回 null
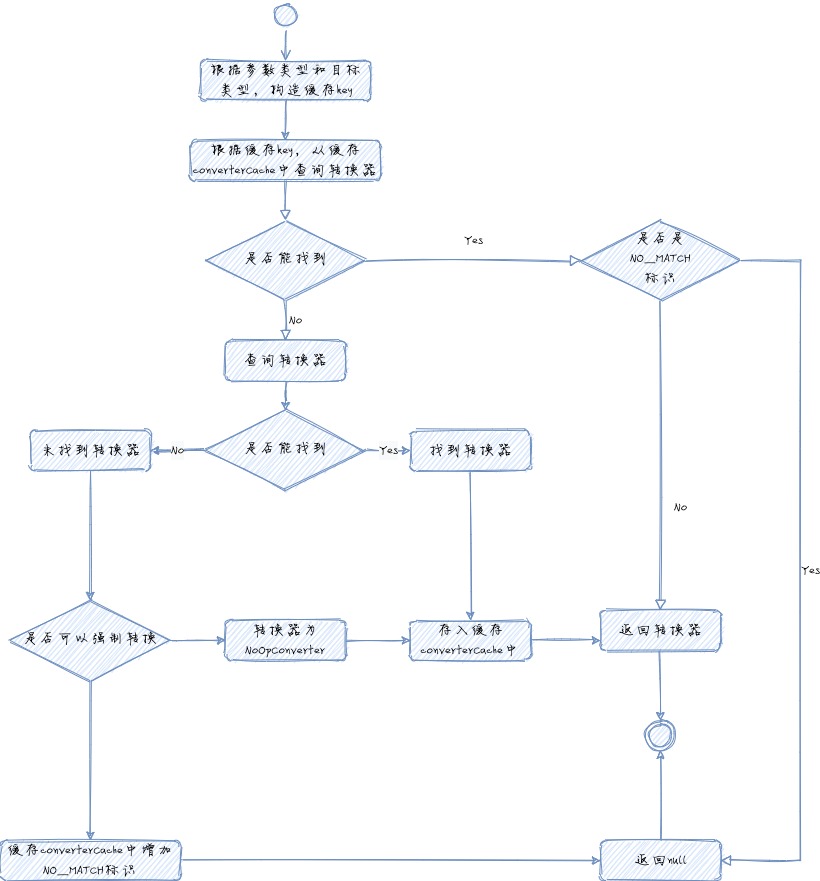
Spring 内部使用Map作为缓存,用来存储通用转换器接口GenericConverter,这个接口会是我们自定义转换器的包装类。我们还可以看到,转换器缓存用的是ConcurrentReferenceHashMap,这个类是线程安全的,可以保证并发情况下,不会出现异常存储。但是getConverter方法没有使用同步逻辑。换句话说,并发请求时,可能存在性能损耗。不过,对于 web 请求场景,并发损耗好过阻塞等待。
我们在看下 Spring 是如何查找转换器的,在org.springframework.core.convert.support.GenericConversionService.Converters#find中就是找到对应转换器的核心逻辑:
private final Map<ConvertiblePair, ConvertersForPair> converters = new ConcurrentHashMap<>(256);
@Nullable
public GenericConverter find(TypeDescriptor sourceType, TypeDescriptor targetType) {
// Search the full type hierarchy
List<Class<?>> sourceCandidates = getClassHierarchy(sourceType.getType());
List<Class<?>> targetCandidates = getClassHierarchy(targetType.getType());
for (Class<?> sourceCandidate : sourceCandidates) {
for (Class<?> targetCandidate : targetCandidates) {
ConvertiblePair convertiblePair = new ConvertiblePair(sourceCandidate, targetCandidate);
GenericConverter converter = getRegisteredConverter(sourceType, targetType, convertiblePair);
if (converter != null) {
return converter;
}
}
}
return null;
}
@Nullable
private GenericConverter getRegisteredConverter(TypeDescriptor sourceType,
TypeDescriptor targetType, ConvertiblePair convertiblePair) {
// Check specifically registered converters
ConvertersForPair convertersForPair = this.converters.get(convertiblePair);
if (convertersForPair != null) {
GenericConverter converter = convertersForPair.getConverter(sourceType, targetType);
if (converter != null) {
return converter;
}
}
// Check ConditionalConverters for a dynamic match
for (GenericConverter globalConverter : this.globalConverters) {
if (((ConditionalConverter) globalConverter).matches(sourceType, targetType)) {
return globalConverter;
}
}
return null;
}
我们可以看到,Spring 是通过源类型和目标类型组合起来,查找对应的转换器。而且,Spring 还通过getClassHierarchy方法,将源类型和目标类型的家族族谱全部列出来,用双层 for 循环遍历查找。
上面的代码中,还有一个matches方法,在这个方法里面,调用了ConverterFactory#getConverter方法,也就是用这个工厂方法,创建了指定类型的转换器。
private final ConverterFactory<Object, Object> converterFactory;
public boolean matches(TypeDescriptor sourceType, TypeDescriptor targetType) {
boolean matches = true;
if (this.converterFactory instanceof ConditionalConverter) {
matches = ((ConditionalConverter) this.converterFactory).matches(sourceType, targetType);
}
if (matches) {
Converter<?, ?> converter = this.converterFactory.getConverter(targetType.getType());
if (converter instanceof ConditionalConverter) {
matches = ((ConditionalConverter) converter).matches(sourceType, targetType);
}
}
return matches;
}
类型转换
经过上面的逻辑,已经找到判断可以进行转换。其核心逻辑就是已经找到对应的转换器了,下面就是转换逻辑,在org.springframework.core.convert.support.GenericConversionService#convert中:
public Object convert(@Nullable Object source, @Nullable TypeDescriptor sourceType, TypeDescriptor targetType) {
Assert.notNull(targetType, "Target type to convert to cannot be null");
if (sourceType == null) {
Assert.isTrue(source == null, "Source must be [null] if source type == [null]");
return handleResult(null, targetType, convertNullSource(null, targetType));
}
if (source != null && !sourceType.getObjectType().isInstance(source)) {
throw new IllegalArgumentException("Source to convert from must be an instance of [" +
sourceType + "]; instead it was a [" + source.getClass().getName() + "]");
}
GenericConverter converter = getConverter(sourceType, targetType);
if (converter != null) {
Object result = ConversionUtils.invokeConverter(converter, source, sourceType, targetType);
return handleResult(sourceType, targetType, result);
}
return handleConverterNotFound(source, sourceType, targetType);
}
其中的GenericConverter converter = getConverter(sourceType, targetType)就是前文中getConverter方法。此处还是可以给我们编码上的一些借鉴的:getConverter方法在canConvert中调用了一次,然后在后续真正转换的时候又调用一次,这是参数转换逻辑,我们该怎么优化这种同一请求内多次调用相同逻辑或者请求相同参数呢?那就是使用缓存。为了保持一次请求中前后两次数据的一致性和请求的高效,推荐使用内存缓存。
执行到这里,直接调用ConversionUtils.invokeConverter(converter, source, sourceType, targetType)转换,其内部是使用org.springframework.core.convert.support.GenericConversionService.ConverterFactoryAdapter#convert方法,代码如下:
public Object convert(@Nullable Object source, TypeDescriptor sourceType, TypeDescriptor targetType) {
if (source == null) {
return convertNullSource(sourceType, targetType);
}
return this.converterFactory.getConverter(targetType.getObjectType()).convert(source);
}
这里就是调用ConverterFactory工厂类构建转换器(即IdCodeToEnumConverterFactory类的getConverter方法),然后调用转换器的conver方法(即IdCodeToEnumConverter类的convert方法),将输入参数转换为目标类型。具体实现可以看一下实战篇中的代码,这里不做赘述。
至此,我们把整个路程通了下来。
文末总结
在本文中,我们跟随源码找到自定义转换器工厂类和转换器类的实现逻辑。这里需要强调一下的是,由于实战篇中我们用到的例子是简单参数的方式,也就是Controller的方法参数都是直接参数,没有包装成对象。这样的话,Spring 是通过RequestParamMethodArgumentResolver处理参数。如果是包装成对象,会使用ModelAttributeMethodProcessor处理参数。这两个处理类中查找类型转换器逻辑都是相同的。
无论是GET请求,还是传参式的POST请求(即Form模式),都可以使用上面这种方式,实现枚举参数的类型转换。但是是 HTTP Body 方式却不行,为什么呢?
Spring 对于 body 参数是通过RequestResponseBodyMethodProcessor处理的,其内部使用了MappingJackson2HttpMessageConverter转换器,逻辑完全不同。所以,想要实现 body 的类型转换,还需要走另外一种方式。将在下一篇中给出。
到此这篇关于SpringBoot实战之高效使用枚举参数(原理篇)案例详解的文章就介绍到这了,更多相关SpringBoot实战之高效使用枚举参数(原理篇)内容请搜索以前的文章或继续浏览下面的相关文章希望大家以后多多支持!
以上是 SpringBoot实战之高效使用枚举参数(原理篇)案例详解 的全部内容, 来源链接: utcz.com/p/248538.html

