OpenCV 视频中火焰检测识别实践
主要完成两个视频中火焰的检测,主要结合RGB判据和HIS判据,设定合适的阈值条件,检测出火焰对应像素的区域,将原图二值化,经过中值滤波以及数学形态学的膨胀运算等图像处理,消除一些噪声及离散点,连通一些遗漏的区域。基于OpenCV的开源库,在VS2013平台上,实现了两个视频中火焰的检测。
利用OpenCV有强大的图像处理库,直接将图像分离为RGB三通道,设置条件限制,找到火焰的像素位置,将原图处理成二值图像。对于火焰检测,本文结合RGB判据和HIS判据,分割出火焰的区域。一般用于人眼观看的颜色模型是RGB模型,对于火焰而言,红色分量(R)和绿色分量(G)会很大,并且绿色分量(G)会大于蓝色分量(B)。HIS颜色模型分别用H(色度)S(饱和度)I(亮度)描述颜色特性,与人们感受颜色的方式紧密相连。考虑到单一颜色模型的判据准确性不够高,在RGB判据基础上,添加HIS约束条件。具体条件[1]为:
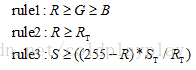
其中,Rt是红色分量阈值,St是饱和度阈值,火焰像素主要取决于红色分量(R)的色度和饱和度。若满足式(1),则判断该位置为火焰像素,显示为白色,否则显示为黑色。判据中阈值的选择对于火焰检测是至关重要的,一般靠经验设定,为了获取火焰识别最好的效果,设置两个滑动条,改变阈值Rt和St的大小,选取最合适的值。
由于(1)中只需要用到HIS中的S分量,所以不需要用到颜色模型转换函数,直接计算S分量即可。
获取二值图像后,需要对其预处理,找到遗漏的点,剔除异常的点。由于存在噪声及离散点,对图像进行平滑滤波,本文采用的是中值滤波,中值滤波是典型的非线性滤波,用像素点邻域灰度值的中值来代替该像素点的灰度值,非常利于消除一些误判断为火焰的像素点。
由于部分火焰的颜色不是介于红黄之间,无法识别,需要实现区域的连通,因此对二值图像进行数学形态学操作。形态学是一种强大的图像处理工具,它可以实现图像去噪、图像分割等功能,最基本的形态学操作有两种,分别是膨胀与腐蚀。它们可以衍生出很多强大的形态学算法,实现我们想要的功能。采用形态学处理的最基础的膨胀操作,作用于火焰的二值图像中。
编写CheckColor函数,将以上3个功能实现。
为了表示出视频中火焰的区域,在预处理过后,将火焰轮廓用矩形框标记,编写了画矩形框的函数DrawFire,其中使用了OpenCV的寻找轮廓的函数findContours,由于作业中test2的火焰位置是分散在不同地方的,所以对整张图像进行区域的划分,分别用不同矩形标记不同区域出现的火焰。
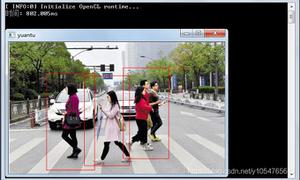
基于OpenCV的库,在VS2013上实现算法,由于视频中的火焰检测是实时动态的,下面截取几帧画面用于展示实验结果:
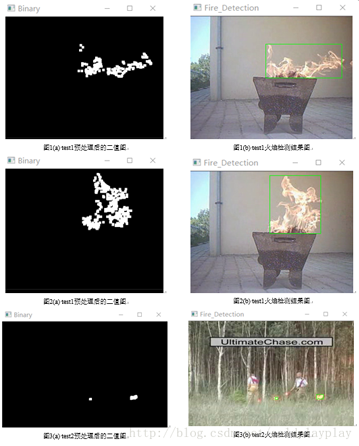
本文采用RGB判据和HIS判据结合的方法,按照经验法和不断地调试,选择合适的阈值,基于OpenCV在VS2013上实现算法,从test1实验结果可以看出,在背景比较单调且与火焰差别较大时,效果良好,几乎没有任何噪声对其造成干扰。从test2实验结果可以看出,当背景复杂或与火焰颜色比较相似时,会不时出现噪声和误判,需要进一步提高算法。
列出处理test2视频的具体代码:
#include<opencv2/opencv.hpp>
#include<cv.h>
using namespace cv;
int redThre =49; // 115~135
int saturationTh = 7; //55~65
Mat CheckColor(Mat &inImg);
void DrawFire(Mat &inputImg, Mat foreImg);
int main()
{
VideoCapture capture("test2.avi");
while (1)
{
Mat frame;
capture >> frame;
if (frame.empty())
break;
namedWindow("Control", CV_WINDOW_AUTOSIZE);
cvCreateTrackbar("redThre", "Control", &redThre, 255);
cvCreateTrackbar("saturationTh", "Control", &saturationTh, 255);
CheckColor(frame);
waitKey(1);
}
return 0;
}
//The Color Check is According to "An Early Fire-Detection Method Based on Image Processing"
//The Author is:Thou-Ho (Chao-Ho) Chen, Ping-Hsueh Wu, and Yung-Chuen Chiou
Mat CheckColor(Mat &inImg)
{
Mat fireImg;
fireImg.create(inImg.size(), CV_8UC1);
Mat multiRGB[3];
int a = inImg.channels();
split(inImg, multiRGB); //将图片拆分成R,G,B,三通道的颜色
for (int i = 0; i < inImg.rows; i++)
{
for (int j = 0; j < inImg.cols; j++)
{
float B, G, R;
B = multiRGB[0].at<uchar>(i, j); //每个像素的R,G,B值,动态地址计算法
G = multiRGB[1].at<uchar>(i, j);
R = multiRGB[2].at<uchar>(i, j);
float maxValue = max(max(B, G), R);
float minValue = min(min(B, G), R);
//与HSI中S分量的计算公式
double S = (1 - 3.0*minValue / (R + G + B));//
//R > RT R>=G>=B S>=((255-R)*ST/RT)
if (R > redThre &&R >= G && G>= B && S >((255 - R) * saturationTh / redThre))
{
fireImg.at<uchar>(i, j) = 255;
}
else
{
fireImg.at<uchar>(i, j) = 0;
}
}
}
//erode(fireImg, fireImg, Mat(3, 3, CV_8UC1));
//GaussianBlur(fireImg, fireImg, Size(5, 5), 0, 0);
medianBlur(fireImg, fireImg, 5);
dilate(fireImg, fireImg, Mat(5, 5, CV_8UC1));
imshow("Binary", fireImg);
DrawFire(inImg, fireImg);
return fireImg;
}
void DrawFire(Mat &inputImg, Mat foreImg)
{
vector<vector<Point>> contours_set;//保存轮廓提取后的点集及拓扑关系
findContours(foreImg, contours_set, CV_RETR_EXTERNAL, CV_CHAIN_APPROX_NONE);
Point point1;
Point point2;
float a = 0.4, b = 0.75;
float xmin1 = a*inputImg.cols, ymin1 = inputImg.rows, xmax1 = 0, ymax1 = 0;
float xmin2 = b*inputImg.cols, ymin2 = inputImg.rows, xmax2 = a*inputImg.cols, ymax2 = 0;
float xmin3 = inputImg.cols, ymin3 = inputImg.rows, xmax3 = b*inputImg.cols, ymax3 = 0;
Rect finalRect1;
Rect finalRect2;
Rect finalRect3;
vector<vector<Point> >::iterator iter = contours_set.begin();
for (; iter != contours_set.end();)
{
Rect rect = boundingRect(*iter);
float radius;
Point2f center;
minEnclosingCircle(*iter, center, radius);
if (rect.area()> 0)
{
point1.x = rect.x;
point1.y = rect.y;
point2.x = point1.x + rect.width;
point2.y = point1.y + rect.height;
if (point2.x< a*inputImg.cols)
{
if (point1.x < xmin1)
xmin1 = point1.x;
if (point1.y < ymin1)
ymin1 = point1.y;
if (point2.x > xmax1 && point2.x < xmax2)
xmax1 = point2.x;
if (point2.y > ymax1)
ymax1 = point2.y;
}
if (point2.x < b*inputImg.cols&&point2.x > a*inputImg.cols)
{
if (point1.x < xmin2 && point1.x>xmin1)
xmin2 = point1.x;
if (point1.y < ymin2)
ymin2 = point1.y;
if (point2.x > xmax2 && point2.x < xmax3)
xmax2 = point2.x;
if (point2.y > ymax2)
ymax2 = point2.y;
}
if (point2.x < inputImg.cols&&point2.x > b*inputImg.cols)
{
if (point1.x < xmin3 && point1.x>xmin2)
xmin3 = point1.x;
if (point1.y < ymin3)
ymin3 = point1.y;
if (point2.x > xmax3)
xmax3 = point2.x;
if (point2.y > ymax3)
ymax3 = point2.y;
}
++iter;
}
else
{
iter = contours_set.erase(iter);
}
}
if (xmin1 == a*inputImg.cols&& ymin1 == inputImg.rows&&xmax1 == 0 && ymax1== 0)
{
xmin1 = ymin1 = xmax1 = ymax1 = 0;
}
if (xmin2 == b*inputImg.cols&& ymin2 == inputImg.rows&& xmax2 == a*inputImg.cols&& ymax2 == 0)
{
xmin2 = ymin2 = xmax2 = ymax2 = 0;
}
if (xmin3 == inputImg.cols&&ymin3 == inputImg.rows&& xmax3 == b*inputImg.cols&& ymax3 == 0)
{
xmin3 = ymin3 = xmax3 = ymax3 = 0;
}
finalRect1= Rect(xmin1, ymin1, xmax1 - xmin1, ymax1 - ymin1);
finalRect2 = Rect(xmin2, ymin2, xmax2 - xmin2, ymax2 - ymin2);
finalRect3 = Rect(xmin3, ymin3, xmax3 - xmin3, ymax3 - ymin3);
rectangle(inputImg, finalRect1, Scalar(0, 255, 0));
rectangle(inputImg, finalRect2, Scalar(0, 255, 0));
rectangle(inputImg, finalRect3, Scalar(0, 255, 0));
imshow("Fire_Detection", inputImg);
}
到此这篇关于OpenCV 视频中的火焰检测识别的文章就介绍到这了,更多相关OpenCV 火焰检测识别内容请搜索以前的文章或继续浏览下面的相关文章希望大家以后多多支持!
以上是 OpenCV 视频中火焰检测识别实践 的全部内容, 来源链接: utcz.com/p/247075.html