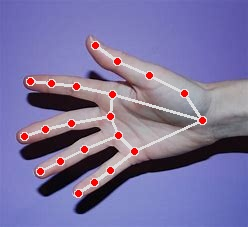
OpenCV+MediaPipe实现手部关键点识别
可视化辅助函数
在下面的代码的注释内有大致的操作
基本操作与前面的人脸检测的操作相似,增加了可视化的辅助函数
import matplotlib.pyplot as plt# 使用ipython的魔法方法,将绘制出的图像直接嵌入在notebook单元格中
import cv2
# 定义可视化图像函数
def look_img(img):
'''opencv读入图像格式为BGR,matplotlib可视化格式为RGB,因此需将BGR转RGB'''
img_RGB = cv2.cvtColor(img, cv2.COLOR_BGR2RGB)
plt.imshow(img_RGB)
plt.show()
#调用摄像头拍照
time.sleep(2) # 运行本代码后两秒拍照
# 获取摄像头,0为电脑默认摄像头,1为外接摄像头
cap = cv2.VideoCapture(0)
# 从摄像头捕获一帧画面
success, image = cap.read()
# 关闭摄像头
cap.release()
# 关闭图像窗口
cv2.destroyAllWindows()
cv2.imwrite('photo.jpg', image)
#调用摄像头拍视频
import cv2
import time
# 定义逐帧处理函数,可不进行任何处理,直接将摄像头捕获的画面写入视频帧
def process_frame(img):
return img
output_name = 'record_video.mp4'
# 获取摄像头,传入0表示获取系统默认摄像头
cap = cv2.VideoCapture(0)
# 打开cap
cap.open(0)
frame_size = (cap.get(cv2.CAP_PROP_FRAME_WIDTH), cap.get(cv2.CAP_PROP_FRAME_HEIGHT))
fourcc = cv2.VideoWriter_fourcc(*'mp4v')
fps = cap.get(cv2.CAP_PROP_FPS)
out = cv2.VideoWriter(output_name, fourcc, fps, (int(frame_size[0]), int(frame_size[1])))
# 无限循环,直到break被触发
while cap.isOpened():
# 获取画面
success, frame = cap.read()
if not success:
break
# 对捕获的帧进行图像处理
frame = process_frame(frame)
## 将帧写入视频文件中
out.write(frame)
# 展示处理后的三通道图像
cv2.imshow('press q to break', frame)
if cv2.waitKey(1) in [ord('q'), 27]: # 按键盘上的q或esc退出(在英文输入法下)
break
# 关闭图像窗口
cv2.destroyAllWindows()
out.release()
# 关闭摄像头
cap.release()
print('视频已保存', output_name)
单张图片
import cv2 as cvimport mediapipe as mp
import tqdm
import time
import matplotlib.pyplot as plt
def look_img(img):
img_RGB=cv.cvtColor(img,cv.COLOR_BGR2RGB)
plt.imshow(img_RGB)
plt.show()
# 手部关键点检测模型
mp_hand=mp.solutions.hands
# 导入模型
hands=mp_hand.Hands(static_image_mode=False,
max_num_hands=5,
min_detection_confidence=0.3,
min_tracking_confidence=0.3
)
# 导入绘图函数
mpDraw=mp.solutions.drawing_utils
img=cv.imread('hand2.png')
# look_img(img)
img_RGB=cv.cvtColor(img,cv.COLOR_BGR2RGB)
results=hands.process(img_RGB)
if results.multi_hand_landmarks:
for hand_idx in range(len(results.multi_hand_landmarks)):
hand_21=results.multi_hand_landmarks[hand_idx]
mpDraw.draw_landmarks(img, hand_21, mp_hand.HAND_CONNECTIONS) # 可视化
look_img(img)
cv.imwrite('hands2.jpg',img)
# 在三维坐标系中可视化索引为0的手
mpDraw.plot_landmarks(results.multi_hand_landmarks[0], mp_
摄像头检测
import cv2# mediapipe人工智能工具包
import mediapipe as mp
# 进度条库
from tqdm import tqdm
# 时间库
import time
# 导入模型
# 导入solution
mp_hands = mp.solutions.hands
# 导入模型
hands = mp_hands.Hands(static_image_mode=False, # 是静态图片还是连续视频帧
max_num_hands=2, # 最多检测几只手
min_detection_confidence=0.7, # 置信度阈值
min_tracking_confidence=0.5) # 追踪阈值
# 导入绘图函数
mpDraw = mp.solutions.drawing_utils
# 处理单帧函数
# 处理帧函数
def process_frame(img):
# 水平镜像翻转图像,使图中左右手与真实左右手对应
# 参数 1:水平翻转,0:竖直翻转,-1:水平和竖直都翻转
img = cv2.flip(img, 1)
# BGR转RGB
img_RGB = cv2.cvtColor(img, cv2.COLOR_BGR2RGB)
# 将RGB图像输入模型,获取预测结果
results = hands.process(img_RGB)
if results.multi_hand_landmarks: # 如果有检测到手
# 遍历每一只检测出的手
for hand_idx in range(len(results.multi_hand_landmarks)):
hand_21 = results.multi_hand_landmarks[hand_idx] # 获取该手的所有关键点坐标
mpDraw.draw_landmarks(img, hand_21, mp_hands.HAND_CONNECTIONS) # 可视化
# 在三维坐标系中可视化索引为0的手
# mpDraw.plot_landmarks(results.multi_hand_landmarks[0], mp_hands.HAND_CONNECTIONS)
return img
# 导入opencv-python
import cv2
import time
# 获取摄像头,传入0表示获取系统默认摄像头
cap = cv2.VideoCapture(1)
# 打开cap
cap.open(0)
# 无限循环,直到break被触发
while cap.isOpened():
# 获取画面
success, frame = cap.read()
if not success:
print('Error')
break
## !!!处理帧函数
frame = process_frame(frame)
# 展示处理后的三通道图像
cv2.imshow('my_window', frame)
if cv2.waitKey(1) in [ord('q'), 27]: # 按键盘上的q或esc退出(在英文输入法下)
break
# 关闭摄像头
cap.release()
# 关闭图像窗口
cv2.destroyAllWindows()
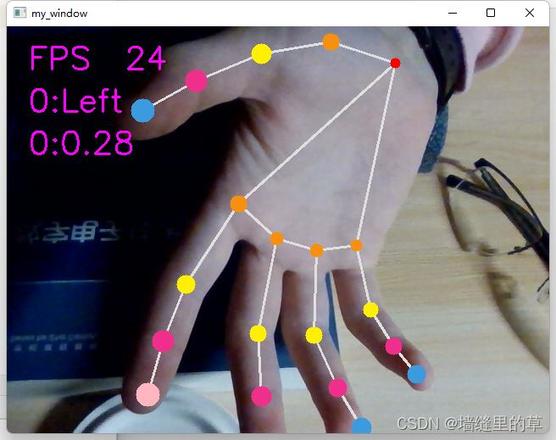
改变关键点数据特征
import cv2# mediapipe人工智能工具包
import mediapipe as mp
# 进度条库
from tqdm import tqdm
# 时间库
import time
# 导入solution
mp_hands = mp.solutions.hands
# 导入模型
hands = mp_hands.Hands(static_image_mode=False, # 是静态图片还是连续视频帧
max_num_hands=2, # 最多检测几只手
min_detection_confidence=0.7, # 置信度阈值
min_tracking_confidence=0.5) # 追踪阈值
# 导入绘图函数
mpDraw = mp.solutions.drawing_utils
def process_frame(img):
# 记录该帧开始处理的时间
start_time = time.time()
# 获取图像宽高
h, w = img.shape[0], img.shape[1]
# 水平镜像翻转图像,使图中左右手与真实左右手对应
# 参数 1:水平翻转,0:竖直翻转,-1:水平和竖直都翻转
img = cv2.flip(img, 1)
# BGR转RGB
img_RGB = cv2.cvtColor(img, cv2.COLOR_BGR2RGB)
# 将RGB图像输入模型,获取预测结果
results = hands.process(img_RGB)
if results.multi_hand_landmarks: # 如果有检测到手
handness_str = ''
index_finger_tip_str = ''
for hand_idx in range(len(results.multi_hand_landmarks)):
# 获取该手的21个关键点坐标
hand_21 = results.multi_hand_landmarks[hand_idx]
# 可视化关键点及骨架连线
mpDraw.draw_landmarks(img, hand_21, mp_hands.HAND_CONNECTIONS)
# 记录左右手信息
temp_handness = results.multi_handedness[hand_idx].classification[0].label
handness_str += '{}:{} '.format(hand_idx, temp_handness)
# 获取手腕根部深度坐标
cz0 = hand_21.landmark[0].z
for i in range(21): # 遍历该手的21个关键点
# 获取3D坐标
cx = int(hand_21.landmark[i].x * w)
cy = int(hand_21.landmark[i].y * h)
cz = hand_21.landmark[i].z
depth_z = cz0 - cz
# 用圆的半径反映深度大小
radius = max(int(6 * (1 + depth_z * 5)), 0)
if i == 0: # 手腕
img = cv2.circle(img, (cx, cy), radius, (0, 0, 255), -1)
if i == 8: # 食指指尖
img = cv2.circle(img, (cx, cy), radius, (193, 182, 255), -1)
# 将相对于手腕的深度距离显示在画面中
index_finger_tip_str += '{}:{:.2f} '.format(hand_idx, depth_z)
if i in [1, 5, 9, 13, 17]: # 指根
img = cv2.circle(img, (cx, cy), radius, (16, 144, 247), -1)
if i in [2, 6, 10, 14, 18]: # 第一指节
img = cv2.circle(img, (cx, cy), radius, (1, 240, 255), -1)
if i in [3, 7, 11, 15, 19]: # 第二指节
img = cv2.circle(img, (cx, cy), radius, (140, 47, 240), -1)
if i in [4, 12, 16, 20]: # 指尖(除食指指尖)
img = cv2.circle(img, (cx, cy), radius, (223, 155, 60), -1)
scaler = 1
img = cv2.putText(img, handness_str, (25 * scaler, 100 * scaler), cv2.FONT_HERSHEY_SIMPLEX, 1.25 * scaler,
(255, 0, 255), 2 * scaler)
img = cv2.putText(img, index_finger_tip_str, (25 * scaler, 150 * scaler), cv2.FONT_HERSHEY_SIMPLEX,
1.25 * scaler, (255, 0, 255), 2 * scaler)
# 记录该帧处理完毕的时间
end_time = time.time()
# 计算每秒处理图像帧数FPS
FPS = 1 / (end_time - start_time)
# 在图像上写FPS数值,参数依次为:图片,添加的文字,左上角坐标,字体,字体大小,颜色,字体粗细
img = cv2.putText(img, 'FPS ' + str(int(FPS)), (25 * scaler, 50 * scaler), cv2.FONT_HERSHEY_SIMPLEX,
1.25 * scaler, (255, 0, 255), 2 * scaler)
return img
# 获取摄像头,传入0表示获取系统默认摄像头
cap = cv2.VideoCapture(0)
# 打开cap
cap.open(0)
# 无限循环,直到break被触发
while cap.isOpened():
# 获取画面
success, frame = cap.read()
if not success:
break
frame = process_frame(frame)
# 展示处理后的三通道图像
cv2.imshow('my_window', frame)
if cv2.waitKey(1) in [ord('q'), 27]: # 按键盘上的q或esc退出(在英文输入法下)
break
# 关闭摄像头
cap.release()
# 关闭图像窗口
cv2.destroyAllWindows()
以上就是OpenCV+MediaPipe实现手部关键点识别的详细内容,更多关于OpenCV MediaPipe手部关键点识别的资料请关注其它相关文章!
以上是 OpenCV+MediaPipe实现手部关键点识别 的全部内容, 来源链接: utcz.com/z/257064.html