opencv图片的任意角度旋转实现示例
一 旋转角度坐标的计算
1.如果O点为圆心,则点P绕点O旋转redian弧度之后,点P的坐标变换为点Q的计算公式为:
Q.x=P.x*cos(redian)-P.y*sin(redian)
Q.y=P.x*sin(redian)+P.y*cos(redian)
redian表示的为弧度
弧度与角度的变换公式为:
redian=pi*180/angle
2. 如果O点不是圆心,则点P绕点O旋转redian弧度之后,点P的坐标变换为Q的计算公式如下:
Q.x=(P.x-O.x)*cos(redian)-(P.y-O.y)*sin(redian)+O.x
Q.y=(P.x-O.x)*sin(redian)+(P.y-O.y)*cos(redian)+O.y
二 旋转任意角度的步骤
1.首先默认旋转45度时,所扩展的图像最大,即为根号2倍的长或宽的最大值,将图像填充到可能达到的最大
2 使用getRotationMatrix2D函数求取旋转矩阵,使用warpAffine函数旋转矩阵
3 求旋转之后包括图像的最大的矩形
4 删除多余的黑色边框
三 实现
#include <iostream>
#include<opencv2/opencv.hpp>
using namespace cv;
void rotate_arbitrarily_angle(Mat &src,Mat &dst,float angle)
{
float radian = (float) (angle /180.0 * CV_PI);
//填充图像
int maxBorder =(int) (max(src.cols, src.rows)* 1.414 ); //即为sqrt(2)*max
int dx = (maxBorder - src.cols)/2;
int dy = (maxBorder - src.rows)/2;
copyMakeBorder(src, dst, dy, dy, dx, dx, BORDER_CONSTANT);
//旋转
Point2f center( (float)(dst.cols/2) , (float) (dst.rows/2));
Mat affine_matrix = getRotationMatrix2D( center, angle, 1.0 );//求得旋转矩阵
warpAffine(dst, dst, affine_matrix, dst.size());
//计算图像旋转之后包含图像的最大的矩形
float sinVal = abs(sin(radian));
float cosVal = abs(cos(radian));
Size targetSize( (int)(src.cols * cosVal +src.rows * sinVal),
(int)(src.cols * sinVal + src.rows * cosVal) );
//剪掉多余边框
int x = (dst.cols - targetSize.width) / 2;
int y = (dst.rows - targetSize.height) / 2;
Rect rect(x, y, targetSize.width, targetSize.height);
dst = Mat(dst,rect);
}
int main() {
cv::Mat src=cv::imread("../3.png");
cv::Mat dst;
rotate_arbitrarily_angle(src,dst,30);
cv::imshow("src",src);
cv::imshow("dst",dst);
cv::waitKey(0);
return 0;
}

原图
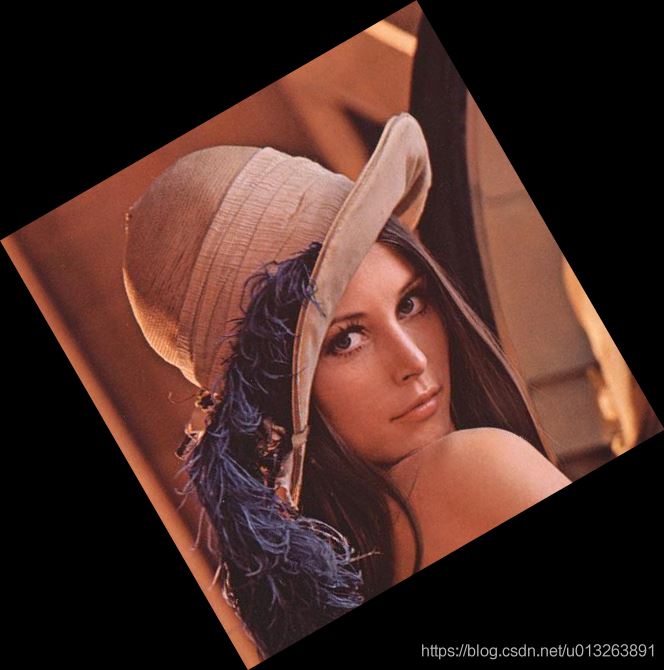
绕中心点旋转30度的结果
需要注意的是该方法仅适用于水平图像旋转到有角度的图像,至于可以随意旋转角度的方法我现在还不知道如何完成,以后有机会再做.
以上做法还有个最大的缺点是在旋转之后像素大小发生了变化,如果你要对像素操作就会产生很多问题,接下来的代码会将像素固定下来,不过也是针对旋转到一定角度之后再返回到水平位置的代码,具有很大的局限性,研究明白之后再更新其他情况
cv::Mat rotate_arbitrarily_angle1(cv::Mat matSrc, float angle, bool direction,int height,int width) {
float theta = angle * CV_PI / 180.0;
int nRowsSrc = matSrc.rows;
int nColsSrc = matSrc.cols; // 如果是顺时针旋转
if (!direction) theta = 2 * CV_PI - theta; // 全部以逆时针旋转来计算
// 逆时针旋转矩阵
float matRotate[3][3]{ {
std::cos(theta), -std::sin(theta), 0},
{std::sin(theta), std::cos(theta), 0 },
{0, 0, 1} };
float pt[3][2]{
{ 0, nRowsSrc },
{nColsSrc, nRowsSrc},
{nColsSrc, 0} };
for (int i = 0; i < 3; i++) {
float x = pt[i][0] * matRotate[0][0] + pt[i][1] * matRotate[1][0];
float y = pt[i][0] * matRotate[0][1] + pt[i][1] * matRotate[1][1];
pt[i][0] = x; pt[i][1] = y;
}
// 计算出旋转后图像的极值点和尺寸
float fMin_x = std::min(std::min(std::min(pt[0][0], pt[1][0]), pt[2][0]), (float)0.0);
float fMin_y = std::min(std::min(std::min(pt[0][1], pt[1][1]), pt[2][1]), (float)0.0);
float fMax_x = std::max(std::max(std::max(pt[0][0], pt[1][0]), pt[2][0]), (float)0.0);
float fMax_y = std::max(std::max(std::max(pt[0][1], pt[1][1]), pt[2][1]), (float)0.0);
int nRows = cvRound(fMax_y - fMin_y + 0.5) + 1;
int nCols = cvRound(fMax_x - fMin_x + 0.5) + 1;
int nMin_x = cvRound(fMin_x + 0.5);
int nMin_y = cvRound(fMin_y + 0.5);
// 拷贝输出图像
cv::Mat matRet(nRows, nCols, matSrc.type(), cv::Scalar(0));
for (int j = 0; j < nRows; j++) {
for (int i = 0; i < nCols; i++) {
// 计算出输出图像在原图像中的对应点的坐标,然后复制该坐标的灰度值
// 因为是逆时针转换,所以这里映射到原图像的时候可以看成是,输出图像
// 到顺时针旋转到原图像的,而顺时针旋转矩阵刚好是逆时针旋转矩阵的转置
// 同时还要考虑到要把旋转后的图像的左上角移动到坐标原点。
int x = (i + nMin_x) * matRotate[0][0] + (j + nMin_y) * matRotate[0][1];
int y = (i + nMin_x) * matRotate[1][0] + (j + nMin_y) * matRotate[1][1];
if (x >= 0 && x < nColsSrc && y >= 0 && y < nRowsSrc) {
matRet.at<uchar>(j, i) = matSrc.at<uchar>(y, x);
}
}
}
if(direction== false){//当需要顺时针旋转回水平位置时
int x = (matRet.cols -width) / 2;
int y = (matRet.rows -height) / 2;
//width和height是水平条件下图像的宽高
cv::Rect rect(x, y, width, height);
matRet = cv::Mat(matRet,rect);
}
return matRet;
}
到此这篇关于opencv图片的任意角度旋转实现示例的文章就介绍到这了,更多相关opencv图片任意角度旋转内容请搜索以前的文章或继续浏览下面的相关文章希望大家以后多多支持!
以上是 opencv图片的任意角度旋转实现示例 的全部内容, 来源链接: utcz.com/p/246301.html