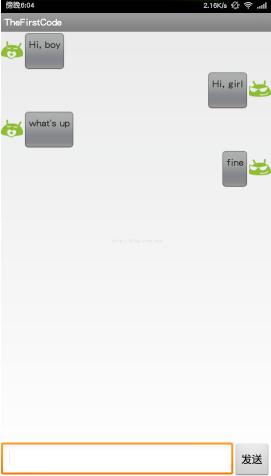
Android ListView仿微信聊天界面
Android ListView仿聊天界面效果图的具体代码,供大家参考,具体内容如下
1.首先页面总布局(ListView + LinearLayout(TextView+Button))
<LinearLayout xmlns:android="http://schemas.android.com/apk/res/android"
android:layout_width="match_parent"
android:layout_height="match_parent"
android:orientation="vertical"
>
<ListView
android:id="@+id/msg_list_view"
android:layout_width="match_parent"
android:layout_height="0dp"
android:layout_weight="1"
android:divider="#000000"
/>
<LinearLayout
android:layout_width="match_parent"
android:layout_height="wrap_content"
android:orientation="horizontal">
<EditText
android:id="@+id/input_text"
android:layout_height="wrap_content"
android:layout_width="0dp"
android:layout_weight="1"
android:gravity="center_vertical"
android:maxLines="2"/>
<Button
android:id="@+id/send"
android:text="发送"
android:layout_height="wrap_content"
android:layout_width="wrap_content"
android:gravity="center"/>
</LinearLayout>
</LinearLayout>
2.为ListView定制Adapter
public class MsgAdapter extends ArrayAdapter<Msg>{
private int resourceID;
public MsgAdapter(Context context, int resource, List<Msg> objects) {
super(context, resource, objects);
resourceID = resource;
}
@Override
public View getView(int position, View convertView, ViewGroup parent) {
Msg msg = getItem(position);
View view;
ViewHolder viewHolder;
if(convertView == null) {
view = LayoutInflater.from(getContext()).inflate(resourceID, null);
viewHolder = new ViewHolder();
viewHolder.leftLayout = (LinearLayout)view.findViewById(R.id.left_layout);
viewHolder.rightLayout = (LinearLayout) view.findViewById(R.id.right_layout);
viewHolder.leftMsg = (TextView) view.findViewById(R.id.left_msg);
viewHolder.rightMsg = (TextView) view.findViewById(R.id.right_msg);
view.setTag(viewHolder);
}else {
view = convertView;
viewHolder = (ViewHolder) view.getTag();
}
if(msg.getType() == Msg.MSG_RECEIVE) {
viewHolder.leftLayout.setVisibility(View.VISIBLE);
viewHolder.rightLayout.setVisibility(View.GONE);
viewHolder.leftMsg.setText(msg.getMessage());
}else {
viewHolder.rightLayout.setVisibility(View.VISIBLE);
viewHolder.leftLayout.setVisibility(View.GONE);
viewHolder.rightMsg.setText(msg.getMessage());
}
return view;
}
class ViewHolder {
LinearLayout leftLayout;
LinearLayout rightLayout;
TextView leftMsg;
TextView rightMsg;
}
}
public class Msg {
public static final int MSG_RECEIVE = 0;
public static final int MSG_SEND = 1;
private int type;
private String content;
public Msg(String content, int type) {
this.content = content;
this.type = type;
}
public String getMessage() {
return content;
}
public int getType() {
return type;
}
}
3.ListView单个view布局
<LinearLayout xmlns:android="http://schemas.android.com/apk/res/android"
android:layout_width="match_parent"
android:layout_height="wrap_content"
android:orientation="vertical" >
<LinearLayout
android:id="@+id/left_layout"
android:layout_height="wrap_content"
android:layout_width="wrap_content"
android:layout_gravity="start"
android:gravity="center"
>
<ImageView
android:id="@+id/left_image"
android:src="@drawable/yan"
android:layout_height="wrap_content"
android:layout_width="wrap_content"
/>
<LinearLayout
android:layout_height="wrap_content"
android:layout_width="wrap_content"
android:background="@drawable/msg">
<TextView
android:id="@+id/left_msg"
android:layout_height="wrap_content"
android:layout_width="wrap_content"
/>
</LinearLayout>
</LinearLayout>
<LinearLayout
android:id="@+id/right_layout"
android:layout_height="wrap_content"
android:layout_width="wrap_content"
android:layout_gravity="end"
android:gravity="center"
>
<LinearLayout
android:layout_height="wrap_content"
android:layout_width="wrap_content"
android:background="@drawable/msg">
<TextView
android:id="@+id/right_msg"
android:layout_height="wrap_content"
android:layout_width="wrap_content"
/>
</LinearLayout>
<ImageView
android:id="@+id/right_image"
android:src="@drawable/meng"
android:layout_height="wrap_content"
android:layout_width="wrap_content"
/>
</LinearLayout>
</LinearLayout>
4.ListView加载Adapter
public class MainActivity extends Activity {
private ListView listView;
private MsgAdapter msgAdapter;
private List<Msg> msgList = new ArrayList<Msg>();
private EditText input;
private Button send;
@Override
protected void onCreate(Bundle savedInstanceState) {
super.onCreate(savedInstanceState);
setContentView(R.layout.activity_main);
listView = (ListView) findViewById(R.id.msg_list_view);
initMsg();
msgAdapter = new MsgAdapter(this, R.layout.msg_item, msgList);
listView.setAdapter(msgAdapter);
input = (EditText) findViewById(R.id.input_text);
send = (Button) findViewById(R.id.send);
send.setOnClickListener(new OnClickListener() {
@Override
public void onClick(View v) {
String message = input.getText().toString();
if(!"".equals(message)) {
Msg msg = new Msg(message, Msg.MSG_SEND);
msgList.add(msg);
msgAdapter.notifyDataSetChanged();//当有新消息时刷新
listView.setSelection(msgList.size());
}else {
Toast.makeText(MainActivity.this, "input can't be empty", Toast.LENGTH_SHORT).show();
}
input.setText("");
}
});
}
private void initMsg() {
Msg msg;
msg = new Msg("Hi, boy", Msg.MSG_RECEIVE);
msgList.add(msg);
msg = new Msg("Hi, girl", Msg.MSG_SEND);
msgList.add(msg);
msg = new Msg("what's up", Msg.MSG_RECEIVE);
msgList.add(msg);
}
}
以上就是本文的全部内容,希望对大家的学习有所帮助,也希望大家多多支持。
以上是 Android ListView仿微信聊天界面 的全部内容, 来源链接: utcz.com/p/243722.html