Android实现全局悬浮框
本文实例为大家分享了Android实现全局悬浮框的具体代码,供大家参考,具体内容如下
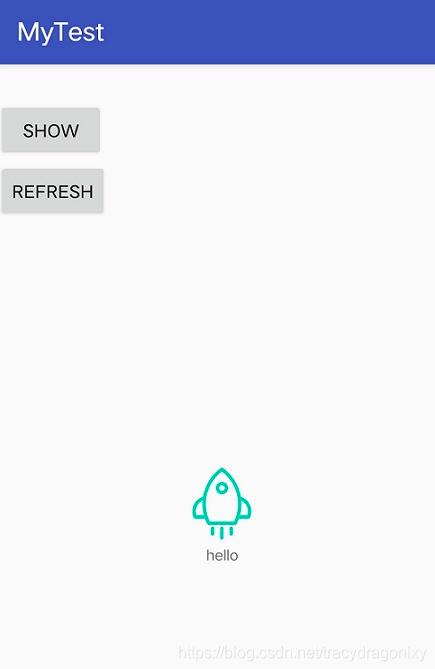
效果图:

代码实现:
Androidmanifest.xml添加弹框权限
<uses-permission android:name="android.permission.SYSTEM_ALERT_WINDOW" />
自定义悬浮窗类FloatWindow.java
public class FloatWindow implements View.OnTouchListener {
private Context mContext;
private WindowManager.LayoutParams mWindowParams;
private WindowManager mWindowManager;
private View mFloatLayout;
private float mInViewX;
private float mInViewY;
private float mDownInScreenX;
private float mDownInScreenY;
private float mInScreenX;
private float mInScreenY;
private TextView infoText;
public FloatWindow(Context context) {
this.mContext = context;
initFloatWindow();
}
private void initFloatWindow() {
LayoutInflater inflater = LayoutInflater.from(mContext);
if(inflater == null)
return;
mFloatLayout = (View) inflater.inflate(R.layout.layout_float, null);
infoText = mFloatLayout.findViewById(R.id.textView);
mFloatLayout.setOnTouchListener(this);
mWindowParams = new WindowManager.LayoutParams();
mWindowManager = (WindowManager) mContext.getSystemService(Context.WINDOW_SERVICE);
if (Build.VERSION.SDK_INT >= 26) {//8.0新特性
mWindowParams.type = WindowManager.LayoutParams.TYPE_APPLICATION_OVERLAY;
}else{
mWindowParams.type = WindowManager.LayoutParams.TYPE_SYSTEM_ALERT;
}
mWindowParams.format = PixelFormat.RGBA_8888;
mWindowParams.flags = WindowManager.LayoutParams.FLAG_NOT_FOCUSABLE;
mWindowParams.gravity = Gravity.START | Gravity.TOP;
mWindowParams.width = WindowManager.LayoutParams.WRAP_CONTENT;
mWindowParams.height = WindowManager.LayoutParams.WRAP_CONTENT;
}
@Override
public boolean onTouch(View view, MotionEvent motionEvent) {
return floatLayoutTouch(motionEvent);
}
private boolean floatLayoutTouch(MotionEvent motionEvent) {
switch (motionEvent.getAction()) {
case MotionEvent.ACTION_DOWN:
// 获取相对View的坐标,即以此View左上角为原点
mInViewX = motionEvent.getX();
mInViewY = motionEvent.getY();
// 获取相对屏幕的坐标,即以屏幕左上角为原点
mDownInScreenX = motionEvent.getRawX();
mDownInScreenY = motionEvent.getRawY() - getSysBarHeight(mContext);
mInScreenX = motionEvent.getRawX();
mInScreenY = motionEvent.getRawY() - getSysBarHeight(mContext);
break;
case MotionEvent.ACTION_MOVE:
// 更新浮动窗口位置参数
mInScreenX = motionEvent.getRawX();
mInScreenY = motionEvent.getRawY() - getSysBarHeight(mContext);
mWindowParams.x = (int) (mInScreenX- mInViewX);
mWindowParams.y = (int) (mInScreenY - mInViewY);
// 手指移动的时候更新小悬浮窗的位置
mWindowManager.updateViewLayout(mFloatLayout, mWindowParams);
break;
case MotionEvent.ACTION_UP:
// 如果手指离开屏幕时,xDownInScreen和xInScreen相等,且yDownInScreen和yInScreen相等,则视为触发了单击事件。
if (mDownInScreenX == mInScreenX && mDownInScreenY == mInScreenY){
}
break;
}
return true;
}
public void showFloatWindow(){
if (mFloatLayout.getParent() == null){
DisplayMetrics metrics = new DisplayMetrics();
// 默认固定位置,靠屏幕右边缘的中间
mWindowManager.getDefaultDisplay().getMetrics(metrics);
mWindowParams.x = metrics.widthPixels;
mWindowParams.y = metrics.heightPixels/2 - getSysBarHeight(mContext);
mWindowManager.addView(mFloatLayout, mWindowParams);
}
}
public void updateText(final String s) {
infoText.setText(s);
}
public void hideFloatWindow(){
if (mFloatLayout.getParent() != null)
mWindowManager.removeView(mFloatLayout);
}
public void setFloatLayoutAlpha(boolean alpha){
if (alpha)
mFloatLayout.setAlpha((float) 0.5);
else
mFloatLayout.setAlpha(1);
}
// 获取系统状态栏高度
public static int getSysBarHeight(Context contex) {
Class<?> c;
Object obj;
Field field;
int x;
int sbar = 0;
try {
c = Class.forName("com.android.internal.R$dimen");
obj = c.newInstance();
field = c.getField("status_bar_height");
x = Integer.parseInt(field.get(obj).toString());
sbar = contex.getResources().getDimensionPixelSize(x);
} catch (Exception e1) {
e1.printStackTrace();
}
return sbar;
}
}
自定义悬浮窗界面布局文件layout_float.xml
<?xml version="1.0" encoding="utf-8"?>
<android.support.constraint.ConstraintLayout xmlns:android="http://schemas.android.com/apk/res/android"
android:layout_width="match_parent"
android:layout_height="match_parent"
xmlns:app="http://schemas.android.com/apk/res-auto">
<ImageView
android:id="@+id/imageView"
android:layout_width="wrap_content"
android:layout_height="wrap_content"
android:src="@mipmap/float_win"
app:layout_constraintStart_toStartOf="parent"
app:layout_constraintTop_toTopOf="parent"/>
<TextView
android:id="@+id/textView"
android:layout_width="wrap_content"
android:layout_height="wrap_content"
android:background="#00ffffff"
android:text="hello"
android:textSize="12sp"
app:layout_constraintLeft_toLeftOf="@id/imageView"
app:layout_constraintRight_toRightOf="@id/imageView"
app:layout_constraintTop_toBottomOf="@id/imageView"/>
</android.support.constraint.ConstraintLayout>
在Activity中使用悬浮窗。
public class MainActivity extends AppCompatActivity {
private Button btnShow;
FloatWindow floatWindow;
@Override
protected void onCreate(Bundle savedInstanceState) {
super.onCreate(savedInstanceState);
// 权限判断
if (Build.VERSION.SDK_INT >= 23) {
if(!Settings.canDrawOverlays(getApplicationContext())) {
// 启动Activity让用户授权
Intent intent = new Intent(Settings.ACTION_MANAGE_OVERLAY_PERMISSION,Uri.parse("package:" + getPackageName()));
startActivityForResult(intent,10);
} else {
// 执行6.0以上绘制代码
initView();
}
} else {
// 执行6.0以下绘制代码
initView();
}
}
@Override
protected void onResume() {
super.onResume();
// 权限判断
if (Build.VERSION.SDK_INT >= 23) {
if(Settings.canDrawOverlays(getApplicationContext())) {
initView();
}
} else {
//执行6.0以下绘制代码
initView();
}
}
private void initView() {
setContentView(R.layout.activity_main);
floatWindow = new FloatWindow(getApplicationContext());
btnShow = findViewById(R.id.btn_show);
btnShow.setOnClickListener(new View.OnClickListener() {
@Override
public void onClick(View view) {
if (null != floatWindow) {
floatWindow.showFloatWindow();
}
}
});
Button btnrefresh = findViewById(R.id.btn_refresh);
btnrefresh.setOnClickListener(new View.OnClickListener() {
@Override
public void onClick(View view) {
int random = (int) (Math.random() * 10);
if (null != floatWindow) {
floatWindow.updateText(String.valueOf(random));
}
}
});
}
@Override
protected void onDestroy() {
super.onDestroy();
if (null != floatWindow) {
floatWindow.hideFloatWindow();
}
}
}
以上就是本文的全部内容,希望对大家的学习有所帮助,也希望大家多多支持。
以上是 Android实现全局悬浮框 的全部内容, 来源链接: utcz.com/p/243239.html


