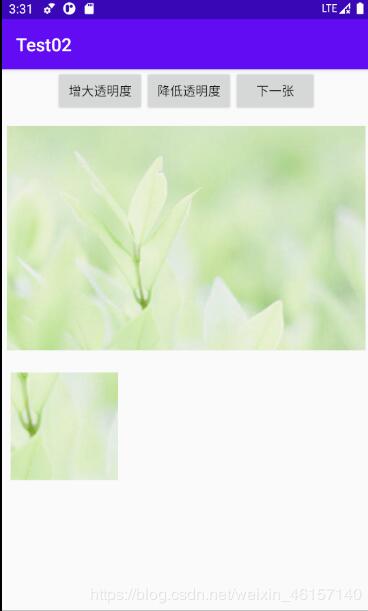
Android实现图片浏览并改变透明度
本文实例为大家分享了简单的图片浏览器制作,供大家参考,具体内容如下
例子中的图片浏览器既可以改变图片的透明度,也可以根据用户在图片上选定的某一区域,对其进行显示,用于查看图片的局部细节。
在activity_main.xml中:
<?xml version="1.0" encoding="utf-8"?>
<LinearLayout xmlns:android="http://schemas.android.com/apk/res/android"
xmlns:app="http://schemas.android.com/apk/res-auto"
xmlns:tools="http://schemas.android.com/tools"
android:layout_width="match_parent"
android:orientation="vertical"
android:layout_height="match_parent"
tools:context=".MainActivity">
<LinearLayout
android:layout_width="match_parent"
android:layout_height="wrap_content"
android:orientation="horizontal"
android:gravity="center">
<Button
android:id="@+id/btn1"
android:layout_width="wrap_content"
android:layout_height="wrap_content"
android:layout_weight="1"
android:text="增大透明度"
android:layout_marginLeft="60dp"/>
<Button
android:id="@+id/btn2"
android:layout_width="wrap_content"
android:layout_height="wrap_content"
android:layout_weight="1"
android:text="降低透明度" />
<Button
android:id="@+id/btn3"
android:layout_width="wrap_content"
android:layout_height="wrap_content"
android:layout_weight="1"
android:layout_marginRight="60dp"
android:text="下一张" />
</LinearLayout>
<ImageView
android:id="@+id/image1"
android:layout_width="400dp"
android:layout_height="280dp"
android:layout_gravity="center"
android:src="@drawable/zm1"
android:scaleType="fitCenter"/>
<ImageView
android:id="@+id/image2"
android:layout_width="120dp"
android:layout_height="120dp"
android:background="#f0f"
android:layout_margin="10dp"/>
</LinearLayout>
在MainActivity.java中:
package com.example.test02;
import androidx.appcompat.app.AppCompatActivity;
import android.graphics.Bitmap;
import android.graphics.drawable.BitmapDrawable;
import android.os.Bundle;
import android.view.MotionEvent;
import android.view.View;
import android.widget.Button;
import android.widget.ImageView;
public class MainActivity extends AppCompatActivity {
// 定义访问图片的数组
private int[] images=new int[]{R.drawable.zm1,R.drawable.zm2,R.drawable.zm6,
R.drawable.zm4,R.drawable.zm5};
// 定义默认显示的图片
private int current=2;
// 定义图片的初始透明度
private int alpha=255;
private Button btn1,btn2,btn3;
private ImageView image1,image2;
@Override
protected void onCreate(Bundle savedInstanceState) {
super.onCreate(savedInstanceState);
setContentView(R.layout.activity_main);
btn1=findViewById(R.id.btn1);
btn2=findViewById(R.id.btn2);
btn3=findViewById(R.id.btn3);
image1=findViewById(R.id.image1);
image2=findViewById(R.id.image2);
//定义查看下一张图片的监听器
btn3.setOnClickListener(new View.OnClickListener() {
@Override
public void onClick(View v) {
image1.setImageResource(images[++current%images.length]);
}
});
// 为按钮添加监听器
btn1.setOnClickListener(new View.OnClickListener() {
@Override
public void onClick(View v) {
//定义改变图片透明度的方法
if (v==btn1){
alpha+=20;
}
if (alpha>=255){
alpha=255;
}
if (alpha<=0){
alpha=0;
}
//改变图片的透明度
image1.setImageAlpha(alpha);
}
});
btn2.setOnClickListener(new View.OnClickListener() {
@Override
public void onClick(View v) {
if (v==btn2){
alpha-=20;
}
if (alpha>=255){
alpha=255;
}
if (alpha<=0){
alpha=0;
}
image1.setImageAlpha(alpha);
}
});
image1.setOnTouchListener(new View.OnTouchListener() {
@Override
public boolean onTouch(View v, MotionEvent event) {
BitmapDrawable bitmapDrawable= (BitmapDrawable) image1.getDrawable();
// 获取第一个图片显示框中的位图
Bitmap bitmap=bitmapDrawable.getBitmap();
// 实际大小与第一张图片的缩放比例
double scale=1.0*bitmap.getHeight()/image1.getHeight();
// 获取需要显示图片的开始点
long x=Math.round(event.getX()*scale);
long y=Math.round(event.getY()*scale);
if (x+120>bitmap.getWidth()){
x=bitmap.getWidth()-120;
}
if (y+120>bitmap.getHeight()){
y=bitmap.getHeight()-120;
}
// 显示图片指定区域
image2.setImageBitmap(Bitmap.createBitmap(bitmap,(int)x,(int)y,120,120));
image2.setImageAlpha(alpha);
return false;
}
});
}
}
以上就是本文的全部内容,希望对大家的学习有所帮助,也希望大家多多支持。
以上是 Android实现图片浏览并改变透明度 的全部内容, 来源链接: utcz.com/p/242948.html