Android仿QQ讨论组头像效果
本文实例为大家分享了Android仿QQ讨论组头像展示的具体代码,供大家参考,具体内容如下
一、效果图
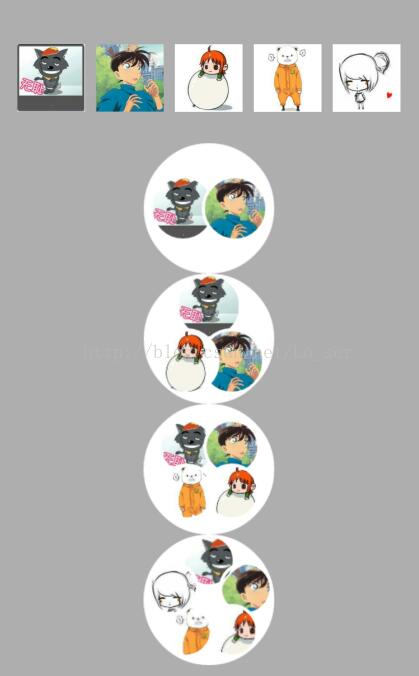
二、实现
基本实现过程:
1.将原图片读取为bitmap
2.在Canvas画布上计算出图片位置,并绘制新的图片。
(ps:计算位置对我来说是难点,花了好长时间);
三、源码
1.布局文件
<?xml version="1.0" encoding="utf-8"?>
<LinearLayout xmlns:android="http://schemas.android.com/apk/res/android"
android:layout_width="match_parent"
android:layout_height="match_parent"
android:padding="16dp"
android:background="#AEAEAE"
android:orientation="vertical">
<LinearLayout
android:layout_width="match_parent"
android:layout_height="0dp"
android:layout_weight="1"
android:orientation="horizontal">
<ImageView
android:id="@+id/img_src_0"
android:layout_width="0dp"
android:layout_height="match_parent"
android:padding="5dp"
android:layout_weight="1"
android:adjustViewBounds="true"
/>
<ImageView
android:id="@+id/img_src_1"
android:layout_width="0dp"
android:layout_height="match_parent"
android:padding="5dp"
android:layout_weight="1"
android:adjustViewBounds="true"
/>
<ImageView
android:id="@+id/img_src_2"
android:layout_width="0dp"
android:layout_height="match_parent"
android:padding="5dp"
android:layout_weight="1"
android:adjustViewBounds="true"
/>
<ImageView
android:id="@+id/img_src_3"
android:layout_width="0dp"
android:layout_height="match_parent"
android:padding="5dp"
android:layout_weight="1"
android:adjustViewBounds="true"
/>
<ImageView
android:id="@+id/img_src_4"
android:layout_width="0dp"
android:layout_height="match_parent"
android:padding="5dp"
android:layout_weight="1"
android:adjustViewBounds="true"
/>
</LinearLayout>
<ImageView
android:id="@+id/img_result_2"
android:layout_width="match_parent"
android:layout_height="0dp"
android:layout_weight="1"
/>
<ImageView
android:id="@+id/img_result_3"
android:layout_width="match_parent"
android:layout_height="0dp"
android:layout_weight="1"
/>
<ImageView
android:id="@+id/img_result_4"
android:layout_width="match_parent"
android:layout_height="0dp"
android:layout_weight="1"
/>
<ImageView
android:id="@+id/img_result_5"
android:layout_width="match_parent"
android:layout_height="0dp"
android:layout_weight="1"
/>
</LinearLayout>
2.Activity
package com.hand.px_demo.QQHead;
import android.app.Activity;
import android.content.res.Resources;
import android.graphics.Bitmap;
import android.graphics.BitmapFactory;
import android.os.Bundle;
import android.widget.ImageView;
import com.hand.px_demo.R;
import java.util.ArrayList;
/**
* Created by panx on 2016/12/12.
*/
public class QHeadActivity extends Activity{
private ArrayList<Bitmap> bitmaps = new ArrayList<Bitmap>();
private ImageView img_src_0;
private ImageView img_src_1;
private ImageView img_src_2;
private ImageView img_src_3;
private ImageView img_src_4;
private ImageView img_result_2;
private ImageView img_result_3;
private ImageView img_result_4;
private ImageView img_result_5;
private HeadManager headManager;
@Override
protected void onCreate(Bundle savedInstanceState) {
super.onCreate(savedInstanceState);
setContentView(R.layout.activity_qq_head);
headManager = new HeadManager();
initView();
initData();
}
private void initView(){
img_src_0 = (ImageView)findViewById(R.id.img_src_0);
img_src_1 = (ImageView)findViewById(R.id.img_src_1);
img_src_2 = (ImageView)findViewById(R.id.img_src_2);
img_src_3 = (ImageView)findViewById(R.id.img_src_3);
img_src_4 = (ImageView)findViewById(R.id.img_src_4);
img_result_2 = (ImageView)findViewById(R.id.img_result_2);
img_result_3 = (ImageView)findViewById(R.id.img_result_3);
img_result_4 = (ImageView)findViewById(R.id.img_result_4);
img_result_5 = (ImageView)findViewById(R.id.img_result_5);
}
private void initData(){
//从drawable中获取图片资源的bitmap
Resources r = this.getResources();
Bitmap bitmap0 = BitmapFactory.decodeResource(r,R.drawable.src_head_1);
Bitmap bitmap1 = BitmapFactory.decodeResource(r,R.drawable.src_head_2);
Bitmap bitmap2 = BitmapFactory.decodeResource(r,R.drawable.src_head_3);
Bitmap bitmap3 = BitmapFactory.decodeResource(r,R.drawable.src_head_4);
Bitmap bitmap4 = BitmapFactory.decodeResource(r,R.drawable.src_head_5);
bitmaps.add(bitmap0);
bitmaps.add(bitmap1);
bitmaps.add(bitmap2);
bitmaps.add(bitmap3);
bitmaps.add(bitmap4);
img_src_0.setImageBitmap(bitmap0);
img_src_1.setImageBitmap(bitmap1);
img_src_2.setImageBitmap(bitmap2);
img_src_3.setImageBitmap(bitmap3);
img_src_4.setImageBitmap(bitmap4);
Bitmap r2Bitmap = headManager.getBitMap(bitmaps, 2);
Bitmap r3Bitmap = headManager.getBitMap(bitmaps, 3);
Bitmap r4Bitmap = headManager.getBitMap(bitmaps, 4);
Bitmap r5Bitmap = headManager.getBitMap(bitmaps, 5);
img_result_2.setImageBitmap(r2Bitmap);
img_result_3.setImageBitmap(r3Bitmap);
img_result_4.setImageBitmap(r4Bitmap);
img_result_5.setImageBitmap(r5Bitmap);
}
}
3.绘制图片的核心代码
(1)压缩图片
/*对原始图片进行缩放*/
public Bitmap zoomImage(Bitmap bgimage, double newWidth,
double newHeight) {
// 获取这个图片的宽和高
float width = bgimage.getWidth();
float height = bgimage.getHeight();
// 创建操作图片用的matrix对象
Matrix matrix = new Matrix();
// 计算宽高缩放率
float scaleWidth = ((float) newWidth) / width;
float scaleHeight = ((float) newHeight) / height;
// 缩放图片动作
matrix.postScale(scaleWidth, scaleHeight);
Bitmap bitmap = Bitmap.createBitmap(bgimage, 0, 0, (int) width,
(int) height, matrix, true);
return bitmap;
}
(2)将图片改成圆角
private Bitmap makeRoundCorner(Bitmap bitmap, int width, int height) {
int left = 0, top = 0, right = width, bottom = height;
float roundPx = height / 2;
if (width > height) {
left = (width - height) / 2;
top = 0;
right = left + height;
bottom = height;
} else if (height > width) {
left = 0;
top = (height - width) / 2;
right = width;
bottom = top + width;
roundPx = width / 2;
}
Bitmap output = Bitmap.createBitmap(width, height, Bitmap.Config.ARGB_8888);
Canvas canvas = new Canvas(output);
int color = 0xff424242;
Paint paint = new Paint();
Rect rect = new Rect(left, top, right, bottom);
RectF rectF = new RectF(rect);
paint.setAntiAlias(true);
canvas.drawARGB(0, 0, 0, 0);
paint.setColor(color);
canvas.drawRoundRect(rectF, roundPx, roundPx, paint);
paint.setXfermode(new PorterDuffXfermode(PorterDuff.Mode.SRC_IN));
canvas.drawBitmap(bitmap, rect, rect, paint);
return output;
}
(3)获取绘制的坐标
private ArrayList<Point> getFivePoints(int point_x, int point_y, int d) {
ArrayList<Point> points = new ArrayList<Point>();
//圆心至图片的距离
int wr = point_y - d;
//大圆心至小圆心的距离
int R = wr + d / 2;
//头像半径,头像直径为d
int r = d / 2;
int RCos18 = (int) (R * (Math.cos(0.1 * Math.PI)));
int RSin18 = (int) (R * (Math.sin(0.1 * Math.PI)));
int RCos36 = (int) (R * (Math.cos(0.2 * Math.PI)));
int RSin36 = (int) (R * (Math.sin(0.2 * Math.PI)));
Point point1 = new Point(point_x - r, 0);
Point point2 = new Point();
point2.x = RCos18 + point_x - r;
point2.y = point_y - RSin18 - r;
Point point3 = new Point();
point3.x = RSin36 + point_x - r;
point3.y = point_y + RCos36 - r;
Point point4 = new Point();
point4.x = point_x - RSin36 - r;
point4.y = point3.y;
Point point5 = new Point();
point5.x = point_x - (int) (RCos18) - r;
point5.y = point2.y;
points.add(point1);
points.add(point2);
points.add(point3);
points.add(point4);
points.add(point5);
return points;
}
(4)该类全部源码
package com.hand.px_demo.QQHead;
import android.app.Activity;
import android.content.res.Resources;
import android.graphics.Bitmap;
import android.graphics.BitmapFactory;
import android.os.Bundle;
import android.widget.ImageView;
import com.hand.px_demo.R;
import java.util.ArrayList;
/**
* Created by panx on 2016/12/12.
*/
public class QHeadActivity extends Activity{
private ArrayList<Bitmap> bitmaps = new ArrayList<Bitmap>();
private ImageView img_src_0;
private ImageView img_src_1;
private ImageView img_src_2;
private ImageView img_src_3;
private ImageView img_src_4;
private ImageView img_result_2;
private ImageView img_result_3;
private ImageView img_result_4;
private ImageView img_result_5;
private HeadManager headManager;
@Override
protected void onCreate(Bundle savedInstanceState) {
super.onCreate(savedInstanceState);
setContentView(R.layout.activity_qq_head);
headManager = new HeadManager();
initView();
initData();
}
private void initView(){
img_src_0 = (ImageView)findViewById(R.id.img_src_0);
img_src_1 = (ImageView)findViewById(R.id.img_src_1);
img_src_2 = (ImageView)findViewById(R.id.img_src_2);
img_src_3 = (ImageView)findViewById(R.id.img_src_3);
img_src_4 = (ImageView)findViewById(R.id.img_src_4);
img_result_2 = (ImageView)findViewById(R.id.img_result_2);
img_result_3 = (ImageView)findViewById(R.id.img_result_3);
img_result_4 = (ImageView)findViewById(R.id.img_result_4);
img_result_5 = (ImageView)findViewById(R.id.img_result_5);
}
private void initData(){
//从drawable中获取图片资源的bitmap
Resources r = this.getResources();
Bitmap bitmap0 = BitmapFactory.decodeResource(r,R.drawable.src_head_1);
Bitmap bitmap1 = BitmapFactory.decodeResource(r,R.drawable.src_head_2);
Bitmap bitmap2 = BitmapFactory.decodeResource(r,R.drawable.src_head_3);
Bitmap bitmap3 = BitmapFactory.decodeResource(r,R.drawable.src_head_4);
Bitmap bitmap4 = BitmapFactory.decodeResource(r,R.drawable.src_head_5);
bitmaps.add(bitmap0);
bitmaps.add(bitmap1);
bitmaps.add(bitmap2);
bitmaps.add(bitmap3);
bitmaps.add(bitmap4);
img_src_0.setImageBitmap(bitmap0);
img_src_1.setImageBitmap(bitmap1);
img_src_2.setImageBitmap(bitmap2);
img_src_3.setImageBitmap(bitmap3);
img_src_4.setImageBitmap(bitmap4);
Bitmap r2Bitmap = headManager.getBitMap(bitmaps, 2);
Bitmap r3Bitmap = headManager.getBitMap(bitmaps, 3);
Bitmap r4Bitmap = headManager.getBitMap(bitmaps, 4);
Bitmap r5Bitmap = headManager.getBitMap(bitmaps, 5);
img_result_2.setImageBitmap(r2Bitmap);
img_result_3.setImageBitmap(r3Bitmap);
img_result_4.setImageBitmap(r4Bitmap);
img_result_5.setImageBitmap(r5Bitmap);
}
}
以上就是本文的全部内容,希望对大家的学习有所帮助,也希望大家多多支持。
以上是 Android仿QQ讨论组头像效果 的全部内容, 来源链接: utcz.com/p/240876.html


